How to Use Modules in TYPO3

Home » Knowledge Base » Design Tools » TYPO3 » How to Use Modules in TYPO3

TYPO3 is a CMS based on a modular architecture, meaning that users can use various built-in tools and add-ons to manage content, other users, configurations, and more.

In this guide, we share how to use modules in TYPO3, so you get the most out of them.


What are Modules in TYPO3

Modules in TYPO3 are default sections at the backend of your TYPO3 project that allow you to manage different aspects of your website. Each accessible module serves a specific purpose such as editing pages, managing files, configuring settings, managing users, and similar.

Modules in TYPO3 are categorized into the following groups and sub-groups:

Web Modules:

  • Page: allows you to manage your pages and their content.
  • List: Grants you a database view of records such as content templates and plugins.
  • View: Preview how your changes appear on your website.


File Modules:

  • Filelist: Allows you to manage file storage, upload media, and organize file folders


User Tools:

  • Task Center: Allows you to make personal notes, reminders, and gives you access to some management tools.
  • User Settings: Grants you customization options for the backend interface for you and your team.


Admin Tools:

  • Maintenance: Clear cache, perform system checks.
  • Extensions: Install, delete, configure, and update TYPO3 extensions
  • Log: View system messages and activity logs.


System Modules:

  • Backen Users: Manage team accounts and permissions
  • Workspaces: manage, edit, add, and remove workspaces
  • Configuration: View system and extension configuration


How to Use Modules in TYPO3

Modules are quite versatile and can be used in numerous ways. Here’s how to proceed.


Step 1: Log in to TYPO3 Admin Dashboard

The first step in the process is to log in to TYPO3. The admin dashboard is the place from which you can manage all your project settings, modules, and colleagues.


Step 2: Use a Module

Now that you have entered the TYPO3 admin panel, it is time to learn how to use modules. Depending on the type of module you wish to use, the menu and options can vary. In this example, we share how to edit a Page module.

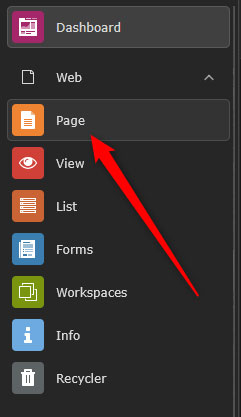
The first step is to navigate to Web -> Page via the TYPO3 admin dashboard:

Access the Pages module in TYPO3


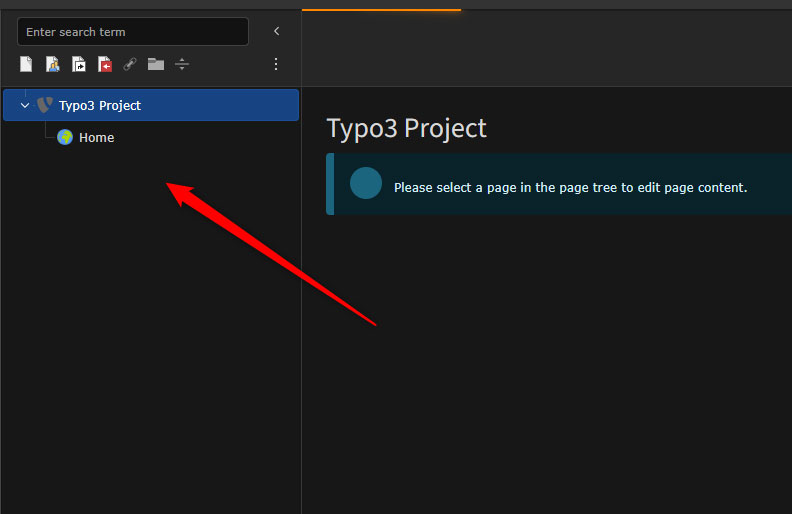
Then, choose a page from the site tree via the left sidebar:

Select TYPO3 page to edit


Now, you can use the content areas (also called colPos) to:

  • Add a new content element
  • Edit existing texts and media files
  • Drag and drop blocks to rearrange the layout


Step 3: Customize a Module Menu

You can control which modules are visible and accessible via the dashboard. This helps your team manage content more easily and quickly. To do so:

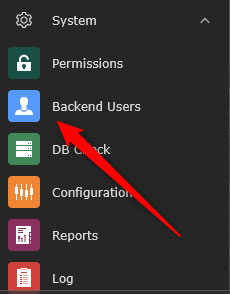
Navigate to System -> Backend Users:

Access the Backend Users menu in TYPO3


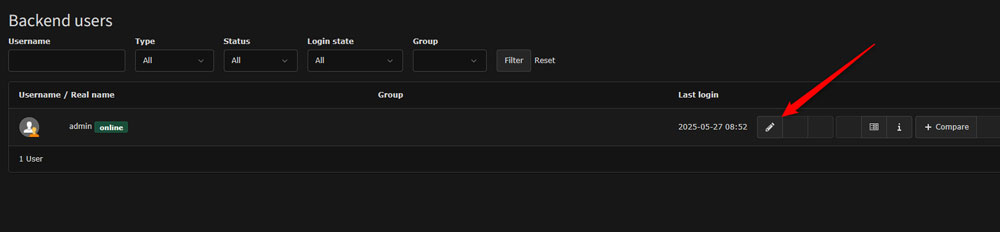
Then, select a user:

Select a user in TYPO3


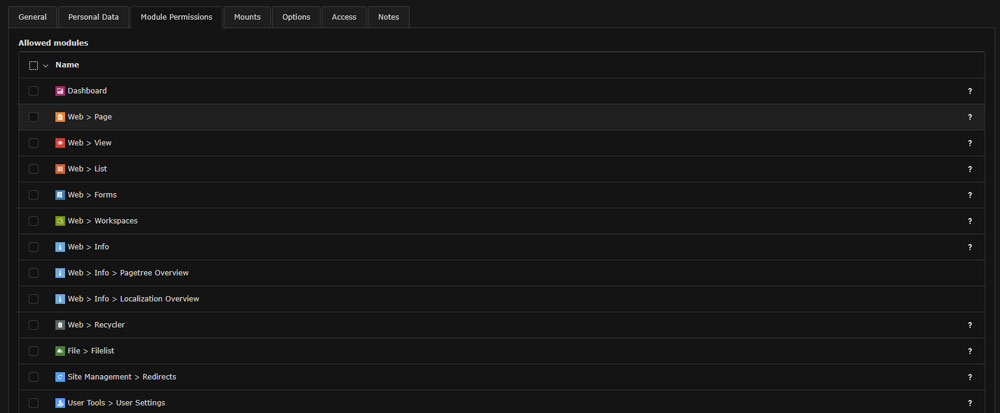
After that, via the Module Permissions tab, select which options are accessible for this user. This will include these elements in the navigational menu of the selected user:

Add permissions for each module and user


Tips and Tricks

  • Add the modules you and your team use the most to the Favourites tab for quick access.
  • Use the search bar above each module menu to quickly search for and find modules.
  • Collapse the unused categories and modules to stay organized.
  • Explore the custom modules section via extensions to add some new functionalities to your TYPO3 project.

Conclusion

Understanding how to use modules in TYPO3 grants you complete control over your website. Via modules, you can manage all aspects of your project via several simple steps and clicks.


Was this post helpful?

i

Relevant tags:

Connect

Latest posts:

How to Display Fields in Different Modes in SuiteCRM

SuiteCRM allows for various customisations of fields. Such are the Detail View, Edit View and List View. Understanding how to customise these is important for tailoring your SuiteCRM project to your preferences. Whether you are streaming data entries or are trying to...

How to Add Grouped Fields to the Record View in SuiteCRM

SuiteCRM offers great versatility when it comes to customising modules, including how fields are displayed on record views. One powerful feature is grouping fields within sections for better layout and user experience. In this article, we share how to group fields in...

How to Back Up Your SuiteCRM Project

Making regular backups of your SuiteCRM project is crucial. Backups help keep any kind of data safe, and also provide a quick recovery after a crash, hacking attack, or any user error. Because of how important backups are for your SuiteCRM website, in this article, we...

How to Install Themes in Zenphoto

Zenphoto allows you to customize the look of your online gallery by incorporating various themes. If you are interested in learning how to install themes in Zenphoto, then this article will guide you through the entire process - from browsing and downloading, through...

How to Add Tags in Zenphoto

Tags are a handy feature for organizing your Zenphoto images and albums. Tags not only help you and your visitors navigate more easily and quickly through your website, but also improve its discoverability in search engines, and can also help you generate more organic...


Create a website for free!


Free forever

Our Support Team is Here to Help


If you need any questions answered, don't hesitate and contact us. Click the button below and follow the instructions. You can expect an answer within an hour.


Contact AwardSpace


iNewest knowledge base articles

How to Display Fields in Different Modes in SuiteCRM

SuiteCRM allows for various customisations of fields. Such are the Detail View, Edit View and List View. Understanding how to customise these is important for tailoring your SuiteCRM project to your preferences. Whether you are streaming data entries or are trying to...

How to Add Grouped Fields to the Record View in SuiteCRM

SuiteCRM offers great versatility when it comes to customising modules, including how fields are displayed on record views. One powerful feature is grouping fields within sections for better layout and user experience. In this article, we share how to group fields in...

How to Back Up Your SuiteCRM Project

Making regular backups of your SuiteCRM project is crucial. Backups help keep any kind of data safe, and also provide a quick recovery after a crash, hacking attack, or any user error. Because of how important backups are for your SuiteCRM website, in this article, we...

How to Install Themes in Zenphoto

Zenphoto allows you to customize the look of your online gallery by incorporating various themes. If you are interested in learning how to install themes in Zenphoto, then this article will guide you through the entire process - from browsing and downloading, through...

How to Add Tags in Zenphoto

Tags are a handy feature for organizing your Zenphoto images and albums. Tags not only help you and your visitors navigate more easily and quickly through your website, but also improve its discoverability in search engines, and can also help you generate more organic...

How to Upload Files in Zenphoto

Knowing how to upload files in Zenphoto is a fundamental skill. In this guide, we share how to go through the process and manage your project and media library quickly and easily.   Step 1: Log in to Zenphoto The first step in the process is to log in to...

Even more web tutorials

Check out our web hosting knowledge base and the WordPress tutorials to learn more, and be better prepared for your website creation and maintenance journey.