

What you need to know:
You can find your incoming and outgoing mail server information in the Email Accounts section of the Control Panel. Just click on your email account name, open the Information tab, and scroll down to the E-mail Settings table.
The ability to send and receive email messages is facilitated by countless mail servers that work continuously and are spread out across the world. The mail service that we offer here at AwardSpace is no exception and works on the same principle. As such, we also have servers that are dedicated to sending and receiving your email messages.
In this article, we will show you where you can find the connection details of the server that is powering your email accounts.
Table of Contents
How Is My Mail Server Information Useful?
The email server information is particularly useful when you wish to connect using a new email client. Once the new email client is successfully connected, you will be able to send and receive email messages through it.

If you do not enter all of the required details, or if you enter them incorrectly, then your mail app will present you with an error message and will not function properly.
Where Can I Find My Incoming and Outgoing Mail Server Information?
You can find the details of your incoming and outgoing mail server in the Email Accounts section of the Control Panel. Follow the steps below to access this information:
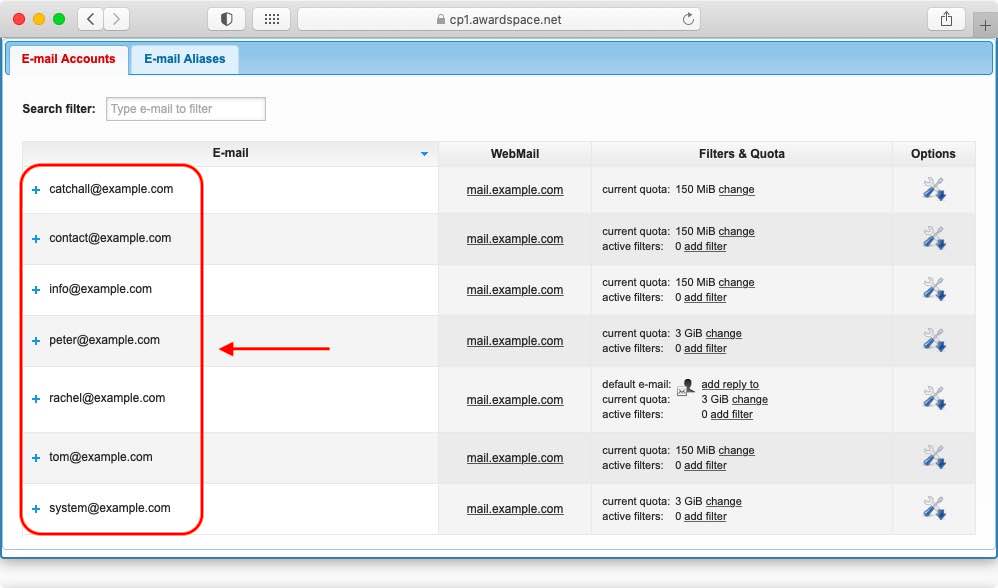
- Open the Email Accounts section.
- Scroll down to the list of existing accounts.
Tip
Is the mail account list empty on your end? Then you don’t have any email accounts yet. You can follow our guide on creating an email account to learn how you can start using our mail service.
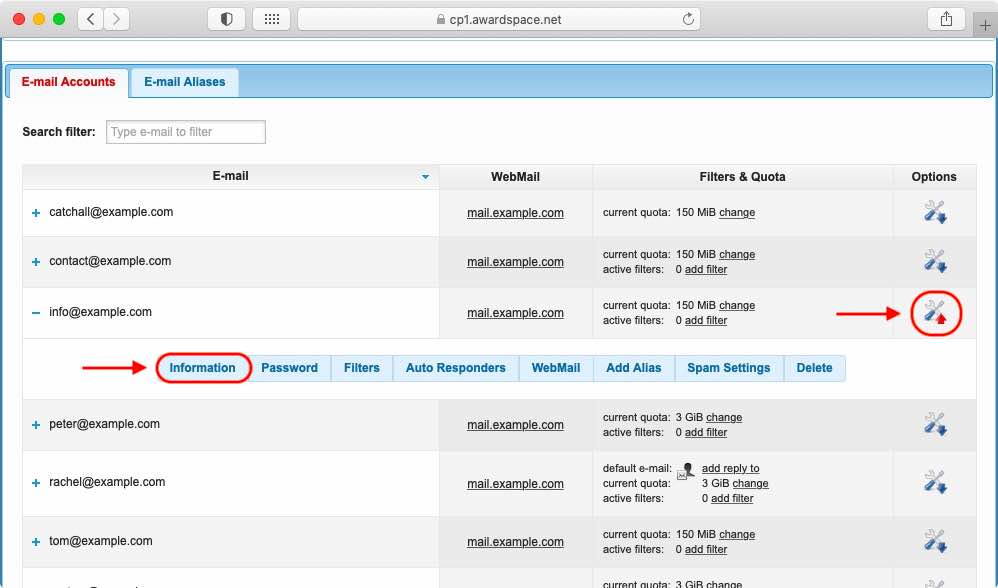
- Locate the email account that you are curious about and click on the Options icon.
- From the list of tabs that appear, choose Information.
- Scroll down until you reach the E-mail Settings section.
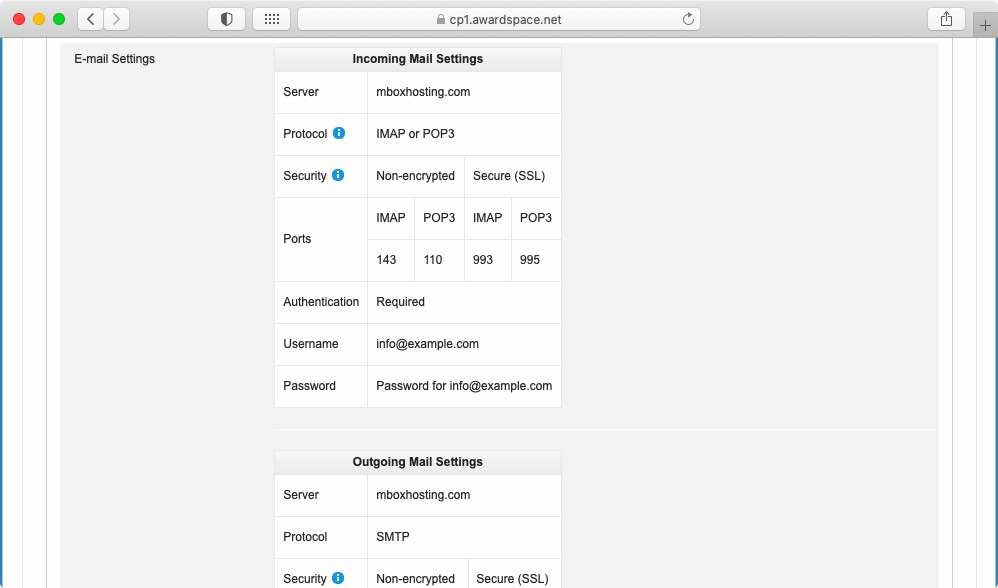
That’s it! In the E-mail Settings section, you will find all the information about your incoming and outgoing mail servers. Continue reading if you wish to learn the meaning of the various terms that are listed.
Tip
Here at AwardSpace, we believe that having an email is an essential part of your online presence. As such, we provide mail services to all of our customers, regardless of the hosting plan they are using. In other words, no matter whether you are using our free hosting service, a premium shared hosting plan or a Semi-Dedicated server you will have access to our Email Accounts section.
What Does This Information Mean?
Thanks to the information listed in the E-mail Settings section, you can configure your email client to properly communicate with the incoming and outgoing mail servers. Once you do so, you will be able to access your email account through your favorite mail app. Below, we will provide a brief explanation for each term, so you can better understand the information you are seeing.
The Incoming Mail Settings provide details about the incoming mail server. This is the server that will be receiving and processing all messages that are addressed to you.
The server represents the mail server’s address on the Internet. The value is provided as a domain name for convenience, but it always resolves to an IP address when your mail app uses it.
The Protocol for the incoming mail server can be either IMAP or POP3. The two protocols are mutually exclusive and work in a slightly different ways. Nonetheless, you will receive your email messages regardless of the protocol you choose. If you wish to learn more, you can read our article on the differences between IMAP and POP3.
Tip
Overall, the IMAP protocol is considered more robust and as such we recommend it over POP3.
When it comes to Security, your mail client can either encrypt your messages with SSL or may send them unencrypted. Needless to say, it is preferable to use encryption.
Your Port choice informs the mail server whether you wish to use encryption or not. Moreover, the Port number also specifies your preferred email protocol.
Authentication is required in all cases as we do not allow anonymous users to utilize our mail servers. You authenticate yourself with the incoming mail server by supplying your username, which is your email address, and your email account password.
Next, we will take a look at the Outgoing Mail Settings. These are the settings that affect the outgoing mail server. Whenever you send a message to someone, you are using functionality that is powered by the outgoing mail server.
The Server entry defines the address where you can reach the outgoing mail server.
You do not get a choice of protocols with the outgoing mail server, unlike its incoming counterpart. The Protocol that you will be used to send messages is SMTP.
That said, you can still choose your level of Security and decide whether to encrypt your communication or not. Encryption is once again carried out by SSL.
Warning
If you decide not to use encryption, you must check your mail app for any SSL settings that pertain to the outgoing mail server. If any such settings are found, they must be turned off.
After you have decided on your preferred level of security, it is time to signal your choice by choosing one of three available Ports.
And lastly, we should note that Authentication is always required, even if you choose not to encrypt your messages. You should authenticate yourself using your username, which is your email address, and your password.
Next Steps
Now that you know what the various pieces of server information mean and what their purpose is, you can proceed to configure your favorite mail app to work with your AwardSpace-powered email account.
If you know what you are doing, you can proceed with the mail client set up on your own. Alternatively, you can take advantage of one of our guides on setting up your email account using some of the most popular mail apps out there. More specifically, we have step-by-step guides that would show you how to add your AwardSpace email account to applications like Microsoft Outlook, Windows Mail, Mozilla Thunderbird, the Mail app on iOS, the Mail app on macOS, and the Gmail web app, and the default Mail app on Android.
