How to Delete Product Categories in Zen Cart

Home » Knowledge Base » Design Tools » Zen Cart » How to Delete Product Categories in Zen Cart

Sometimes, your online store needs a bit of cleaning. Whether you have discontinued a given product or reorganized your goods, it is always important to know how to delete product categories in Zen Cart. This article showcases the process step by step.


When You Might Need to Delete Categories

Before you read how to delete product categories in Zen Cart, it is important to outline some of the reasons why this is a feasible idea:

  • The product line has been discontinued
  • A duplicate category exists
  • The store structure has been organized
  • No longer needed seasonal categories


Step 1: Log in to the Admin Panel

The first step you need to take is to log in to Zen Cart


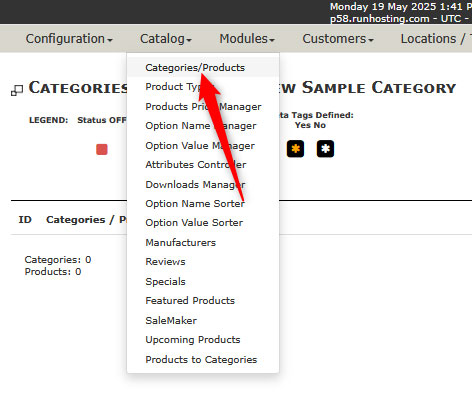
Step 2: Go to the Categories/Products Section

The second step is to access the category management page. To do so, via the admin panel, head to Catalog -> Categories/Products:

Open Zen Cart Category manager to delete a given category


Step 3: Locate the Category You Wish to Delete

Once you have accessed the categories management page, browse the list of your categories and locate the one you wish to delete:

Locate the Zen Cart category you wish to delete


Pro Tip: Expand your main categories to look for a subcategory you wish to delete.


Step 4: Delete Selected Category

Now that you have located the category, it is time to delete it. To do so, click on the red garbage bin icon, located to the right of each category name:

Click the red bin icon to delete a Zen Cart category


After you click the icon, Zen Cart will ask you whether you are sure you wish to proceed with the deletion of the category. If you are sure, click the red Delete button:

Confirmation message for deleting a Zen Cart category


Now you have managed to delete a product category in Zen Cart.


Tips and Tricks:

  • Products within deleted product category will also be deleted. Keep in mind that all products contained by a given category will be always deleted along with the category itself, unless they are listed in another category as well.
  • Zen Cart doesn’t provide a recovery option: There’s no undo feature in Zen Cart, so be very careful with category deletes. Always backup your online store before deleting categories.
  • Use the Move Product feature to reassign products instead of deleting them along with their parent category.
  • You can use the “Inactive” category feature, which hides the given category from being displayed on your online store without deleting it.


Conclusion – How to Delete Product Categories in Zen Cart

Now that you know how to delete product categories in Zen Cart, you can maintain a clean and well-organized store. Whether you are simply cleaning up your inventory or completely restructuring your online store, knowing how to remove categories is an important part of store management.

Was this post helpful?

i

Relevant tags:

Connect

Latest posts:

How to Fix 308 Permanent Redirect

308 Permanent Redirect is an HTTPS status code indicating that the requested resource has been permanently moved to another location. Similar to 301 Moved Permanently, 308 informs the user of the movement of a given online resource, and unlike the 301 redirect, 308...

How to Fix 301 Error Moved Permanently

The 301 Moved Permanently is an HTTP status code that indicates a permanent relocation of an online resource from a given URL to a new one. More technically, the moved resource has been moved to the new URL specified in the Location header. The HTTP 301 status code is...

How to Fix 307 Temporary Redirect

307 Temporary Redirect is a response HTTP status code that indicates the requested resource has been moved to a different URL for a limited period of time. Unlike a 301 permanent redirect, the 307 Temporary Redirect message indicates that the change is temporary and...

How to Access Crontab Settings

To access the crontab settings, first, you need to log in to your AwardSpace hosting panel. After you have logged in, head to Crontab Settings, located within the Advanced Tools category:   After you click the Crontab Settings icon, a new page should load. Once...

How to Check My Auto Renewals

To check your AwardSpace hosting plan auto-renewals, first log in to the admin dashboard. Then, head to Wallet, within the Orders & Invoices section:   After that, click the Auto Renewals tab, where you can check any relevant information about your hosting...


Create a website for free!


Free forever

Our Support Team is Here to Help


If you need any questions answered, don't hesitate and contact us. Click the button below and follow the instructions. You can expect an answer within an hour.


Contact AwardSpace


iNewest knowledge base articles

How to Fix 308 Permanent Redirect

308 Permanent Redirect is an HTTPS status code indicating that the requested resource has been permanently moved to another location. Similar to 301 Moved Permanently, 308 informs the user of the movement of a given online resource, and unlike the 301 redirect, 308...

How to Fix 301 Error Moved Permanently

The 301 Moved Permanently is an HTTP status code that indicates a permanent relocation of an online resource from a given URL to a new one. More technically, the moved resource has been moved to the new URL specified in the Location header. The HTTP 301 status code is...

How to Fix 307 Temporary Redirect

307 Temporary Redirect is a response HTTP status code that indicates the requested resource has been moved to a different URL for a limited period of time. Unlike a 301 permanent redirect, the 307 Temporary Redirect message indicates that the change is temporary and...

How to Access Crontab Settings

To access the crontab settings, first, you need to log in to your AwardSpace hosting panel. After you have logged in, head to Crontab Settings, located within the Advanced Tools category:   After you click the Crontab Settings icon, a new page should load. Once...

How to Check My Auto Renewals

To check your AwardSpace hosting plan auto-renewals, first log in to the admin dashboard. Then, head to Wallet, within the Orders & Invoices section:   After that, click the Auto Renewals tab, where you can check any relevant information about your hosting...

How to Check My Payment Requests

To check your payment requests, first log in to the AwardSpace hosting panel. Then, head to Wallet within the Orders & Invoices category:   Then, click the Payment Requests tab. There, you can browse all the information you need about your...

Even more web tutorials

Check out our web hosting knowledge base and the WordPress tutorials to learn more, and be better prepared for your website creation and maintenance journey.