How to Create a New Page with Concrete5

Home » Knowledge Base » Design Tools » Concrete5 » How to Create a New Page with Concrete5

Creating a new page in Concrete5 CMS involves a few steps. Below is a guide to help you understand how to create a new page with Concrete5.

Step 1: Log in to the Dashboard

To create a new page in Concrete5, you should first install Concrete5 and then sign in to the CMS.


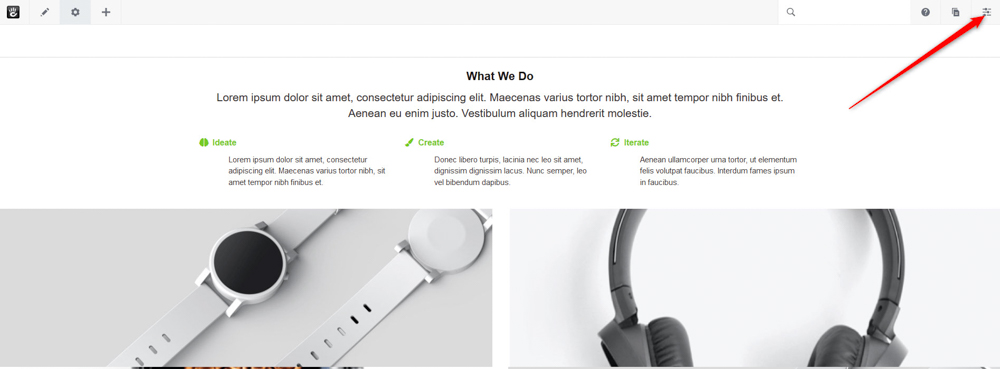
Step 2: Access the Sitemap

Once logged in, click on the Settings button at the top right of the page:

Create a new Page in Concrete5 access settings


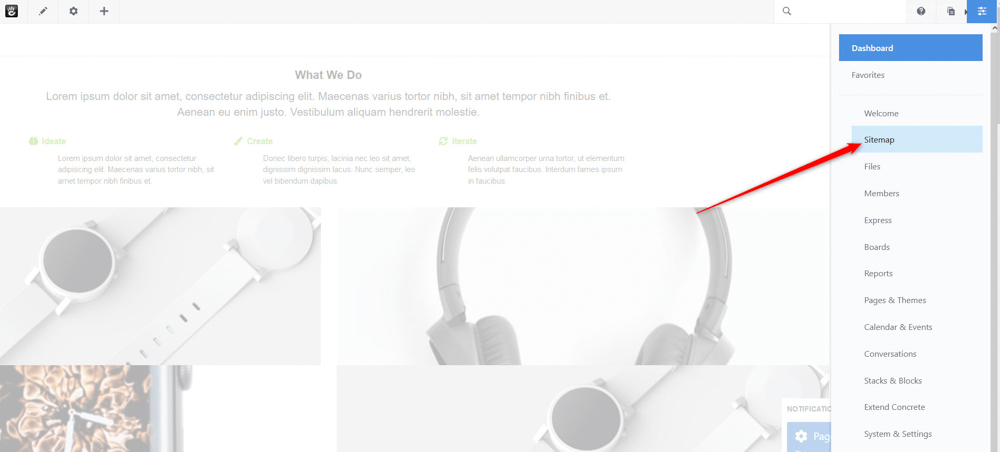
Once you click the button, a sidebar will appear. From there click on Sitemap:

Create a new Page in Concrete5 by accessing the Sitemap


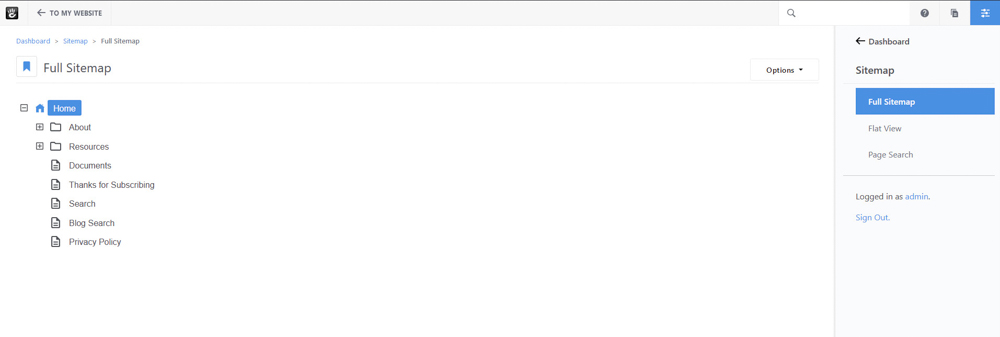
A new page will load:

Concrete5 Sitemap Page


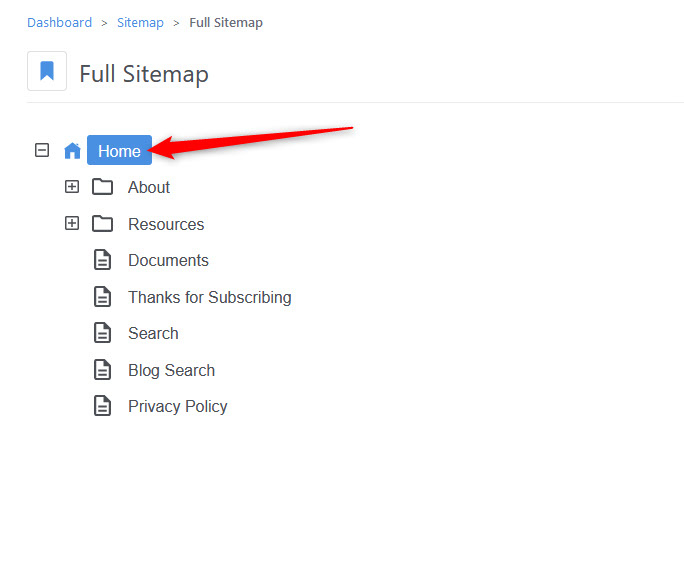
Step 3: Add a New Page

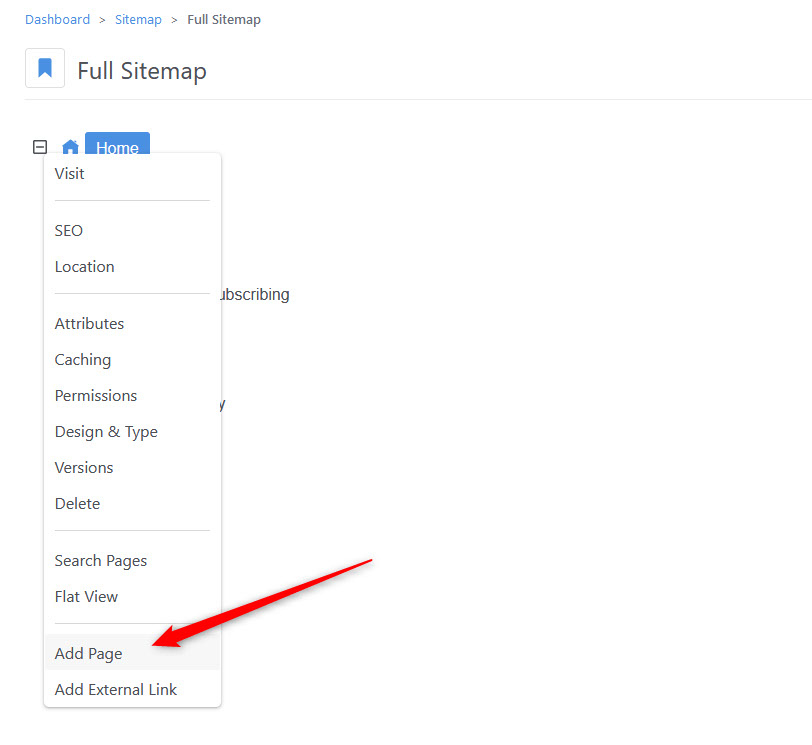
In the Sitemap page, click on the parent page where you want to create the new page.

For this example, we will have our homepage as a parent page, so we click it:

To create a new page in Concrete5, select a parent page


After you click the parent page, a new menu will appear. From there select Add Page:

Create a new page in Concrete5 via the drop-down menu


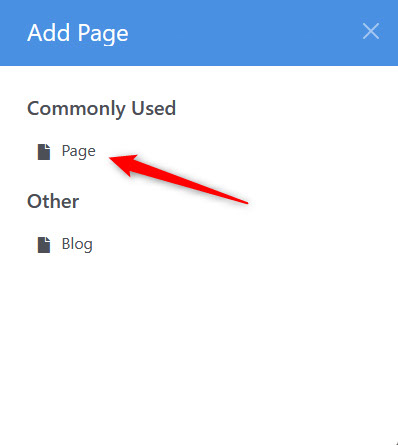
A new box will appear. From there select Page:

To create a page, select a page type from the dialogue box


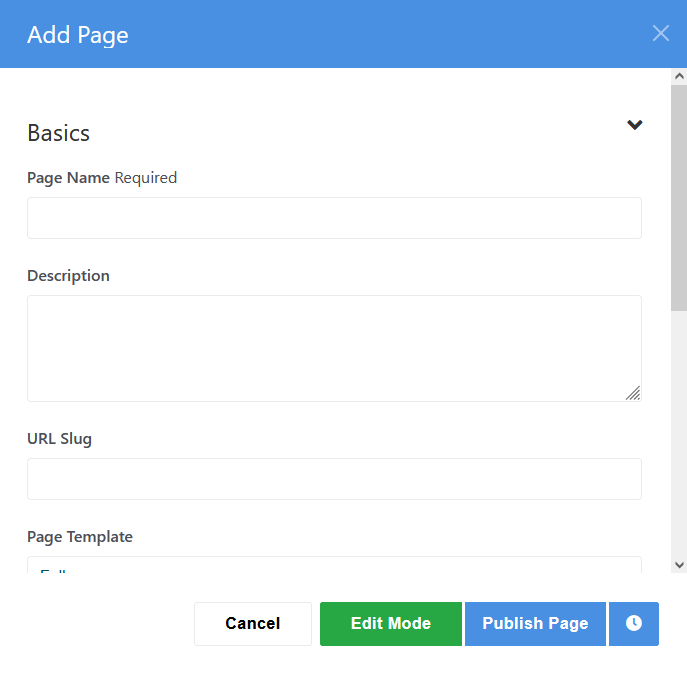
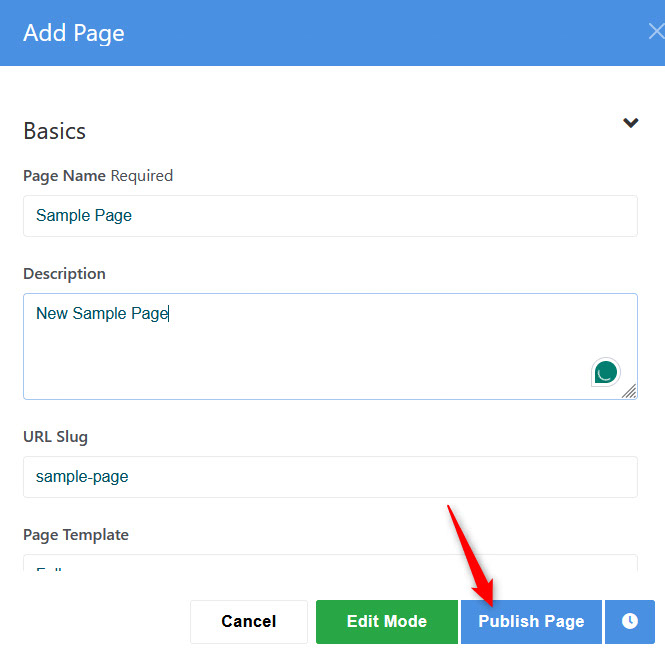
Step 4: Add Page Details

Once you click on Page, a new window with options will appear. From there, add your page details such as Page Name, Description, URL Slug, Page Template, and Page Content:

Add page content and details


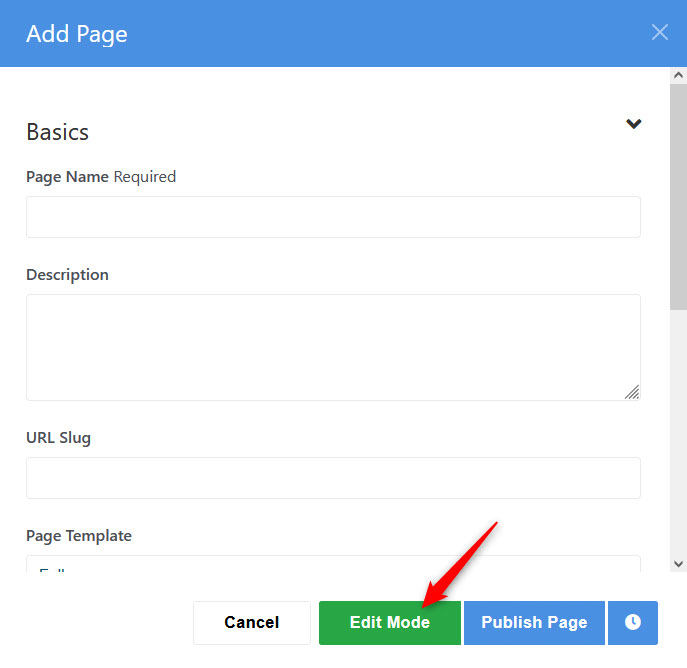
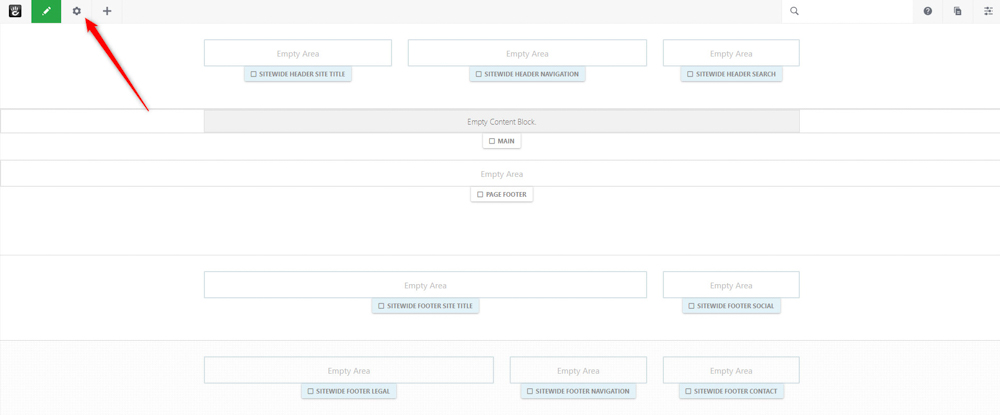
If you wish to customize and edit your new page fully, enter the Edit Mode. To do so, simply click on the green Edit Mode:

To customize your new page, enter the Edit Mode


Step 5: Publish the New Page

Once you have added content to your new page, click on the blue Publish Page button:

Publish your new Concrete5 page via the Publish button


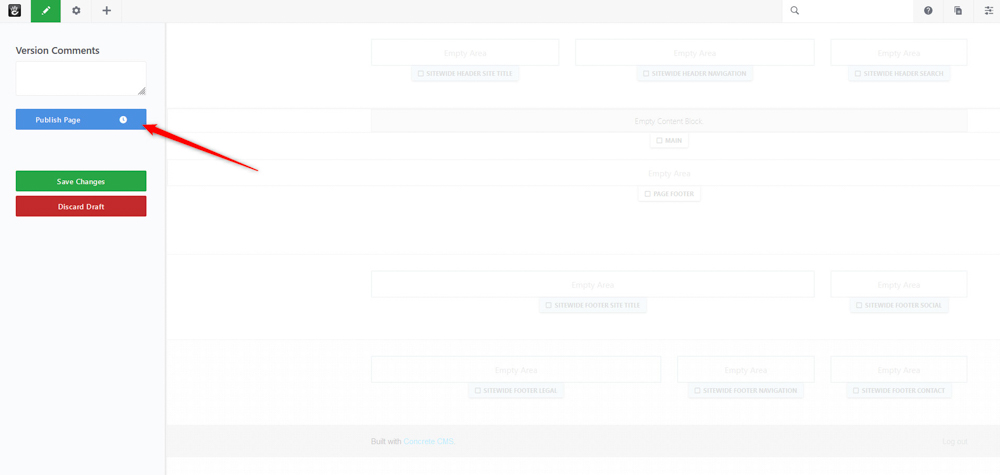
If you are editing your new page via the Edit Mode, then click on the Options button at the top left of the screen:

Concrete5 Edit Mode Options Menu


Once you click on Options, 3 buttons will appear. After they appear, click on the blue Publish Page button, located at the left of the page:

Concrete5 Edit Mode Publish Page button


Now you have managed to create a new page with Concrete5 CMS.


How to Create a New Page with Concrete5 – Conclusion

Creating a new page with Concrete5 involves only a few steps that are easy to follow. Use this method to add content to your Concrete5 website.

Read more:

Was this post helpful?

i

Relevant tags:

Connect

Latest posts:

How to Fix 308 Permanent Redirect

308 Permanent Redirect is an HTTPS status code indicating that the requested resource has been permanently moved to another location. Similar to 301 Moved Permanently, 308 informs the user of the movement of a given online resource, and unlike the 301 redirect, 308...

How to Fix 301 Error Moved Permanently

The 301 Moved Permanently is an HTTP status code that indicates a permanent relocation of an online resource from a given URL to a new one. More technically, the moved resource has been moved to the new URL specified in the Location header. The HTTP 301 status code is...

How to Fix 307 Temporary Redirect

307 Temporary Redirect is a response HTTP status code that indicates the requested resource has been moved to a different URL for a limited period of time. Unlike a 301 permanent redirect, the 307 Temporary Redirect message indicates that the change is temporary and...

How to Access Crontab Settings

To access the crontab settings, first, you need to log in to your AwardSpace hosting panel. After you have logged in, head to Crontab Settings, located within the Advanced Tools category:   After you click the Crontab Settings icon, a new page should load. Once...

How to Check My Auto Renewals

To check your AwardSpace hosting plan auto-renewals, first log in to the admin dashboard. Then, head to Wallet, within the Orders & Invoices section:   After that, click the Auto Renewals tab, where you can check any relevant information about your hosting...


Create a website for free!


Free forever

Our Support Team is Here to Help


If you need any questions answered, don't hesitate and contact us. Click the button below and follow the instructions. You can expect an answer within an hour.


Contact AwardSpace


iNewest knowledge base articles

How to Fix 308 Permanent Redirect

308 Permanent Redirect is an HTTPS status code indicating that the requested resource has been permanently moved to another location. Similar to 301 Moved Permanently, 308 informs the user of the movement of a given online resource, and unlike the 301 redirect, 308...

How to Fix 301 Error Moved Permanently

The 301 Moved Permanently is an HTTP status code that indicates a permanent relocation of an online resource from a given URL to a new one. More technically, the moved resource has been moved to the new URL specified in the Location header. The HTTP 301 status code is...

How to Fix 307 Temporary Redirect

307 Temporary Redirect is a response HTTP status code that indicates the requested resource has been moved to a different URL for a limited period of time. Unlike a 301 permanent redirect, the 307 Temporary Redirect message indicates that the change is temporary and...

How to Access Crontab Settings

To access the crontab settings, first, you need to log in to your AwardSpace hosting panel. After you have logged in, head to Crontab Settings, located within the Advanced Tools category:   After you click the Crontab Settings icon, a new page should load. Once...

How to Check My Auto Renewals

To check your AwardSpace hosting plan auto-renewals, first log in to the admin dashboard. Then, head to Wallet, within the Orders & Invoices section:   After that, click the Auto Renewals tab, where you can check any relevant information about your hosting...

How to Check My Payment Requests

To check your payment requests, first log in to the AwardSpace hosting panel. Then, head to Wallet within the Orders & Invoices category:   Then, click the Payment Requests tab. There, you can browse all the information you need about your...

Even more web tutorials

Check out our web hosting knowledge base and the WordPress tutorials to learn more, and be better prepared for your website creation and maintenance journey.