How to Install Extensions on Vtiger

Home » Knowledge Base » Design Tools » Vtiger » How to Install Extensions on Vtiger

Vtiger is a versatile open-source platform that helps you with managing your business processes – streamline customer relationships, manage sales, manage your team, and more. One of the platform’s great features is the ability to add new functionalities by installing extensions. These extensions are used to integrate new features into your Vtiger platform, helping you customize it to fit your business needs perfectly.

In this article, we outline the steps to install extensions on Vtiger, making the process simple.


What are Vtiger Extensions

An extension in Vtiger is a term that encompasses the addition of various modules, widgets, and other integrations to the platform’s core, so you add new features and functionalities to it. Via extensions, you can add email management, payment gateways, marketing tools, language packs, and many more.

Vtiger extensions are a valuable asset to each business project, as they help managers customize the platform in such a way that it fits their business needs and preferences just the way they want them to be.


How to Install Extensions on Vtiger

The installation process is simple and comprises only a few steps. Here they are.

First, you need to install Vtiger, and then you should log in to the Vtiger admin dashboard.

After you have entered the admin dashboard, click the sandwich menu button, located at the top left corner of the page:

Click the sandwich menu button in Vtiger to install an extension


Then, from the drop-down menu, click on Extension Store:
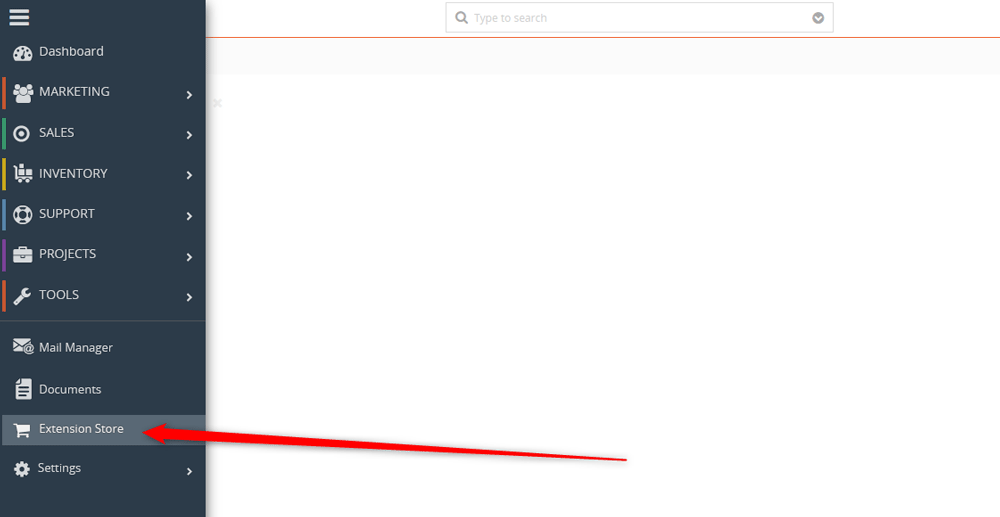
Head to the Extensions Store in Vtiger


Now, within the extension store, browse for an extension you wish to add to Vtiger:

Browse Extensions


Once you locate a suitable extension, click on the green Install/blue Buy button (depending on whether the extension is free or premium) within the extension’s presentation box:
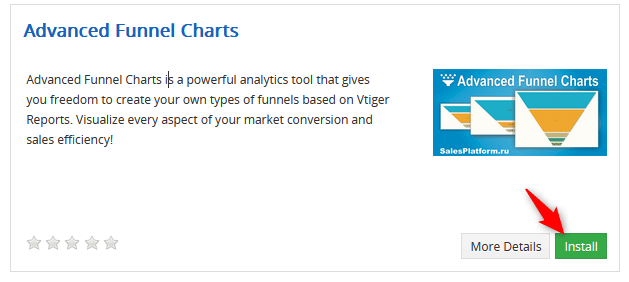
Click the Install Button


Once you click the Install/Buy button, you will be asked whether you are sure to install the extension. Click Yes:

Confirm the installation of selected extention


Now that the extension is installed, you should configure it. To do so, head to Settings -> CRM Settings via the sandwich menu icon at the top left of the page:
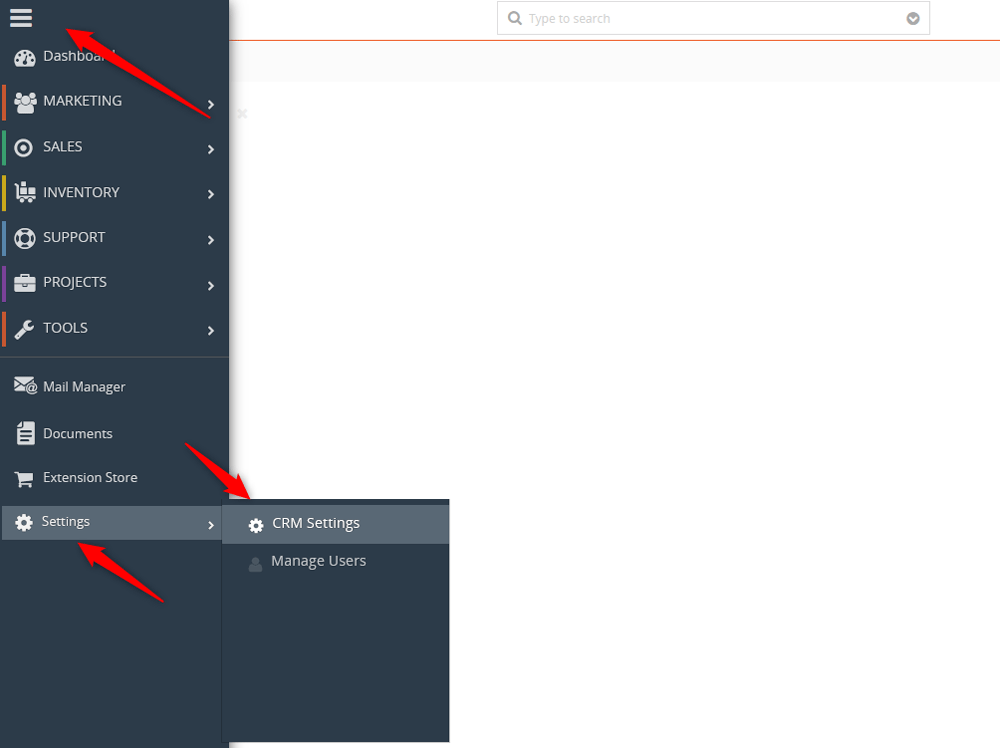
Open the Vtiger CRM settings


Now, from the list of available extensions, find the one and activate it by adding a check in the checkbox, and manage its settings by using the Settings drop-down menu on the right of the extension’s name (keep in mind that only some of the extensions include a Settings menu. To find out whether the one you installed features such a menu, simply hover your mouse cursor over the extension’s name, and an options menu will appear, should it be there in the first place:

Make Extnsion setup and change settings


Now you know how to install extensions to Vtiger

Was this post helpful?

i

Relevant tags:

Connect

Latest posts:

How to Check My Hosting Limits

To check your hosting limits, follow these steps: First, log in to the hosting control panel. Then, via the dashboard, head to Hosting Settings:   After that, click the Hosting Limits tab:   Then, you will access the information about your account's hosting...

How to Access the Security Settings of My Domains

Accessing the security settings of your hosted domains is easy with AwardSpace. You can access the settings in just a few minutes by following the steps below. First, log in to the AwardSpace hosting panel. Then, head to the Domain Manager page by clicking the...

How to Access The Name Servers Settings of My Domain

Accessing the name server settings with AwardSpace is quite simple. Just follow the next steps. First, log in to the AwardSpace hosting panel. Then, head to Domain Manager:   After that, locate the domain whose Name Server settings you wish to access and click...

How to Access the DNS Settings of My Domains

Accessing the DNS settings of your domains is easy with AwardSpace. The process is comprised of a few simple steps and requires only a minute or two of your time. First, log in to the AwardSpace hosting panel. Then, head to the Domain Manager:   After that,...


Create a website for free!


Free forever

Our Support Team is Here to Help


If you need any questions answered, don't hesitate and contact us. Click the button below and follow the instructions. You can expect an answer within an hour.


Contact AwardSpace


iNewest knowledge base articles

How to Check My Hosting Limits

To check your hosting limits, follow these steps: First, log in to the hosting control panel. Then, via the dashboard, head to Hosting Settings:   After that, click the Hosting Limits tab:   Then, you will access the information about your account's hosting...

How to Access the Security Settings of My Domains

Accessing the security settings of your hosted domains is easy with AwardSpace. You can access the settings in just a few minutes by following the steps below. First, log in to the AwardSpace hosting panel. Then, head to the Domain Manager page by clicking the...

How to Access The Name Servers Settings of My Domain

Accessing the name server settings with AwardSpace is quite simple. Just follow the next steps. First, log in to the AwardSpace hosting panel. Then, head to Domain Manager:   After that, locate the domain whose Name Server settings you wish to access and click...

How to Access the DNS Settings of My Domains

Accessing the DNS settings of your domains is easy with AwardSpace. The process is comprised of a few simple steps and requires only a minute or two of your time. First, log in to the AwardSpace hosting panel. Then, head to the Domain Manager:   After that,...

How to Access The Settings for My Subdomains

Accessing the settings for your subdomain with AwardSpace is quite simple. First, log in to the AwardSpace hosting panel. Then, head to Domain Manager:   A new page should open. Once you see it, scroll down until you see your list of hosted subdomains:  ...

Even more web tutorials

Check out our web hosting knowledge base and the WordPress tutorials to learn more, and be better prepared for your website creation and maintenance journey.