How to Manage the Main Menu in Zen Cart

Home » Knowledge Base » Design Tools » Zen Cart » How to Manage the Main Menu in Zen Cart

The main menu in your Zen Cart store plays an important role in guiding your site visitors through your products. Whether you wish to add a new link to a new product, remove an existing product and the links that lead to it, or fully customize your store navigation, understanding how to work with menus when configuring your Zen Cart store is essential for each Zen Cart project.

In this guide, we share how to manage the main menu in Zen Cart in a few simple steps.


Understanding the Main Menu in Zen Cart

Unlike other CMS platforms such as WordPress, Zen Cart doesn’t use a single drag-and-drop menu builder. Instead, the main menu in Zen Cart is comprised of several components:

  • Default navigational links that lead to main store pages, such as the Homepage, Featured Products, and others.
  • EZ-Pages that let you create and manage custom menu links.
  • Category menus, created after your product categories.

This concept allows you to customize each component independently from all others.


Customize the Default Menu Items

Zen Cart comes with default menu items such as Home, Shipping & Returns, Contact Us, Order Status, and others. You can use these to set up your homepage. To show or hide these, follow these steps:

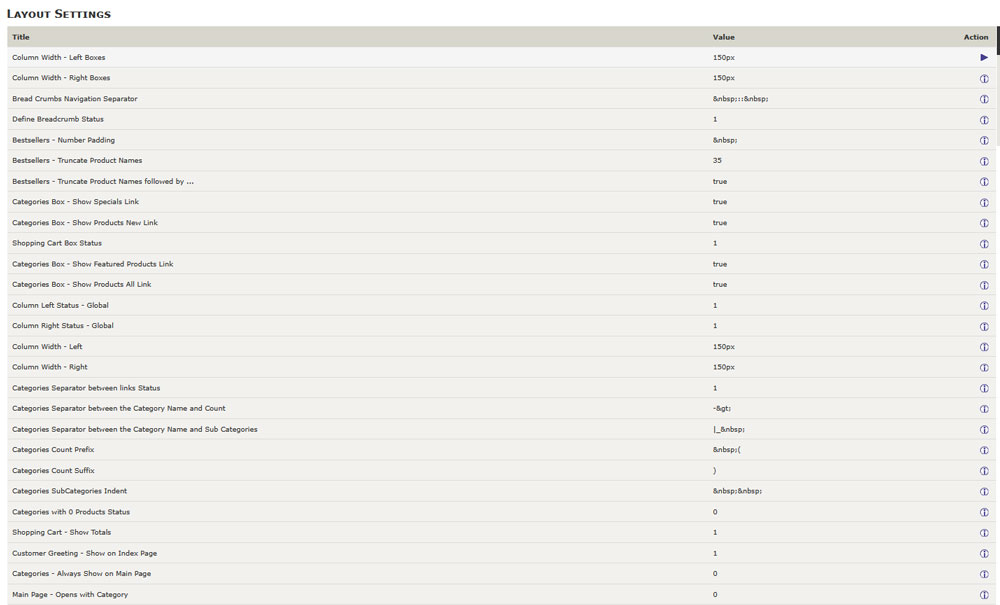
Log in to Zen Cart. Then, via the admin panel, navigate to Configuration -> Layout Settings:

Open the layout settings in Zen Cart to manage the main menu


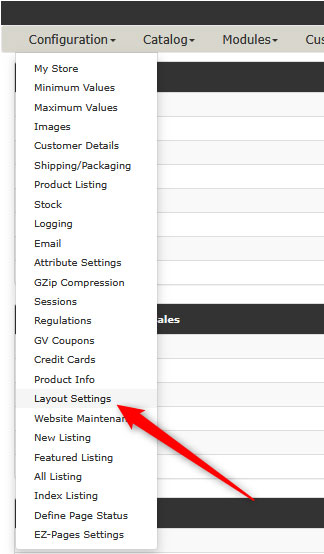
From this page, you can show or hide menu items by toggling:

  • Show Special Link
  • Show New Product Link
  • Show Featured Product Link
  • Show Contact Us Link

Each item can be toggled on and off by selecting 1 (on) or 0 (off):

Layout Page Options list in Zen Cart


Add Custom Menu Items

If you want to include custom menu items such as Blog, FAQs, and others, you can do so by following these steps:

Via the admin panel, navigate to Tools -> EZ-Pages:

Open the EZ pages in Zen Cart to edit your main menu


Once there, click on the blue New Page button, located at the right of the screen:

Add New Page via the EZ Pages settings


Then, fill in the page credentials:

add EZ Pages details


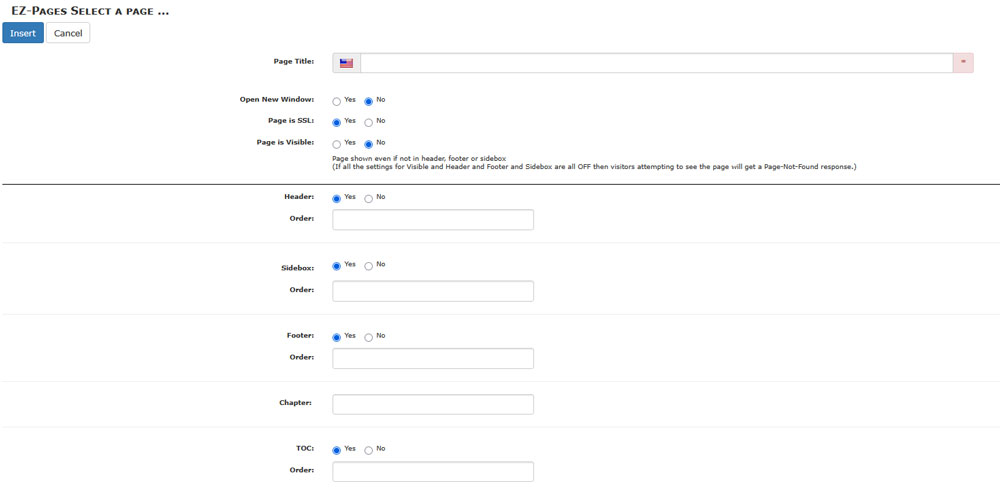
Keep in mind the following:

  • Enter a Page Title – this will be the menu item name (label).
  • Set the Internal or External link – use this to link to either your store pages or other websites.
  • Display in Header – check this box if you wish the menu item to appear in your main menu.
  • There are numerous other settings; check them thoroughly and change them in a way that fits your goals the best.

Once you finish with the setup, click on the blue Insert button, located at the bottom left of the page:

EZ Pages credential page


Add Product Category Menus

When you create product categories, Zen Cart automatically displays them in a sitebar or a drop-down menu, depending on your store layout. To manage these, do the following:

Navigate to Catalog -> Categories/Products:

Categories and Products page in Zen Cart Admin Panel


Then, to add or remove a category menu item from your main menu, click on the green status symbol of each category, so the color changes. Remember that GREEN status means the category will appear in your menu, and RED means it won’t:

Category Page status in Zen Cart


Tips and Tricks to Manage the Main Menu in Zen Cart

  • Use the EZ-Pages settings for static pages such as Terms of Service and Return Policy
  • Sort order is important – it controls the order your menu items appear in the main menu.
  • Consider using menu-editing plugins such as Zen Cart Mega Menu.


Conclusion – How to Manage the Main Menu in Zen Cart

Learning how to manage the main menu in Zen Cart is important for improving your online store’s usability. Whether you use the built-in layout menu settings or the EZ-Page settings, Zen Cart grants you the tools to customize your main menu to your preferences.


Was this post helpful?

i

Relevant tags:

Connect

Latest posts:

How to Check My Hosting Limits

To check your hosting limits, follow these steps: First, log in to the hosting control panel. Then, via the dashboard, head to Hosting Settings:   After that, click the Hosting Limits tab:   Then, you will access the information about your account's hosting...

How to Access the Security Settings of My Domains

Accessing the security settings of your hosted domains is easy with AwardSpace. You can access the settings in just a few minutes by following the steps below. First, log in to the AwardSpace hosting panel. Then, head to the Domain Manager page by clicking the...

How to Access The Name Servers Settings of My Domain

Accessing the name server settings with AwardSpace is quite simple. Just follow the next steps. First, log in to the AwardSpace hosting panel. Then, head to Domain Manager:   After that, locate the domain whose Name Server settings you wish to access and click...

How to Access the DNS Settings of My Domains

Accessing the DNS settings of your domains is easy with AwardSpace. The process is comprised of a few simple steps and requires only a minute or two of your time. First, log in to the AwardSpace hosting panel. Then, head to the Domain Manager:   After that,...


Create a website for free!


Free forever

Our Support Team is Here to Help


If you need any questions answered, don't hesitate and contact us. Click the button below and follow the instructions. You can expect an answer within an hour.


Contact AwardSpace


iNewest knowledge base articles

How to Check My Hosting Limits

To check your hosting limits, follow these steps: First, log in to the hosting control panel. Then, via the dashboard, head to Hosting Settings:   After that, click the Hosting Limits tab:   Then, you will access the information about your account's hosting...

How to Access the Security Settings of My Domains

Accessing the security settings of your hosted domains is easy with AwardSpace. You can access the settings in just a few minutes by following the steps below. First, log in to the AwardSpace hosting panel. Then, head to the Domain Manager page by clicking the...

How to Access The Name Servers Settings of My Domain

Accessing the name server settings with AwardSpace is quite simple. Just follow the next steps. First, log in to the AwardSpace hosting panel. Then, head to Domain Manager:   After that, locate the domain whose Name Server settings you wish to access and click...

How to Access the DNS Settings of My Domains

Accessing the DNS settings of your domains is easy with AwardSpace. The process is comprised of a few simple steps and requires only a minute or two of your time. First, log in to the AwardSpace hosting panel. Then, head to the Domain Manager:   After that,...

How to Access The Settings for My Subdomains

Accessing the settings for your subdomain with AwardSpace is quite simple. First, log in to the AwardSpace hosting panel. Then, head to Domain Manager:   A new page should open. Once you see it, scroll down until you see your list of hosted subdomains:  ...

Even more web tutorials

Check out our web hosting knowledge base and the WordPress tutorials to learn more, and be better prepared for your website creation and maintenance journey.