How to Customize Menus in SuiteCRM

Home » Knowledge Base » Design Tools » SuiteCRM » How to Customize Menus in SuiteCRM

SuiteCRM grants you the option to customise your website menus and control what modules appear in them, how they are grouped and in what categories. This customisation can help you improve user workflow and reduce clutter, especially if you are working on a large SuiteCRM project.

In this article, we share how to customise menus in SuteCRM. The process is simple and requires only a few minutes of your time.

Read also:


What are Menus in SuiteCRM

Before we embark on customising, it is important to understand what menus are in SuiteCRM.

Menus are boxes that contain links to certain pages of your website. These links are not shown, but masked with words that clearly describe where the links lead to. For example, the top navigation bar in SuiteCRM contains menu items such as “Contacts”, “Leads” and “Opportunities”. When you click a single menu item, practically, you click the link beneath the word, and it leads you to a certain page on the website.

Menus make website browsing convenient and help your site visitors retain interest in your business. Therefore, it is important to customise your website menus in such a way that it becomes as simple as possible for customers to find what they are looking for.


How to Customize Menus in SuiteCRM

The process is simple and is comprised of only a few simple-to-follow steps. Here’s what you need to do to customize your menus.


Step 1: Log in to SuiteCRM

The first step in the process is to log in to SuiteCRM. This step is important, as logging in will allow you to customize every aspect of your website, including menus.


Step 2: Open the SuiteCRM Admin Section

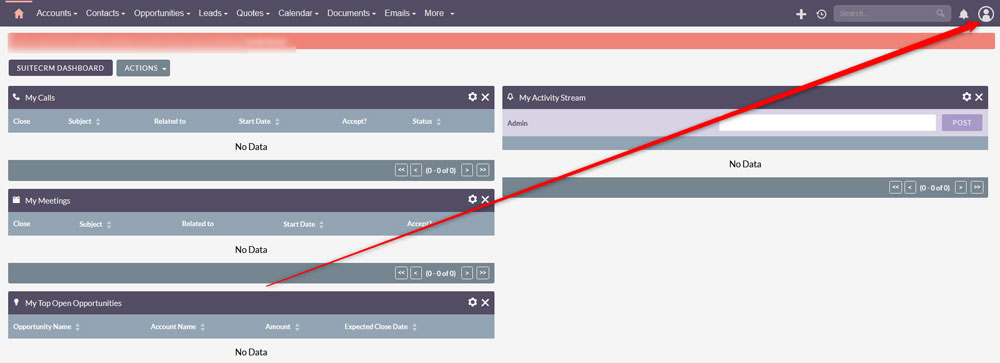
Once logged in, hover your mouse button over your profile picture at the top right corner of the screen and then select Admin:

Acess the admin page in SuiteCRM to customize your menus


Step 3: Access the Menu Management Page

Once in the Admin section, click on Configure Module Menu Filters within the Module Settings box:

Click the Configure Module Menus in SuiteCRM Admin page


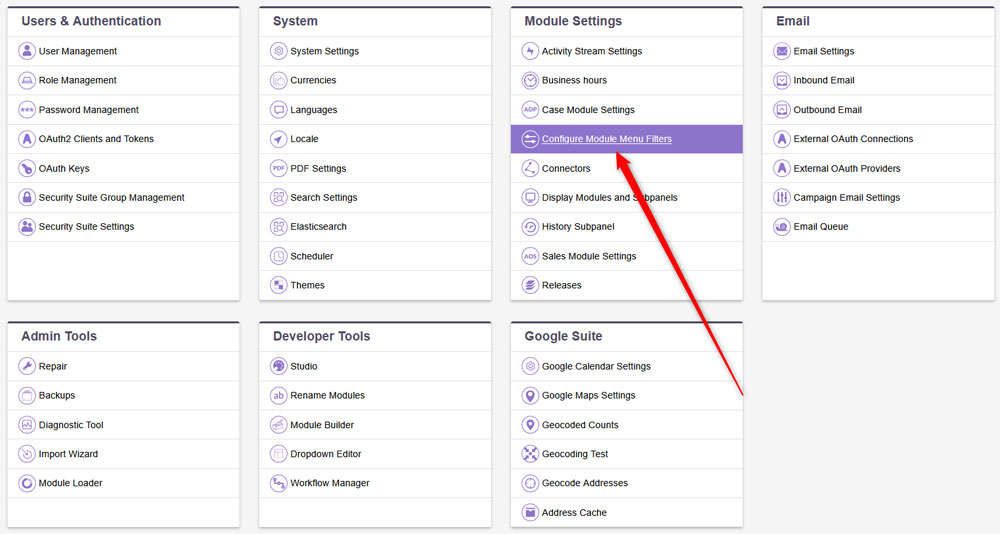
This will lead you to the menu management page.


Step 4: Create, Edit or Delete a Menu Item

While on the menu management page, you can work on your menus. You can create new menu items, delete them, edit them and group menus within certain categories. Here’s how to create, delete and edit menus in SuiteCRM.


Create a Menu Item

Click the grey Add Filter button at the bottom of the page to create a new menu element:

Create a new menu item in SuiteCRM


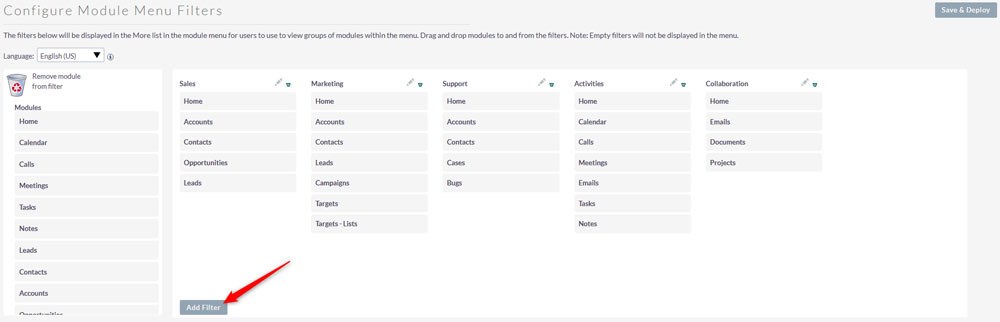
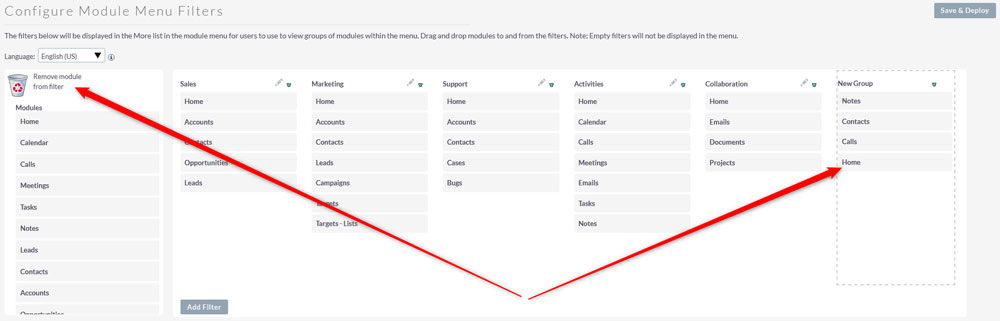
Then, from the Module box located at the left of the page, choose a module and drag and drop it within the module you just created:

Add a menu item to your new menu section


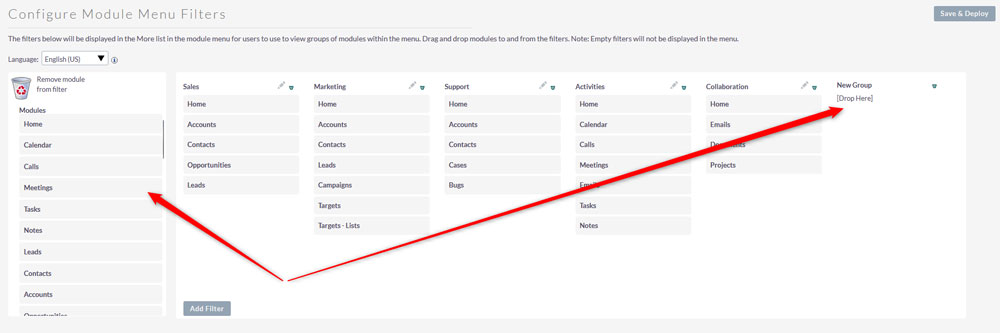
These added modules will be the core of your new menu.


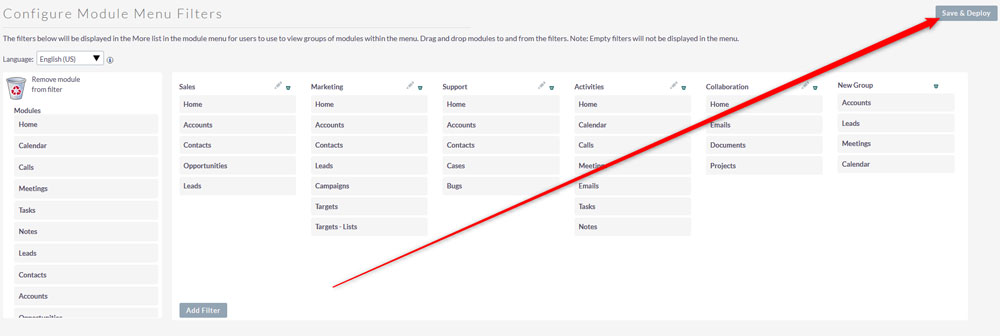
Once you have finished adding modules for your new menu, click on Save & Deploy:

Save changes in SuiteCRM


Now you have managed to create a new menu in SuiteCRM.


Delete a Menu

To delete a menu, similar to the creation process, simply drag a module from the menu you wish to delete and drag it to the Bin icon at the left of the page:

Remove menu items by dragging and dropping them in the bin icon


Edit a Menu

To edit an existing menu, simply drag and drop modules to it and from it. To add modules, drag the ones you wish to appear in this menu from the list on the right and to delete an item, simply drag It from the menu to the bin icon, similarly to the creation and deletion process.


Step 5: Save and Refresh

Now that you have created, deleted or edited a menu, it is time to save the changes. To do so, simply click on the Save & Deploy button at the top right of the page:

Click on Save & Deploy, so SuiteCRM applies the changes you just made


Conclusion

Customizing menus in SuiteCRM can help you create a more user-friendly website and improve the workflow of your team members. This is an essential skill, and the good news is that it takes only a few minutes to master.


Was this post helpful?

i

Relevant tags:

Connect

Latest posts:

How to Fix 308 Permanent Redirect

308 Permanent Redirect is an HTTPS status code indicating that the requested resource has been permanently moved to another location. Similar to 301 Moved Permanently, 308 informs the user of the movement of a given online resource, and unlike the 301 redirect, 308...

How to Fix 301 Error Moved Permanently

The 301 Moved Permanently is an HTTP status code that indicates a permanent relocation of an online resource from a given URL to a new one. More technically, the moved resource has been moved to the new URL specified in the Location header. The HTTP 301 status code is...

How to Fix 307 Temporary Redirect

307 Temporary Redirect is a response HTTP status code that indicates the requested resource has been moved to a different URL for a limited period of time. Unlike a 301 permanent redirect, the 307 Temporary Redirect message indicates that the change is temporary and...

How to Access Crontab Settings

To access the crontab settings, first, you need to log in to your AwardSpace hosting panel. After you have logged in, head to Crontab Settings, located within the Advanced Tools category:   After you click the Crontab Settings icon, a new page should load. Once...

How to Check My Auto Renewals

To check your AwardSpace hosting plan auto-renewals, first log in to the admin dashboard. Then, head to Wallet, within the Orders & Invoices section:   After that, click the Auto Renewals tab, where you can check any relevant information about your hosting...


Create a website for free!


Free forever

Our Support Team is Here to Help


If you need any questions answered, don't hesitate and contact us. Click the button below and follow the instructions. You can expect an answer within an hour.


Contact AwardSpace


iNewest knowledge base articles

How to Fix 308 Permanent Redirect

308 Permanent Redirect is an HTTPS status code indicating that the requested resource has been permanently moved to another location. Similar to 301 Moved Permanently, 308 informs the user of the movement of a given online resource, and unlike the 301 redirect, 308...

How to Fix 301 Error Moved Permanently

The 301 Moved Permanently is an HTTP status code that indicates a permanent relocation of an online resource from a given URL to a new one. More technically, the moved resource has been moved to the new URL specified in the Location header. The HTTP 301 status code is...

How to Fix 307 Temporary Redirect

307 Temporary Redirect is a response HTTP status code that indicates the requested resource has been moved to a different URL for a limited period of time. Unlike a 301 permanent redirect, the 307 Temporary Redirect message indicates that the change is temporary and...

How to Access Crontab Settings

To access the crontab settings, first, you need to log in to your AwardSpace hosting panel. After you have logged in, head to Crontab Settings, located within the Advanced Tools category:   After you click the Crontab Settings icon, a new page should load. Once...

How to Check My Auto Renewals

To check your AwardSpace hosting plan auto-renewals, first log in to the admin dashboard. Then, head to Wallet, within the Orders & Invoices section:   After that, click the Auto Renewals tab, where you can check any relevant information about your hosting...

How to Check My Payment Requests

To check your payment requests, first log in to the AwardSpace hosting panel. Then, head to Wallet within the Orders & Invoices category:   Then, click the Payment Requests tab. There, you can browse all the information you need about your...

Even more web tutorials

Check out our web hosting knowledge base and the WordPress tutorials to learn more, and be better prepared for your website creation and maintenance journey.