

What you need to know:
You can point your existing domain to AwardSpace by using the Host a Domain option in our Domain Manager and then updating your nameservers. After the nameservers are updated, you may need to wait a few hours for the DNS change to fully propagate across the web.
One of the great perks that comes with having a hosting plan with AwardSpace is that you are allowed to host a domain name that you have purchased from a third party. For instance, if you own the domain example.com, you can point it to your AwardSpace hosting account. When you do so, your website will be powered by AwardSpace servers and your site visitors will be able to view the website you have uploaded to your hosting account by navigating to http://example.com/ in their web browsers.
Changing the hosting provider for a domain name happens by updating its DNS records. Your domain’s DNS records are important as they show clients like web browsers where your website is hosted. More specifically, a domain’s DNS reveals the IP address of the web server that powers the website. In that sense, DNS records are the glue that binds your domain name and hosting plan together.

There are two general approaches that you can take when it comes to pointing your domain to a new hosting provider: you can either update your nameservers or your A records. Both of these actions will point your domain name to AwardSpace and they both require a similar amount of effort. We will mainly focus on how to host your domain by changing your nameservers, but we will also touch upon pointing a domain using A records a bit later in the article.
Prerequisites
Before we demonstrate how domain pointing works in AwardSpace, you must take care of a few things beforehand. We will briefly outline them below:
- You need to own a domain name. If you don’t have a domain name yet, you can register a domain through AwardSpace or through another domain registrar of your choosing.
- You must be able to change the DNS settings for your domain name.
- Lastly, you must have a hosting plan with AwardSpace. If you do not have an AwardSpace hosting account yet, you can sign up for a premium hosting plan, a VPS instance, or a semi-dedicated server package. And if you are looking for the opportunity to test our hosting services before paying, you can go for our free hosting plan.
Tip
All AwardSpace hosting plans, including the free website hosting package, allow the use of a custom domain name!
With these prerequisites out of the way, we can now look at the steps that you need to take in order to point your existing domain name to AwardSpace. You can read through the entire process or jump to the step that interests you:
Table of Contents:
How Do I Point My Existing Domain to AwardSpace?
Pointing your domain to AwardSpace is a relatively straightforward process that involves just a handful of steps. The only thing to keep in mind is that the change is not instant and it usually takes a few hours or even a day for your changes to take effect.
1. Decide Between Pointing a Domain and Transferring It
Before we begin the domain pointing process, we need to draw a distinction between pointing a domain to a new hosting provider and transferring a domain to a new hosting provider. While the two terms may seem interchangeable at first glance, they carry a different meaning.

Pointing a domain name, or hosting a domain name, is a process that involves assigning a new hosting provider to your domain. When you do so, you can take advantage of the web hosting services by the new provider, such as having a website that is accessible through your domain name, having a custom email address, etc.
Transferring a domain name, on the other hand, tells the hosting provider that you not only wish to point your domain to their servers, but you also wish to make the hosting provider your new domain registrar. In other words, domain renewal will be carried through your hosting provider if you choose to transfer your domain name. Domain transfers usually cost money and the process involves renewing your domain name for one additional year.
Warning
The term domain transfer has a special meaning to web hosting providers, so do not use it to describe the process of pointing a domain name to a new hosting provider.
We have a dedicated article on the differences between transferring and pointing a domain that you can read if you wish to learn even more on the subject.
Moving forward, this guide will focus on pointing your domain name to AwardSpace. If you need help with a domain transfer, you can check our in-depth tutorial on how to transfer a domain name to AwardSpace.
2. Add Your Domain to the AwardSpace Domain Manager
To add your domain name to our Domain Manager, follow these steps:
- Open our Domain Manager.
- Choose the Host a Domain option.
- Enter your domain name into the empty field on the right.
- Press the Host Domain button.
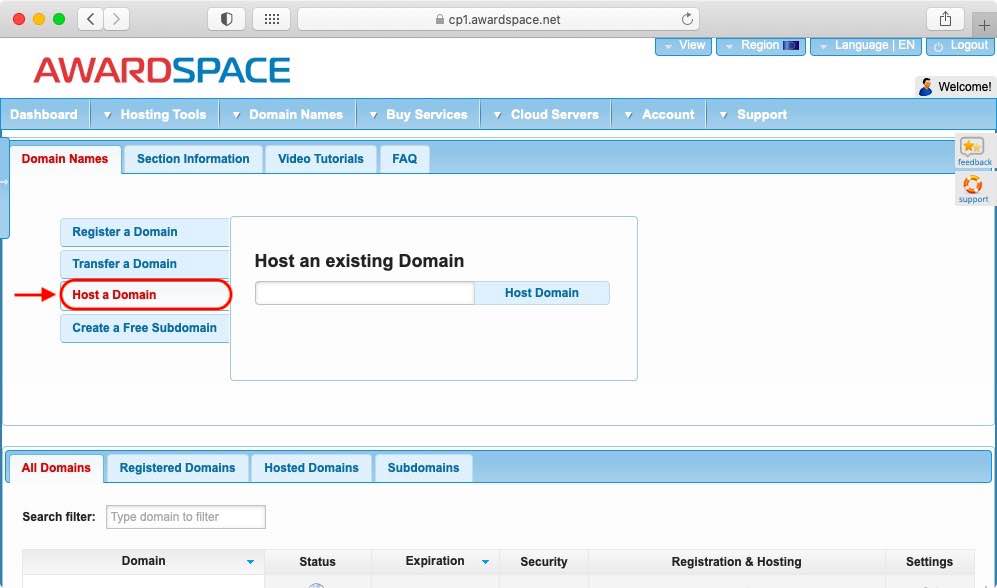
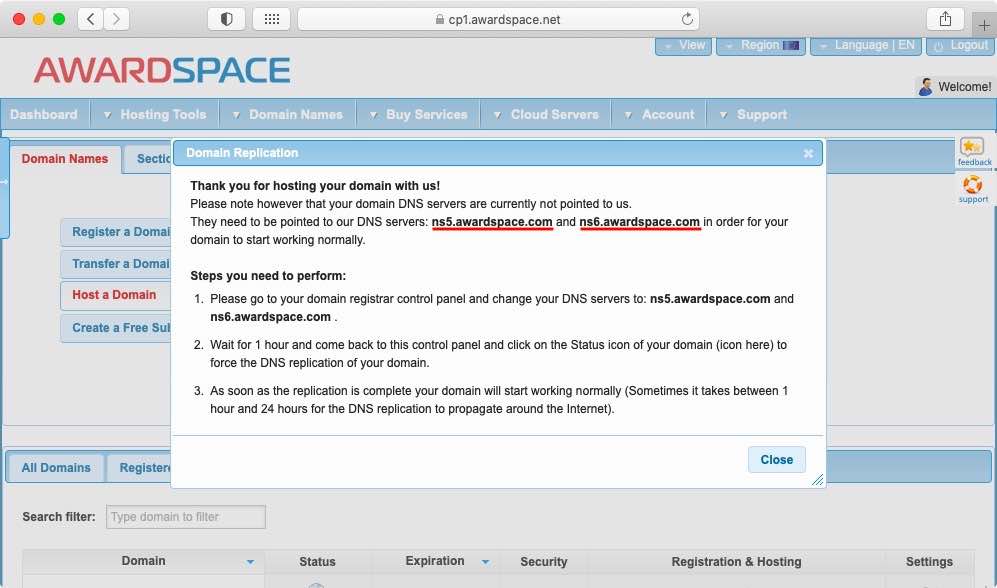
You will be presented with a screen that will show you the hosting nameservers that your domain needs to be using. Make a note of them as you will need them later.
3. Adjust Your Domain’s DNS Records
Now that you have obtained the AwardSpace nameservers, you can proceed to set those DNS records on your domain name.
Important
Keep in mind that you need to set the AwardSpace nameservers inside of the control panel provided by your domain registrar. You cannot set your domain’s nameservers in the AwardSpace Control Panel!
Since every domain registrar has a slightly different control panel, we cannot provide you with concrete instructions in this step. Instead, we will give you a general idea of what to look for.
- So, to begin the process, go to your registrar’s website and log into their control panel. Your domain registrar is the company where you have purchased your domain name.
- Once you have logged into your domain registrar’s control panel, look for a domain manager section or another place that lists all of your domains and allows you to adjust their settings.
- When you have found your domain name, you need to figure out how to edit its settings. You may have a dropdown menu with domain-related options, a toolbar with buttons for each action, or some other way of making adjustments. The specific option that you are looking for would allow you to change your domain’s nameservers. Possible names for the option include Nameservers, Change Nameservers, Hosting Nameservers, Edit Nameservers, Edit NS Records, Custom NS Records, Change DNS, DNS, and similar.
- Once you find the correct option, click on it. You should then be taken to a page that contains two or more fields for your nameservers. Remove all existing entries and enter the two nameservers that you obtained earlier from the AwardSpace Domain Manager. When you are done, click the Save, Done, or Confirm button.
Warning
When you are changing hosting providers and updating your nameservers, always make sure to fully erase the old records. Never have nameservers from two different hosting providers active at the same time as this can introduce reliability and stability problems for your domain.
Tip
If your domain registrar allows you to enter more than two nameservers, it is OK to fill only the first two fields with the AwardSpace nameservers and leave the other fields blank.
That’s it! At this point, you have successfully pointed your domain name to AwardSpace by changing your nameservers.
For the sake of completeness, in the next section, we will briefly explain how you can achieve the same effect by updating your A record instead of your NS records. If you have already pointed your domain by changing your nameservers, skip the next section and go to this one directly.
Using an A Record Instead of Nameservers
While it is recommended to update your nameservers when pointing a domain to AwardSpace, it is also possible to host your domain by updating your A record.
Tip
You should consider pointing your domain name to AwardSpace using an A record instead of nameservers if there are certain services active on your old hosting provider that you wish to keep. For example, using an A record is a good idea if you wish to start hosting your website on AwardSpace while also keeping the email services provided by your old host.
To find out what A record you need to be using, follow the steps below:
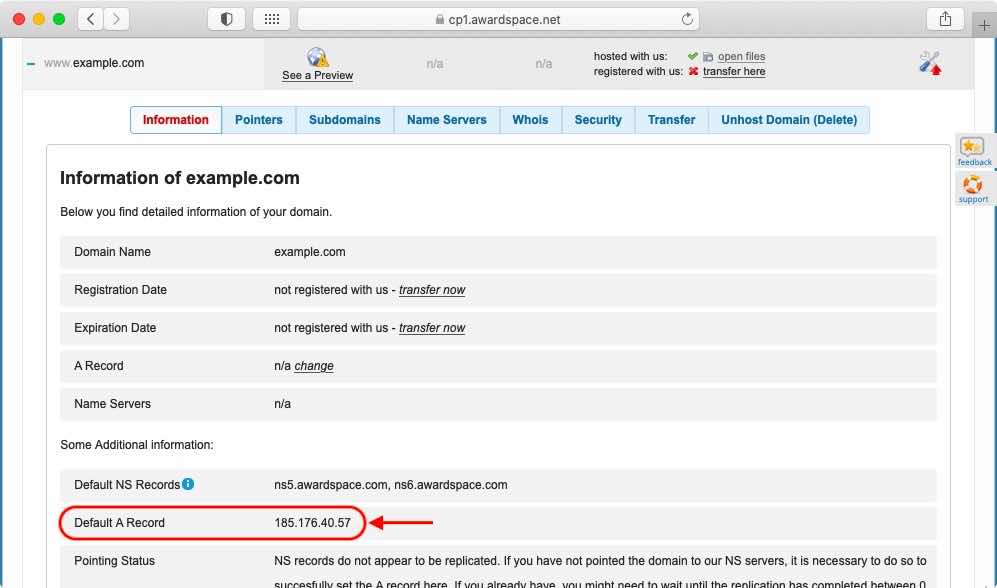
- Open our Domain Manager.
- Click on your domain name.
- Open the Information tab.
- Make a note of the value in the Default A Record field.
After you have obtained your A record, go to your domain registrar and find the option to edit your domain’s DNS records. The option will likely be located in their domain manager and the option label will contain the word DNS.
Once you locate your domain’s DNS settings, you should see at least one A record that has a label that simply @ matches your domain name. Edit this record and replace its value with the IP address that you obtained from our Domain Manager. If you see another A record that has the name www, update its value to the AwardSpace IP as well.
That’s it! All that’s left to do is to save your changes and move on to the next step.
4. Wait for the DNS Changes to Take Effect
At this point, you have successfully set your NS or A record and you are probably wondering what’s next. The answer is that you need to wait for the changes in your DNS records to propagate across the world. This process can take up to 48 hours to complete.
Tip
Many modern domain registrars are able to cut down the amount of time that is required for DNS propagation to just an hour. As such, in most cases, you wouldn’t have to wait a whole day before the changes are propagated.
5. Replicate Your Domain
Tip
This domain replication step is not mandatory. If you wait long enough, our servers will carry out the domain replication process on your behalf. But you can save yourself some time by following the instructions in this section.
Warning
If you have opted to point your domain name using an A record, then you should skip this step entirely and wait for the DNS propagation and domain replication processes to complete on their own.
When you believe that your new DNS records have propagated across the world, you should replicate your domain name. To do so, follow the steps below:
- Open our Domain Manager.
- Next to your domain name you will see a globe icon with a yellow warning triangle. Hover your mouse over this icon and a popup option should appear.
- In the pop-up option, choose the Replicate Now button.
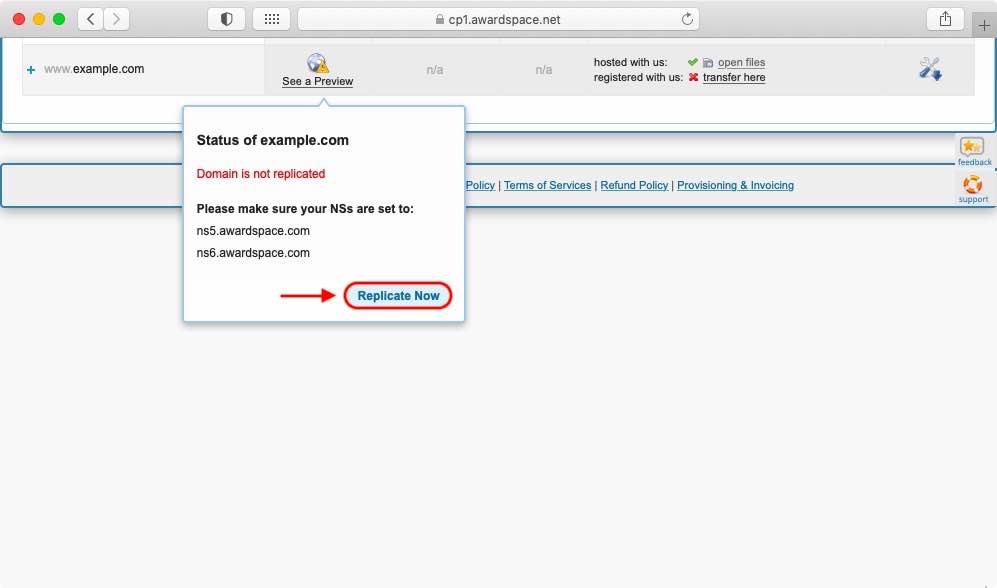
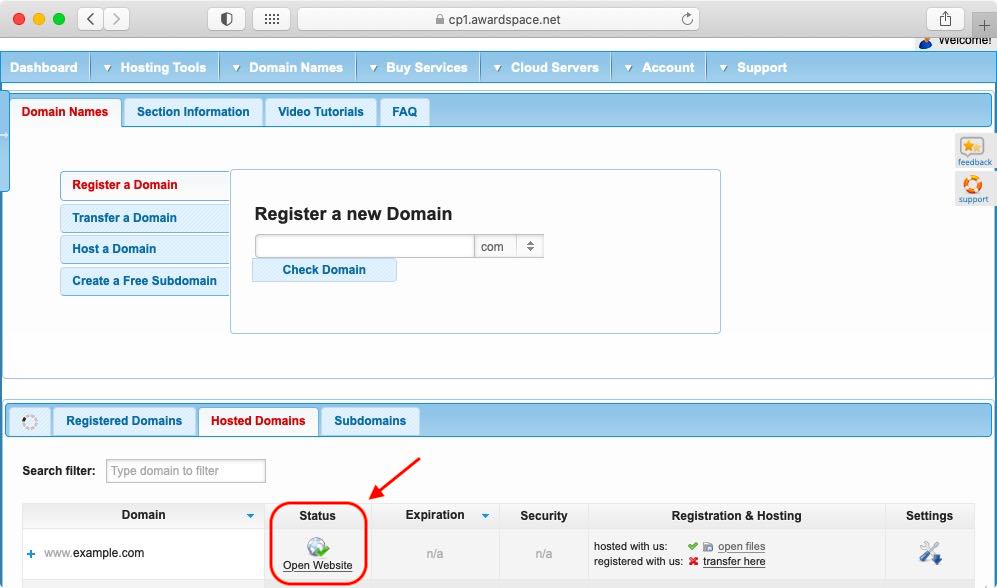
If the domain replication fails, you will see an error message and you should try performing the replication after some more time has passed. And if the replication succeeds, this means that the domain name is ready for use. Once the replication has passed successfully, the globe status icon will have a green checkmark next to it:
Next Steps
Congratulations! If you have come this far, then you have successfully pointed your domain name to AwardSpace. And now that the boring stuff is out of the way, you can get right down to the business of creating and publishing your website!
If you are not sure where to start, you can check our tutorial on how to create a website from scratch. Or, if you already have a website that you wish to move to AwardSpace, you can check our tutorial on how to migrate a website from one hosting provider to another. Lastly, you might be interested in learning how to create a custom email address that uses your domain name.
