“500 Unable to service PORT commands” error appears when connecting through FTP

Home » Knowledge Base » File Management » FTP » “500 Unable to service PORT commands” error appears when connecting through FTP

In this tutorial, we’re going to provide information regarding the error message 500 Unable to service PORT commands, including ways to fix it.


What Does the Error Mean?

The error message 500 Unable to service PORT commands usually occurs if you attempt to access a folder or upload a file to your server using an Active FTP data transfer mode.

500 Unable to service PORT commands 1

By default, FTP may run in two modes – Active and Passive. Active mode is not currently supported on our Shared hosting platform, as it is considered less secure and reliable. So, any attempt to access a directory or manipulate data in active FTP mode will be blocked by the FTP server’s firewall.


How Can I Resolve this Problem?

In order to resolve the situation and connect to your server properly, you would need to enable Passive data transfer mode in your FTP software application.

Below you’ll find illustrated instructions on how to enable Passive mode in some of the most used FTP software applications (such as FileZilla, Cyberduck, CoffeeCup, and Dreamweaver).


Configuring Passive Mode in FileZilla

You can follow these simple instructions to enable Passive Mode in FileZilla:

    1. Launch FileZilla.
    2. Open the Edit menu and click Settings….
    3. In the left pane, select FTP.
    4. Switch the Transfer Mode from Active to Passive (recommended).

500 Unable to service PORT commands 2

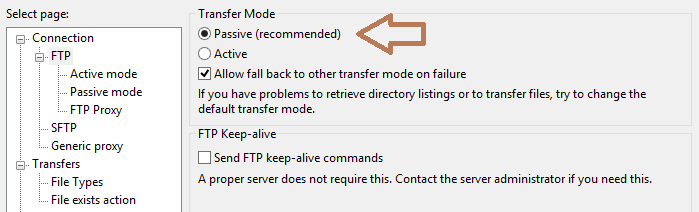
Once you have made the necessary corrections, press OK and retry the connection.


Configuring Passive Mode in Cyberduck

To make your Cyberduck FTP account run in Passive mode:

    1. Start Cyberduck.
    2. Open the File menu and select Open Connection.
    3. Next, click on the More Options button.
    4. Change the Connect Mode setting from Default to Passive (PASV).

500 Unable to service PORT commands 3

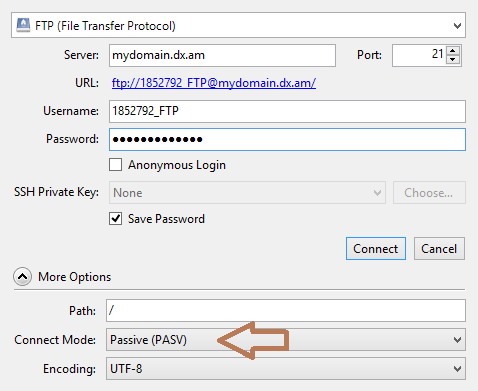
Press Connect and retry establishing an FTP connection.


Configuring Passive Mode in CoffeeCup

To enable Passive mode in CoffeeCup, perform the following actions:

    1. Launch CoffeeCup.
    2. Open the File menu and select Manage Servers.
    3. Next, click on the green plus icon.
    4. Mark the Passive Mode checkbox.

500 Unable to service PORT commands 4

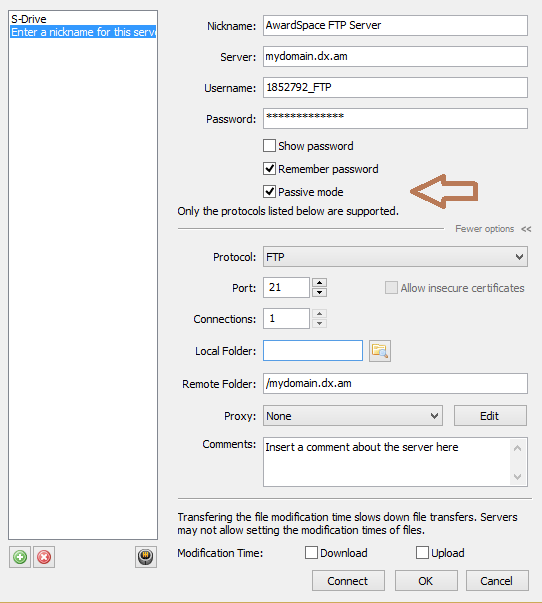
Press Connect, and then try to reconnect to your FTP server.


Configuring Passive Mode in Dreamweaver

You can configure Passive Mode in a Dreamweaver FTP client program in five easy steps:

    1. Start Dreamweaver.
    2. Open the Site menu and choose Manage Sites.
    3. Select the Servers tab and click on your existing AwardSpace FTP profile (account).
    4. Click More Options and select the checkbox Use Passive FTP.

500 Unable to service PORT commands 5

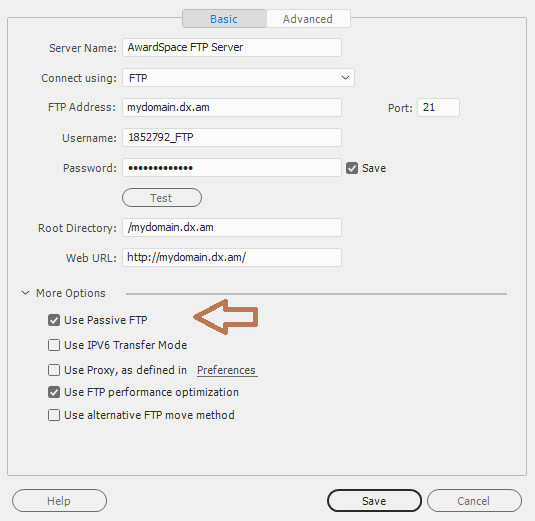
Click Save, and then re-attempt to establish a connection.


Am I Able to Use Passive Mode in Windows FTP (FTP.exe)?

Unfortunately, the Microsoft built-in FTP tool does not support passive FTP data transfers. As a result, you won’t be able to establish an FTP connection to our server or transfer files via FTP.exe.

Therefore, we highly recommend that you use an FTP client program for migrating your website data. Information on how to use and configure an FTP client program can be found on our FTP Connection Settings page.

Was this post helpful?

i

Relevant tags:

Connect

Latest posts:

How to Access the AwardSpace Terms of Services

When you sign up for any of the AwardSpace hosting services, it is always a good idea to read our Terms of Service carefully. At AwardSpace, we want each user to know and understand their rights, responsibilities, and the scope of our services. Our Terms of Service...

How to Add Dynamic Fields in Vtiger

Vtiger is a versatile CMS that you can use for free with all AwardSpace hosting plans. The CMS offers numerous options to manage your online business, workflows, and team roles. Among other useful tweaks, Vtiger also provides you with dynamic fields and layouts that...

How to Add Tags in Vtiger

Tags in Vtiger grant you the possibility to quickly and efficiently organize and retrieve records. Tags work like labels, allowing you to distribute leads, contacts, opportunities, tickets, and other entries into different categories based on a set of criteria. What...

How to Set Up User Roles in Vtiger

User roles in Vtiger are an important feature that enables you to control access and determine how your team members interact with the system. By tweaking user roles, you can set up permissions, control access levels, and make sure that sensitive business information...

How to Install Extensions on Vtiger

Vtiger is a versatile open-source platform that helps you with managing your business processes - streamline customer relationships, manage sales, manage your team, and more. One of the platform's great features is the ability to add new functionalities by installing...


Create a website for free!


Free forever

Our Support Team is Here to Help


If you need any questions answered, don't hesitate and contact us. Click the button below and follow the instructions. You can expect an answer within an hour.


Contact AwardSpace


iNewest knowledge base articles

How to Access the AwardSpace Terms of Services

When you sign up for any of the AwardSpace hosting services, it is always a good idea to read our Terms of Service carefully. At AwardSpace, we want each user to know and understand their rights, responsibilities, and the scope of our services. Our Terms of Service...

How to Add Dynamic Fields in Vtiger

Vtiger is a versatile CMS that you can use for free with all AwardSpace hosting plans. The CMS offers numerous options to manage your online business, workflows, and team roles. Among other useful tweaks, Vtiger also provides you with dynamic fields and layouts that...

How to Add Tags in Vtiger

Tags in Vtiger grant you the possibility to quickly and efficiently organize and retrieve records. Tags work like labels, allowing you to distribute leads, contacts, opportunities, tickets, and other entries into different categories based on a set of criteria. What...

How to Set Up User Roles in Vtiger

User roles in Vtiger are an important feature that enables you to control access and determine how your team members interact with the system. By tweaking user roles, you can set up permissions, control access levels, and make sure that sensitive business information...

How to Install Extensions on Vtiger

Vtiger is a versatile open-source platform that helps you with managing your business processes - streamline customer relationships, manage sales, manage your team, and more. One of the platform's great features is the ability to add new functionalities by installing...

How to Log in to Vtiger

Vtiger is a versatile platform that allows you to manage your business processes from a single place. It helps you organize customer data, optimize workflows, and improve team collaboration from a handy dashboard that is instantly available once you install the...

Even more web tutorials

Check out our web hosting knowledge base and the WordPress tutorials to learn more, and be better prepared for your website creation and maintenance journey.