How to Configure Your Email Account in Microsoft Outlook?

Home » Knowledge Base » Email » Email Client Configuration » How to Configure Your Email Account in Microsoft Outlook?

Outlook is a Microsoft mail client which is part of the Microsoft Office suite. In this article, we will guide you on how to configure your email account with AwardSpace inside Outlook.


How to Configure My Email Account?

Setting up an email account in Outlook is quite easy to accomplish and can be done by following the below steps:

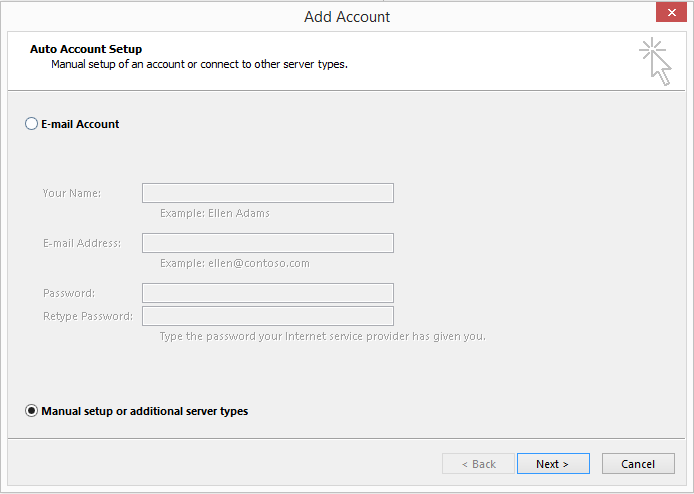
  • Start MS Outlook. Open the File menu and click Add Account. Select the Manual setup or additional server types checkbox and press Next.
email account settings 3
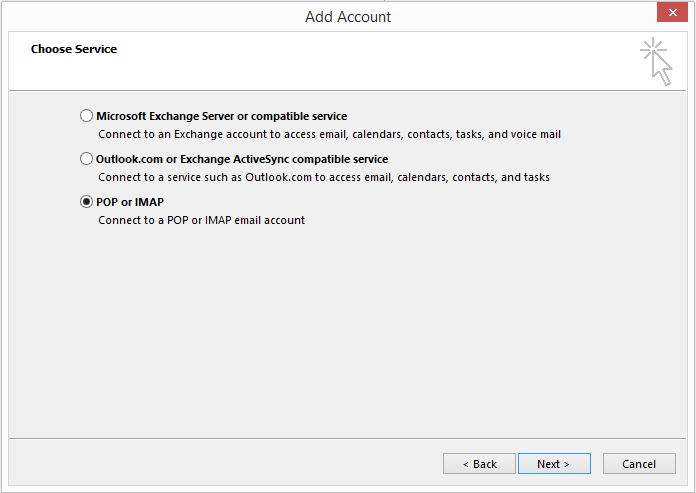
  • On the next page, you will be prompted to choose a service (account) type. Mark the POP or IMAP checkbox and press Next.
email account settings 4
  • Enter the following email connection settings:

Your Name: Give your account a name (for example, John Smith)
Email Address: Enter your AwardSpace.com email account’s full address (for example, name@yourdomain.com)
Account Type: IMAP
Incoming mail server: mboxhosting.com (if you are on a free plan, please use free.mboxhosting.com)
Outgoing mail server (SMTP): mboxhosting.com (if you are on a free plan, please use free.mboxhosting.com)
User Name: name@yourdomain.com
Password: The password for name@yourdomain.com
Remember password: Must be checked
Require logon using Secure Password Authentication (SPA): Must be unchecked

email account settings 5

Note: Please make sure you replace name@yourdomain.com with your AwardSpace.com email account!

  • Next, click the More Settings button and open the Outgoing Server tab.
email account settings 6

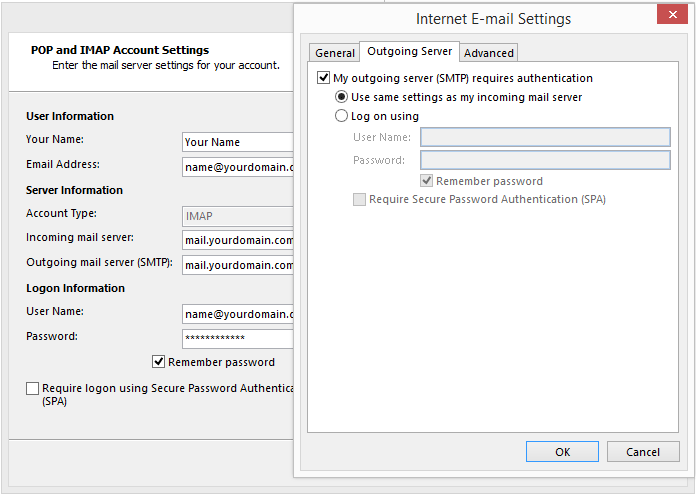
Tick the My outgoing server (SMTP) requires an authentication checkbox. Choose “Use the same settings as my incoming mail server” and press OK.

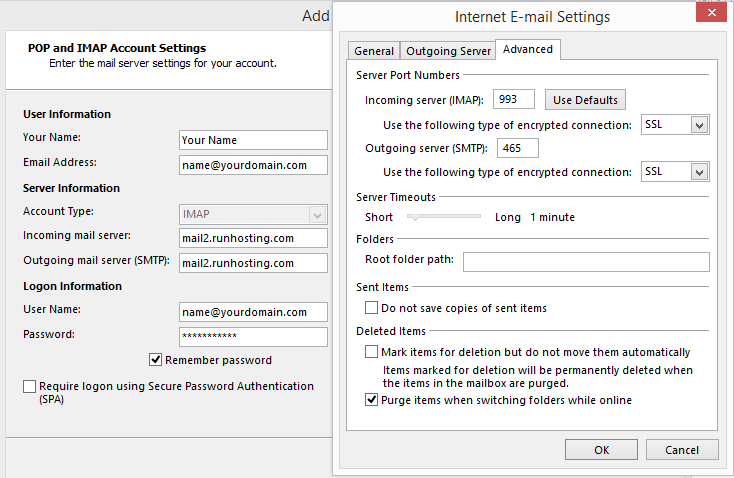
Note: If you wish to connect to your mail server securely (over SSL), open the Advanced tab and change the IMAP and SMTP server ports, to 993 and 465 respectively. Next, click OK and change the outgoing and incoming address to mboxhosting.com (if you’re on a free hosting plan, you should configure free.mboxhosting.com).

email account settings 8
  • Click Next to finalize the setup.

Congratulations! You have successfully configured your email account in MS Outlook.

Was this post helpful?

i

Relevant tags:

Connect

Latest posts:

How to Install a MediaWiki Skin

In MediaWiki, skins determine the visual appearance of your wiki website. Skins define how content is presented to users and include such settings for the overall website layout, typography, color scheme, and more. By default, when you install MediaWiki, the platform...

How to Create a Page in MediaWiki

Creating pages in MediaWiki is а core feature that allows you to add content to your MediaWiki website. Whether you are adding details for a project, contributing to a knowledge base, or anything else, learning how to create a page in MediaWiki is crucial for your...

How to Install MediaWiki Extensions

Now that you have installed MediaWiki and learned how to log in to the CMS, it is time to extend MediaWiki's functionality via extensions. MediaWiki extensions are sets of files that add various types of functionality to your MediaWiki website. You can use extensions...

How to Log In to MediaWiki

After you install MediaWiki, it is time to log in to the platform, so you can start working on your new MediaWiki website. To log in, you must open the MediaWiki login page and enter your credentials. Doing so will open the platform’s admin panel. In the following...

How to Install MediaWiki

You can quickly install MediaWiki on any of the AwardSpace web hosting plans. This includes our free web hosting, shared hosting, as well as advanced services such as semi-dedicated hosting and VPS hosting. You can install MediaWiki in a matter of minutes, whichever...


Create a website for free!


Free forever

Our Support Team is Here to Help


If you need any questions answered, don't hesitate and contact us. Click the button below and follow the instructions. You can expect an answer within an hour.


Contact AwardSpace


iNewest knowledge base articles

How to Install a MediaWiki Skin

In MediaWiki, skins determine the visual appearance of your wiki website. Skins define how content is presented to users and include such settings for the overall website layout, typography, color scheme, and more. By default, when you install MediaWiki, the platform...

How to Create a Page in MediaWiki

Creating pages in MediaWiki is а core feature that allows you to add content to your MediaWiki website. Whether you are adding details for a project, contributing to a knowledge base, or anything else, learning how to create a page in MediaWiki is crucial for your...

How to Install MediaWiki Extensions

Now that you have installed MediaWiki and learned how to log in to the CMS, it is time to extend MediaWiki's functionality via extensions. MediaWiki extensions are sets of files that add various types of functionality to your MediaWiki website. You can use extensions...

How to Log In to MediaWiki

After you install MediaWiki, it is time to log in to the platform, so you can start working on your new MediaWiki website. To log in, you must open the MediaWiki login page and enter your credentials. Doing so will open the platform’s admin panel. In the following...

How to Install MediaWiki

You can quickly install MediaWiki on any of the AwardSpace web hosting plans. This includes our free web hosting, shared hosting, as well as advanced services such as semi-dedicated hosting and VPS hosting. You can install MediaWiki in a matter of minutes, whichever...

How to Install an Elgg Theme

After you have installed Elgg core and logged in to the admin dashboard, you can search for themes that can help you customize your new website. Elgg themes are a set of files that help you customize the appearance of your website. Via themes, you can modify website...

Even more web tutorials

Check out our web hosting knowledge base and the WordPress tutorials to learn more, and be better prepared for your website creation and maintenance journey.