How to Enable the cURL PHP Extension

Home » Knowledge Base » Control Panel » PHP Settings » How to Enable the cURL PHP Extension

Enabling the cURL PHP extension is essential for many web applications and APIs, allowing your server to communicate with other servers. At AwardSpare, we understand the importance of ensuring your PHP environment is set up correctly to support these functionalities. This guide will walk you through the steps to enable the cURL extension via your hosting tools, ensuring a smooth setup process.

Step-by-Step Instructions

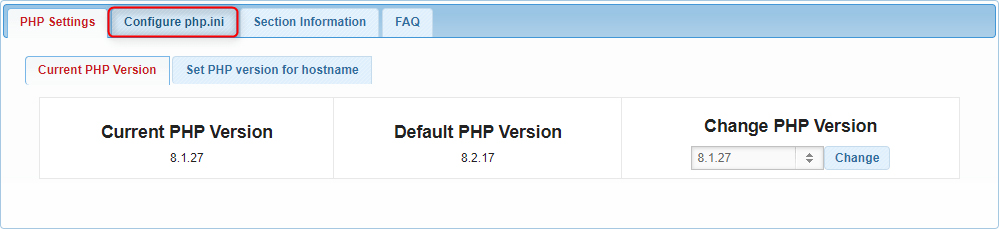
  1. Log in to your AwardSpace account and navigate to the PHP Settings menu.The PHP Settings menu in the hosting control panel.
  2. Enter the php.ini configuration options that are available in the PHP settings section.The menu in which you configure the PHP settings.
  3. Locate the following line in the php.ini file:
    ;extension=curl
    The disabled cURL extension within the PHP ini file.
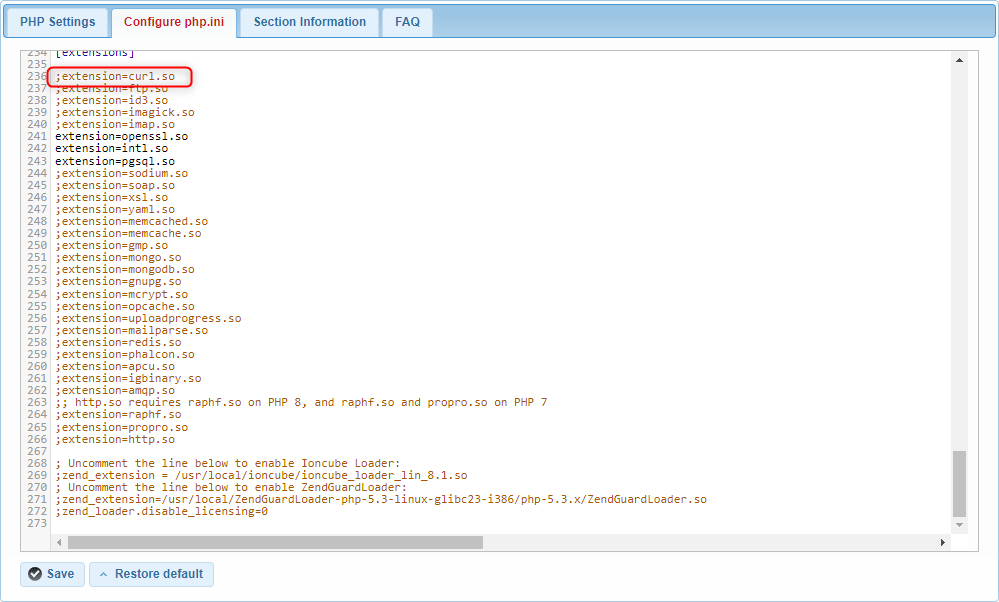
  4. Enable the cURL extension by removing the semicolon (;) at the beginning of the line.
    extension=curl
    The enabled cURL extension within the PHP ini file.
  5. After editing the file, save your changes.


Important Note
: If you change your PHP version, you need to re-enable the cURL extension. Each PHP version has its own php.ini file, and the changes made to one version do not carry over to another. Follow the same steps outlined above to enable cURL for the new PHP version.

Conclusion

Enabling the cURL extension in PHP is a straightforward process that involves accessing your hosting tools, editing the php.ini file, and saving your changes. At AwardSpare, we aim to provide clear and concise guides to help you manage your web hosting environment efficiently. Remember to re-enable cURL whenever you update your PHP version to maintain the uninterrupted functionality of your web applications.

For any further assistance or inquiries, feel free to reach out to our support team. We’re here to help!

Was this post helpful?

i

Relevant tags:

Connect

Latest posts:

How to Upload Files in Zenphoto

Knowing how to upload files in Zenphoto is a fundamental skill. In this guide, we share how to go through the process and manage your project and media library quickly and easily.   Step 1: Log in to Zenphoto The first step in the process is to log in to...

How to Back Up your TYPO3 Project

In this article, we outline the step-by-step process for backing up your TYPO3 project, ensuring that all your data, settings, and other essential information are safely stored. Regardless of your level of expertise, this method is simple to follow and provides...

How to Install Themes in TYPO3

Learning how to install themes in TYPO3 is essential, as it enables you to personalize your website fully. Whether you are working on a personal blog or a complex business website, the process of installing a theme in TYPO3 is the same. In this article, we share how...

How to Add Extensions to TYPO3

TYPO3 is a versatile platform that allows you to customize it any way you wish. One of TYPO3's strengths is the so-called extensions that enable you to add any kind of functionality to your website. In this article, we share how to add extensions to TYPO3. What are...

How to Add a Page in TYPO3

TYPO3 is a versatile platform that offers numerous features and an intuitive interface. If you're just getting started with the CMS, one of the first tasks you'll likely complete is creating a new page for your website. In this guide, we showcase how to do so and...


Create a website for free!


Free forever

Our Support Team is Here to Help


If you need any questions answered, don't hesitate and contact us. Click the button below and follow the instructions. You can expect an answer within an hour.


Contact AwardSpace


iNewest knowledge base articles

How to Upload Files in Zenphoto

Knowing how to upload files in Zenphoto is a fundamental skill. In this guide, we share how to go through the process and manage your project and media library quickly and easily.   Step 1: Log in to Zenphoto The first step in the process is to log in to...

How to Back Up your TYPO3 Project

In this article, we outline the step-by-step process for backing up your TYPO3 project, ensuring that all your data, settings, and other essential information are safely stored. Regardless of your level of expertise, this method is simple to follow and provides...

How to Install Themes in TYPO3

Learning how to install themes in TYPO3 is essential, as it enables you to personalize your website fully. Whether you are working on a personal blog or a complex business website, the process of installing a theme in TYPO3 is the same. In this article, we share how...

How to Add Extensions to TYPO3

TYPO3 is a versatile platform that allows you to customize it any way you wish. One of TYPO3's strengths is the so-called extensions that enable you to add any kind of functionality to your website. In this article, we share how to add extensions to TYPO3. What are...

How to Add a Page in TYPO3

TYPO3 is a versatile platform that offers numerous features and an intuitive interface. If you're just getting started with the CMS, one of the first tasks you'll likely complete is creating a new page for your website. In this guide, we showcase how to do so and...

How to Use Modules in TYPO3

TYPO3 is a CMS based on a modular architecture, meaning that users can use various built-in tools and add-ons to manage content, other users, configurations, and more. In this guide, we share how to use modules in TYPO3, so you get the most out of them.   What...

Even more web tutorials

Check out our web hosting knowledge base and the WordPress tutorials to learn more, and be better prepared for your website creation and maintenance journey.