How to log into my website and start developing it?

Home » Knowledge Base » Hosting Basics » How to log into my website and start developing it?

In order to start creating your website, after you’ve chosen a hosting plan, a domain name, and a website-building tool, you have to log into the newly created website and start developing it. There are, of course, some exceptions to the rule of logging in. Like, for example, if you are creating a website from scratch by writing the code, there is no place for you to log in. On the other hand, most website building tools, are creating a basic website, on top of which you are building your specific one.

Logging into your website to start developing it generally depends on the platform or system you’re using. Here’s a general guide to help you get started with some common scenarios:


1. Website Builder

Log in to your hosting account.  Use the login option at the top right corner of the navigation menu. You’ll need your username and password.

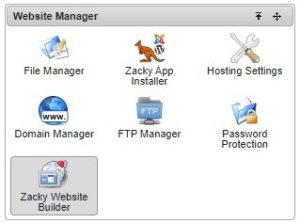
Access the Dashboard: Once logged in, you’ll see a control panel where you have to find and select the Zacky Website Builder.

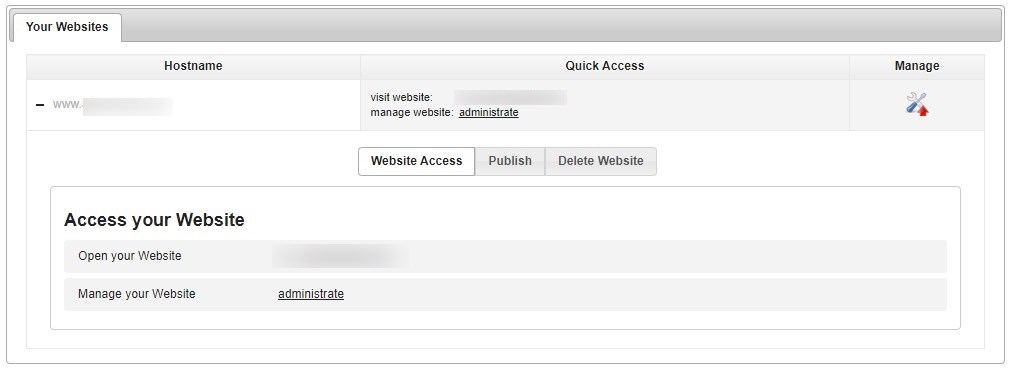
Now that you’ve chosen the Zacky Website Builder, you’ll find yourself on a new page. On the second (lower) part of the screen, you will see a list of your websites, that are connected to the Zacky Website Builder. Alternatively, there is a button to create a new one.

If you’ve already connected your domain name to the website builder, you’ll see it in the list, and should just click the “administrate” button. That will lead you to the drag-and-drop website builder, where you can start creating your website.


2. Content Management Systems (CMS) like WordPress

As every CMS has its way of logging in, we’ll only cover how it generally works.

If you need specific directions, for your chosen Content Management System, please refer to our article on How to log in to your CMS Admin Panel.

Every CMS has an Admin URL that you need to enter in your browser to reach the admin panel (Dashboard).

For example, WordPress uses the /wp-admin/ slug, right after your domain name.

It looks like this:

https://www.mywordpresswebsite.com/wp-admin

No matter what CMS and what Admin URL you are using, after you’ve entered the log in page, you need to enter your username and password.

You will be redirected to the CMS Dashboard and will be able to manage content, install plugins, and customize themes.


3. Custom Built Websites

As mentioned above, the custom build websites, do not have a dashboard (at least not by default). Although you can create files, and write code inside AwardSpace’s Control Panel, the best way to build a custom website is, naturally, using a specialized software to do so.

Once, you’ve build the website, you can deploy it on our servers, by using a so-called File transfer protocol (FTP).

Related: What is FTP and FTP Client?


General Tips for Logging in your Website

  • Credentials: Ensure you have the right login credentials. If you’ve forgotten them, use the “Forgot Password” feature typically available on the login page.
  • Secure Connection: Always make sure you’re using a secure connection (https) when entering your login information.
  • Documentation: Refer to the specific platform’s help or documentation section for detailed instructions tailored to their system.


If you encounter issues or need specific instructions for a platform not mentioned here, feel free to open a ticket and ask our Technical Support Team for direction and help.

Related: How to contact the Technical Support Team

Was this post helpful?

i

Relevant tags:

Connect

Latest posts:

How to Access the AwardSpace Terms of Services

When you sign up for any of the AwardSpace hosting services, it is always a good idea to read our Terms of Service carefully. At AwardSpace, we want each user to know and understand their rights, responsibilities, and the scope of our services. Our Terms of Service...

How to Add Dynamic Fields in Vtiger

Vtiger is a versatile CMS that you can use for free with all AwardSpace hosting plans. The CMS offers numerous options to manage your online business, workflows, and team roles. Among other useful tweaks, Vtiger also provides you with dynamic fields and layouts that...

How to Add Tags in Vtiger

Tags in Vtiger grant you the possibility to quickly and efficiently organize and retrieve records. Tags work like labels, allowing you to distribute leads, contacts, opportunities, tickets, and other entries into different categories based on a set of criteria. What...

How to Set Up User Roles in Vtiger

User roles in Vtiger are an important feature that enables you to control access and determine how your team members interact with the system. By tweaking user roles, you can set up permissions, control access levels, and make sure that sensitive business information...

How to Install Extensions on Vtiger

Vtiger is a versatile open-source platform that helps you with managing your business processes - streamline customer relationships, manage sales, manage your team, and more. One of the platform's great features is the ability to add new functionalities by installing...


Create a website for free!


Free forever

Our Support Team is Here to Help


If you need any questions answered, don't hesitate and contact us. Click the button below and follow the instructions. You can expect an answer within an hour.


Contact AwardSpace


iNewest knowledge base articles

How to Access the AwardSpace Terms of Services

When you sign up for any of the AwardSpace hosting services, it is always a good idea to read our Terms of Service carefully. At AwardSpace, we want each user to know and understand their rights, responsibilities, and the scope of our services. Our Terms of Service...

How to Add Dynamic Fields in Vtiger

Vtiger is a versatile CMS that you can use for free with all AwardSpace hosting plans. The CMS offers numerous options to manage your online business, workflows, and team roles. Among other useful tweaks, Vtiger also provides you with dynamic fields and layouts that...

How to Add Tags in Vtiger

Tags in Vtiger grant you the possibility to quickly and efficiently organize and retrieve records. Tags work like labels, allowing you to distribute leads, contacts, opportunities, tickets, and other entries into different categories based on a set of criteria. What...

How to Set Up User Roles in Vtiger

User roles in Vtiger are an important feature that enables you to control access and determine how your team members interact with the system. By tweaking user roles, you can set up permissions, control access levels, and make sure that sensitive business information...

How to Install Extensions on Vtiger

Vtiger is a versatile open-source platform that helps you with managing your business processes - streamline customer relationships, manage sales, manage your team, and more. One of the platform's great features is the ability to add new functionalities by installing...

How to Log in to Vtiger

Vtiger is a versatile platform that allows you to manage your business processes from a single place. It helps you organize customer data, optimize workflows, and improve team collaboration from a handy dashboard that is instantly available once you install the...

Even more web tutorials

Check out our web hosting knowledge base and the WordPress tutorials to learn more, and be better prepared for your website creation and maintenance journey.