Remove the Comment Section of WordPress Posts

Home » Knowledge Base » Design Tools » WordPress » Remove the Comment Section of WordPress Posts

There are multiple reasons that might make you decide to remove the comment section of your WordPress website. For instance, you might want to have a cleaner design for your posts, or you might experience a significant spam inflow. Also, a viable reason for removing the comment section is the that you feel like the content you write does not need a comment section.

NB! Even if you decide to disable the comments on your posts, it is always a good idea to let the users of your website engage with the content in some way. Even if that is to let you know what they think via an email.

The following are the three steps that you need to take to remove the comment section.


Step 1: Log in Your WordPress Website

Naturally, if you want to change something on your WordPress website, the first thing you have to do is to log in the WordPress Dashboard.

Doing so is easy. And if you are thinking of disabling the comments on your website, you most probably know how to do it.  Yet, here is a refresher:

Go to yourdomainname.com/wp-admin -> fill in the credentials -> click Log in.

If you need more in-depth directions, please refer to our article.


Step 2: Go to the Discussion Options Menu

Once you’ve logged in, navigate yourself to the discussion options. To do so, hover over the Settings button in the sidebar menu. In the sub-menu that will show-up click Discussion.

How to Remove Comments from WordPress


Step 3: Disable the Comment Section

When the Discussion settings page opens, you might find all the available options a bit daunting. However, since our goal is to disable the comment section, there’s just one key option you need to focus on. This crucial setting is conveniently located at the top of the page.

Specifically, we’re referring to the option labeled “Allow people to post comments on new articles.”

Uncheck this box to achieve your objective.

Disable Comments on WordPress

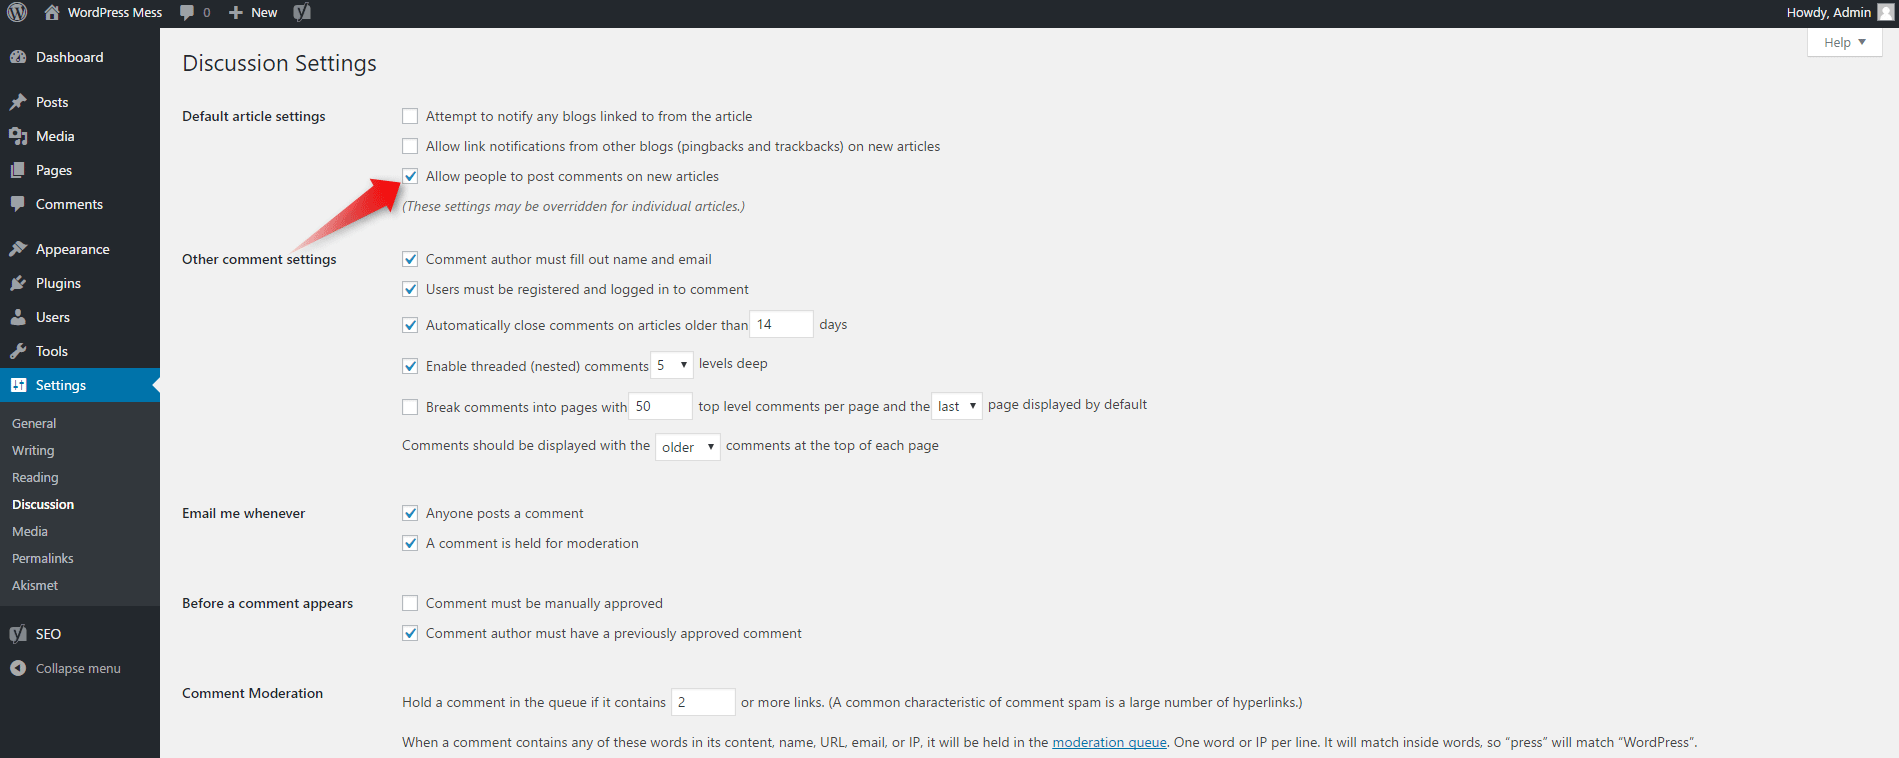
You’re all set! Comments will no longer appear on your website.

Note: As indicated just beneath the option we adjusted, “These settings may be overridden for individual articles.” This means that, despite the general settings, you have the flexibility to enable comments for specific pages or posts if desired. Let’s explore how to make those adjustments.


If you need more in-depth directions, and to find out how to remove the comment section for a specific post or page, check our previously published article on How to Disable Comments in WordPress

If you feel like you are ready to go further in the CMS, feel free to browse our WordPress Tutorials section.


Was this post helpful?

i

Relevant tags:

Connect

Latest posts:

How to Check My Auto Renewals

To check your AwardSpace hosting plan auto-renewals, first log in to the admin dashboard. Then, head to Wallet, within the Orders & Invoices section:   After that, click the Auto Renewals tab, where you can check any relevant information about your hosting...

How to Check My Payment Requests

To check your payment requests, first log in to the AwardSpace hosting panel. Then, head to Wallet within the Orders & Invoices category:   Then, click the Payment Requests tab. There, you can browse all the information you need about your...

How to Check My Invoices

To check your invoices in AwardSpace, first log in to the hosting panel. From there, head to Invoices within the Orders & Invoices category:   From this place, you can browse order references, payment orders, payment types, order dates, and various...

How to Check My Wallet Flow

To check your wallet flow, first log in to the AwardSpace hosting panel. Then, click on Wallet within Payments & Invoices:   After that, click the Wallet Flow tab. This is where you can see details about your wallet flaw:

How to Check My Incomplete Orders

To check your incomplete orders, first log in to the AwardSpace hosting panel. Then, head to Incomplete Orders within Orders & Invoices:   Then, you can check the list within the Incomplete Orders tab:  


Create a website for free!


Free forever

Our Support Team is Here to Help


If you need any questions answered, don't hesitate and contact us. Click the button below and follow the instructions. You can expect an answer within an hour.


Contact AwardSpace


iNewest knowledge base articles

How to Check My Auto Renewals

To check your AwardSpace hosting plan auto-renewals, first log in to the admin dashboard. Then, head to Wallet, within the Orders & Invoices section:   After that, click the Auto Renewals tab, where you can check any relevant information about your hosting...

How to Check My Payment Requests

To check your payment requests, first log in to the AwardSpace hosting panel. Then, head to Wallet within the Orders & Invoices category:   Then, click the Payment Requests tab. There, you can browse all the information you need about your...

How to Check My Invoices

To check your invoices in AwardSpace, first log in to the hosting panel. From there, head to Invoices within the Orders & Invoices category:   From this place, you can browse order references, payment orders, payment types, order dates, and various...

How to Check My Wallet Flow

To check your wallet flow, first log in to the AwardSpace hosting panel. Then, click on Wallet within Payments & Invoices:   After that, click the Wallet Flow tab. This is where you can see details about your wallet flaw:

How to Check My Incomplete Orders

To check your incomplete orders, first log in to the AwardSpace hosting panel. Then, head to Incomplete Orders within Orders & Invoices:   Then, you can check the list within the Incomplete Orders tab:  

How to Check My Canceled Orders

To check your canceled orders with AwardSpace, first, log in to the hosting panel. Then, head to Caneled Orders within the Orders & Invoices category:   Then, within the Canceled Orders tab, you can browse your canceled orders with AwardSpace:

Even more web tutorials

Check out our web hosting knowledge base and the WordPress tutorials to learn more, and be better prepared for your website creation and maintenance journey.