
Our MySQL servers offer great flexibility when it comes to importing and exporting SQL files to and from your database. We allow three distinct ways of achieving this task. You can either use the Database Manager sectionof our Control Panel, you may opt to use the phpMyAdmin utility instead, or you can connect straight to our servers via an SSH connection and issue MySQL commands to import/export your SQL file.
In this article, we will focus on that third option and will show you how you can use Terminal or a similar application to establish an SSH connection. Then, we will go over how to use the MySQL command line to import or export your data.
Am I Allowed to Use the SSH Functionality?
Before you can start issuing MySQL commands, you first need to connect to our servers via a secure shell (SSH) connection. As a security precaution, we allow only our web hosting servers to communicate with the database servers. In other words, you cannot issue MySQL commands from your own computer directly to the database server. Instead, you need to log onto our web server first and then issue your MySQL commands from there. The only exception to this rule is our array of VPS hosting packages.
SSH is a fairly advanced feature and as such, it is not available on all of our shared hosting plans. You need to be using either our Web Pro Plus or Max Pack Plus hosting plan. Clients who own a Semi-Dedicated web server can also take full advantage of our SSH functionality. SSH is currently not available on our Basic and free website hosting service.
How Do I Connect to the Server via SSH?
To connect to our servers via SSH, follow the steps below:
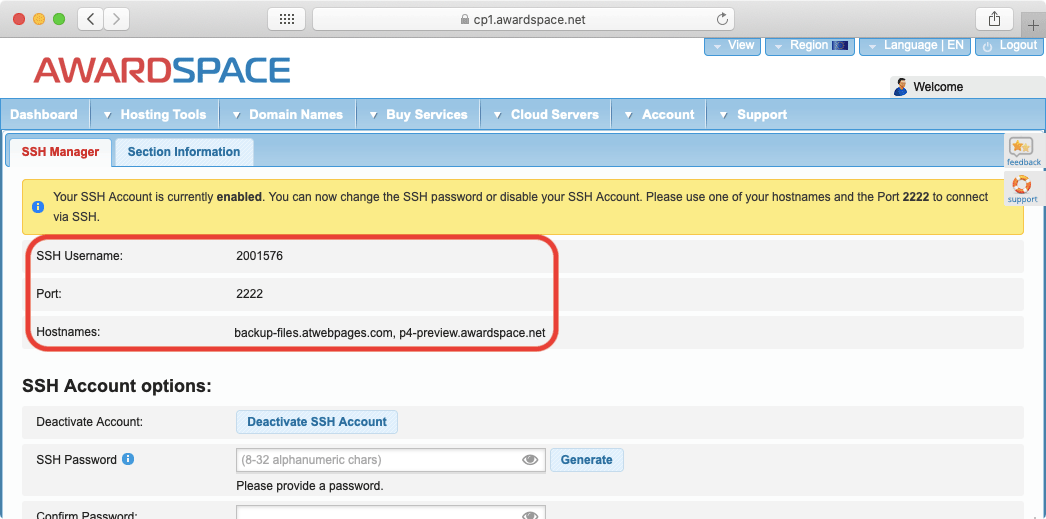
- Go to the SSH Manager section of our Control Panel.
- Make a note of the SSH information that is provided. If you are new to the SSH Manager and you do not have an SSH account set up yet, you can refer to our SSH Manager overview article for guidance.
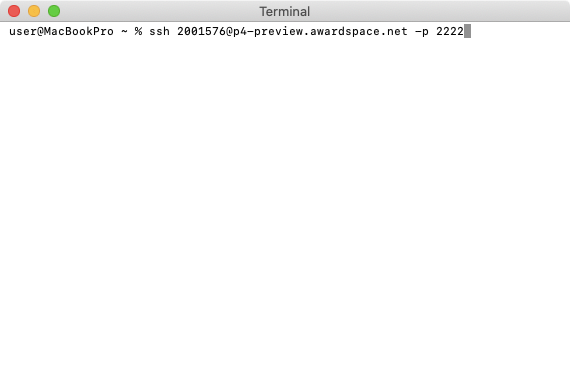
- Once you have obtained your SSH information, open your SSH client of choice. Linux and macOS users can use the Terminal app. If you are running the latest version of Windows 10, you can use Windows PowerShell to initiate an SSH connection. Or, if your Windows installation is outdated, you can use a third party SSH client like PuTTY.
- Enter the following command into your SSH client. Be sure to replace
client-idwith your Client ID number andserver-addresswith one of the hostnames found in the SSH Manager section of the Control Panel.
ssh client-id@server-address -p 2222
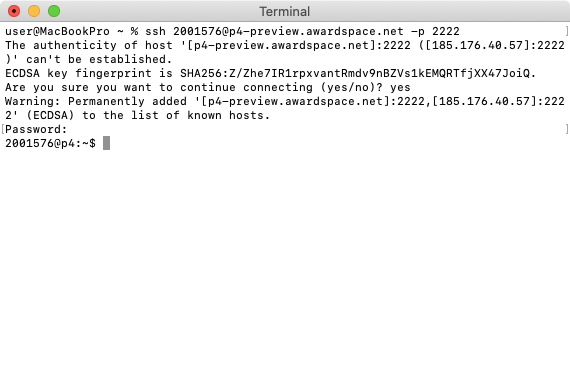
- Execute the connection command and enter your SSH password when prompted. If the connection is successfully established, you should be connected to our server and you should see your Client ID number as your user ID.
What Is the SSH MySQL Command to Export a Database?
In order to create a MySQL dump (backup) of your database, you need to issue the following MySQL command:
mysqldump -h database-address -u database-user -p database-name > save-directory
The above command has four placeholders that you need to update before you can successfully run it:
- you need to replace
database-addresswith the address of the database server that is powering your MySQL database. - you need to replace
database-userwith the username for your database. - you need to replace
database-namewith the name of your database. On our shared platform, thedatabase-useranddatabase-nameare always identical. - lastly, you need to replace
save-directorywith the full path to the place where the database dump should be saved.
If you need help filling in the first three placeholders, you can consult our in-depth Database Manager guide where we outline where the required information can be found.
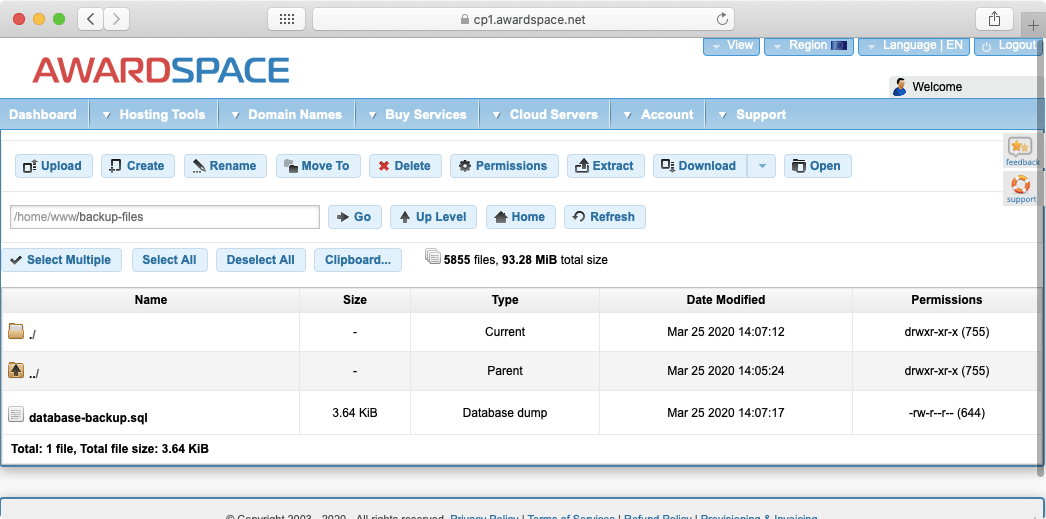
As for the save-directory placeholder, you need to choose a folder where the database backup should be saved. In our example, we will create a new folder called backup-files using the File Manager section and we will store the MySQL dump there:
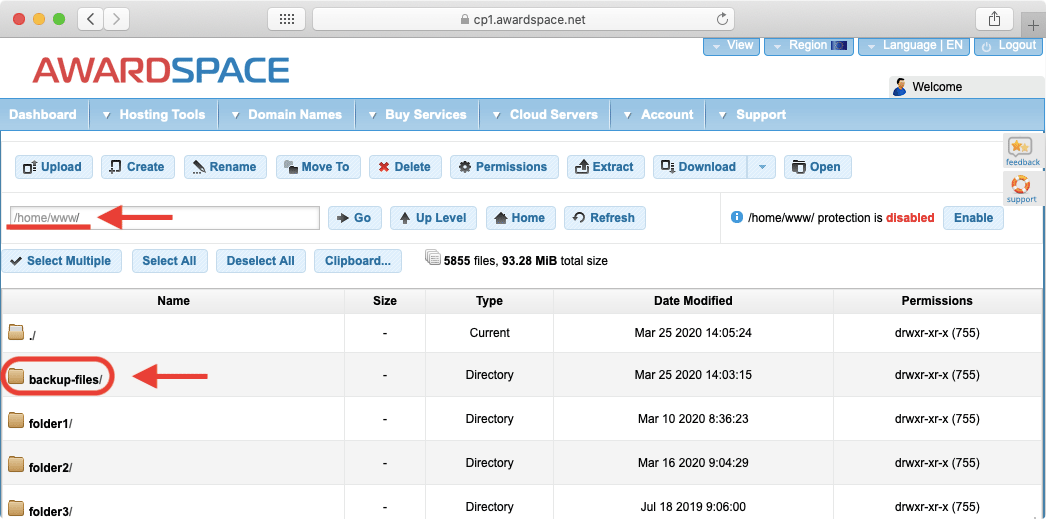
We are creating the backup-files folder in the /home/www/ directory, so the full directory path should be /home/www/backup-files/. But as part of the full path we also need to include the name of the MySQL dump file that we wish to create. In our case, we will be calling the MySQL dump database-backup.sql. When we append this file name to the full directory, we get the complete version of the save path for our backup: /home/www/backup-files/database-backup.sql
With all of the information now available, the Terminal command for exporting our example database is complete:
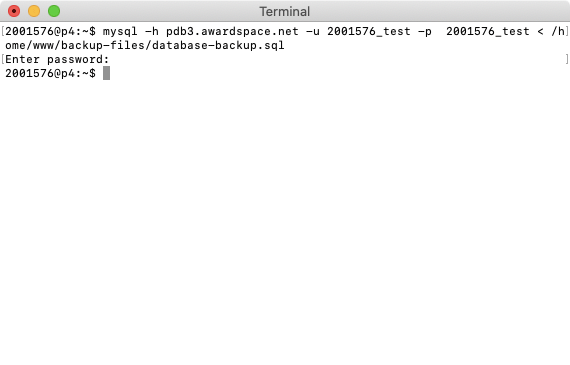
mysqldump -h pdb3.awardspace.net -u 2001576_test -p 2001576_test > /home/www/backup-files/database-backup.sql
When we press Enter, the command will be executed and we will be prompted to enter the password for the MySQL database that we are exporting:

Like most Linux commands, we do not get any sort of confirmation message that the command was carried out successfully. Instead, we can regard the lack of any error messages as proof that everything has gone well. And sure enough, if we check the File Manager we can find our shiny new MySQL backup ready and waiting:
What Is the SSH MySQL Command to Import a Database?
You can use the following MySQL command to import an .SQL file:
mysql -h database-address -u database-user -p database-name < file-location
For the above command to work, you need to fill the four placeholder values with the correct information:
- you need to replace
database-addresswith the address of the server that is powering your MySQL database. - you need to replace
database-userwith the username that is assigned to your database. - you need to replace
database-namewith the name of your database. On our shared platform, thedatabase-useranddatabase-nameare always identical. - finally, you need to replace
file-locationwith the full path to the .SQL dump on your shared hosting account.
You can obtain the necessary database information through the Database Manager section of our Control Panel. If you are not sure exactly which piece of information you need, or if you do not have a database created yet, you can read through our Database Manager overview.
The file-location must be a local file path for your .SQL dump. In our example, we have created a folder called backup-files in the /home/www/ directory and we have placed the our .SQL file called database-backup.sql inside. So our full path will be /home/www/backup-files/database-backup.sql.
With all of the above information at hand, our final MySQL command to import an .SQL file looks like this:
mysql -h pdb3.awardspace.net -u 2001576_test -p 2001576_test < /home/www/backup-files/database-backup.sql
When we run the command by pressing Enter, we will be asked for our database password. Upon providing the database password as well, the command will be executed:
Conclusion
Admittedly, using the MySQL command line to import and export SQL files may not be the easiest approach to take. Tools like our Database Manager and phpMyAdmin offer one-click solutions that accomplish the same task. What sets these MySQL commands apart is the fact that they give you greater control over the entire process. Additionally, such commands can easily be integrated into comprehensive scripts that can run at set intervals and perform a full backup of your hosting account.
