How to create an auto-responder?

Home » Knowledge Base » Control Panel » Email Manager » How to create an auto-responder?

In this tutorial, we’re going to walk you through the process of configuring an automatic email reply on your AwardSpace mail server.


What is an Automatic Responder?

An automatic email responder (also known as an auto-reply) is a tool that automatically generates a response to an incoming email. Automatic replies are mainly used to inform senders that you are on vacation or out of your workplace.


How Would I Go About Setting Up an Automatic Reply?

Configuring an automatic reply can be achieved by following the below steps:

  1. Sign in to your AwardSpace website hosting account.
  2. Visit the Email Accounts page.
  3. Select the E-mail Accounts tab.
  4. Click on your mailing address. (Do not have an e-mail account yet? You can easily set up one by following the steps in our Creating an Email Account tutorial.)
  5. Open the Auto Responders menu.

email responder 1

Fill in the following information:

  • Auto Responder Name – Give your automatic reply a name.
  • Auto Responder Type – From the drop-down menu list, select your automatic reply type. You can choose from Out of office, Away from office (Holidays), Email received (Will be contacted shortly), Message received (24-48h response), Inquiry received (Will be responded soon), or Custom Auto Responder. The last option allows you to set up a custom automatic reply, without using the premade auto-responder templates.
  • Auto Responder Text – In the Auto Responder Text box, you’re able to customize the text of a template or add your own text message.
  • Use for all incoming e-mails? – If you would like our mail server to send an auto-response to all of the people who send you a message, click Yes. Otherwise, click No and specify your Auto Responder criteria.

email responder 2

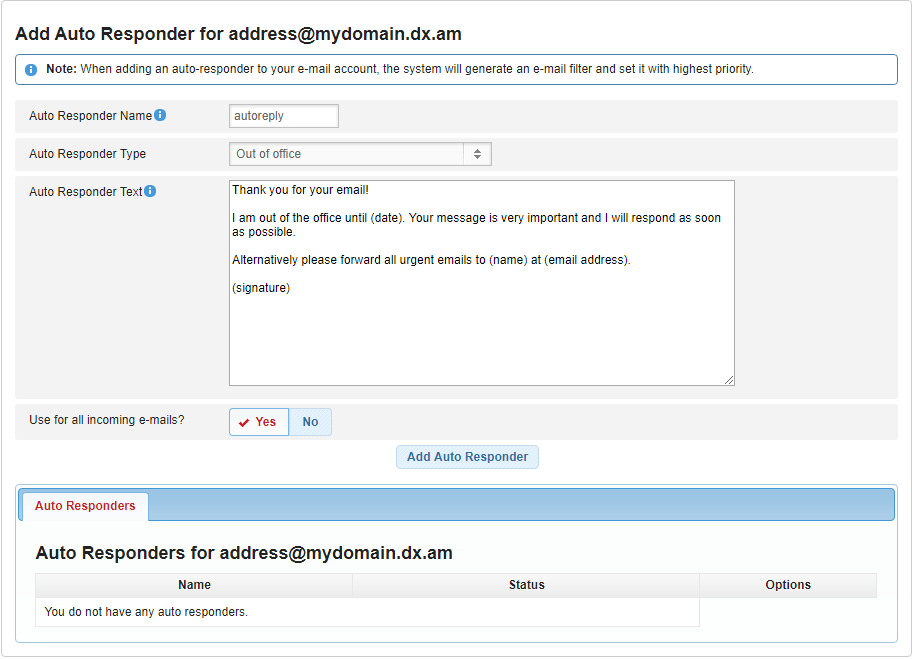
To finalize the setup, click Add Auto Responder.

Congratulations! Your automatic email responder has been created successfully and is ready to use.

Was this post helpful?

i

Relevant tags:

Connect

Latest posts:

How to Install Themes in Zenphoto

Zenphoto allows you to customize the look of your online gallery by incorporating various themes. If you are interested in learning how to install themes in Zenphoto, then this article will guide you through the entire process - from browsing and downloading, through...

How to Add Tags in Zenphoto

Tags are a handy feature for organizing your Zenphoto images and albums. Tags not only help you and your visitors navigate more easily and quickly through your website, but also improve its discoverability in search engines, and can also help you generate more organic...

How to Upload Files in Zenphoto

Knowing how to upload files in Zenphoto is a fundamental skill. In this guide, we share how to go through the process and manage your project and media library quickly and easily.   Step 1: Log in to Zenphoto The first step in the process is to log in to...

How to Back Up your TYPO3 Project

In this article, we outline the step-by-step process for backing up your TYPO3 project, ensuring that all your data, settings, and other essential information are safely stored. Regardless of your level of expertise, this method is simple to follow and provides...

How to Install Themes in TYPO3

Learning how to install themes in TYPO3 is essential, as it enables you to personalize your website fully. Whether you are working on a personal blog or a complex business website, the process of installing a theme in TYPO3 is the same. In this article, we share how...


Create a website for free!


Free forever

Our Support Team is Here to Help


If you need any questions answered, don't hesitate and contact us. Click the button below and follow the instructions. You can expect an answer within an hour.


Contact AwardSpace


iNewest knowledge base articles

How to Install Themes in Zenphoto

Zenphoto allows you to customize the look of your online gallery by incorporating various themes. If you are interested in learning how to install themes in Zenphoto, then this article will guide you through the entire process - from browsing and downloading, through...

How to Add Tags in Zenphoto

Tags are a handy feature for organizing your Zenphoto images and albums. Tags not only help you and your visitors navigate more easily and quickly through your website, but also improve its discoverability in search engines, and can also help you generate more organic...

How to Upload Files in Zenphoto

Knowing how to upload files in Zenphoto is a fundamental skill. In this guide, we share how to go through the process and manage your project and media library quickly and easily.   Step 1: Log in to Zenphoto The first step in the process is to log in to...

How to Back Up your TYPO3 Project

In this article, we outline the step-by-step process for backing up your TYPO3 project, ensuring that all your data, settings, and other essential information are safely stored. Regardless of your level of expertise, this method is simple to follow and provides...

How to Install Themes in TYPO3

Learning how to install themes in TYPO3 is essential, as it enables you to personalize your website fully. Whether you are working on a personal blog or a complex business website, the process of installing a theme in TYPO3 is the same. In this article, we share how...

How to Add Extensions to TYPO3

TYPO3 is a versatile platform that allows you to customize it any way you wish. One of TYPO3's strengths is the so-called extensions that enable you to add any kind of functionality to your website. In this article, we share how to add extensions to TYPO3. What are...

Even more web tutorials

Check out our web hosting knowledge base and the WordPress tutorials to learn more, and be better prepared for your website creation and maintenance journey.