How to Install MediaWiki

Home » Knowledge Base » Design Tools » MediaWiki » How to Install MediaWiki

You can quickly install MediaWiki on any of the AwardSpace web hosting plans. This includes our free web hosting, shared hosting, as well as advanced services such as semi-dedicated hosting and VPS hosting. You can install MediaWiki in a matter of minutes, whichever you choose.

Also, keep in mind that you don’t need a dedicated MediaWiki hosting plan – any of the AwardSpace hosting services is tailored to run MediaWiki flawlessly and smoothly, no matter the size or requirements of your website.

Read also: How to Choose the Best Web Hosting Plan for Your Site


How to Install MediaWiki

To install the CMS, first, you need to sign up for an AwardSpace hosting plan.

After that, you should log in to the AwardSpace hosting control panel. From there, you can manage all your website, hosting, and domain settings.

To be able to install MediaWiki, you should first register a domain name. Read how:

How to Register a Domain


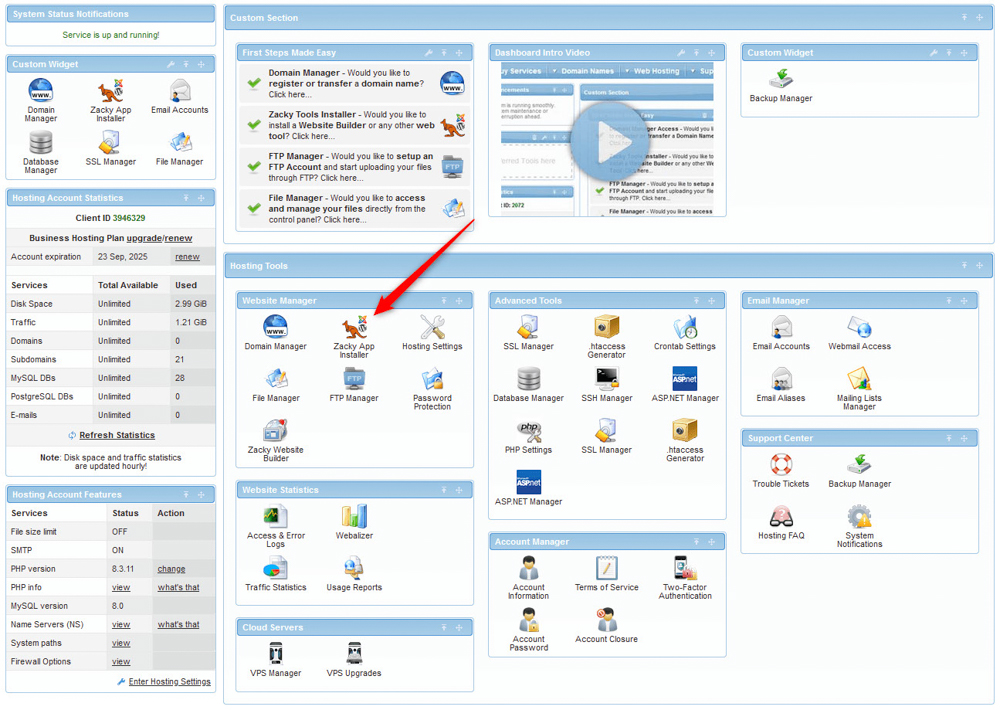
After you enter the hosting panel, head to Zacky App Installer, located within the Website Manager box:

How to install MediaWiki CMS on AwardSpace


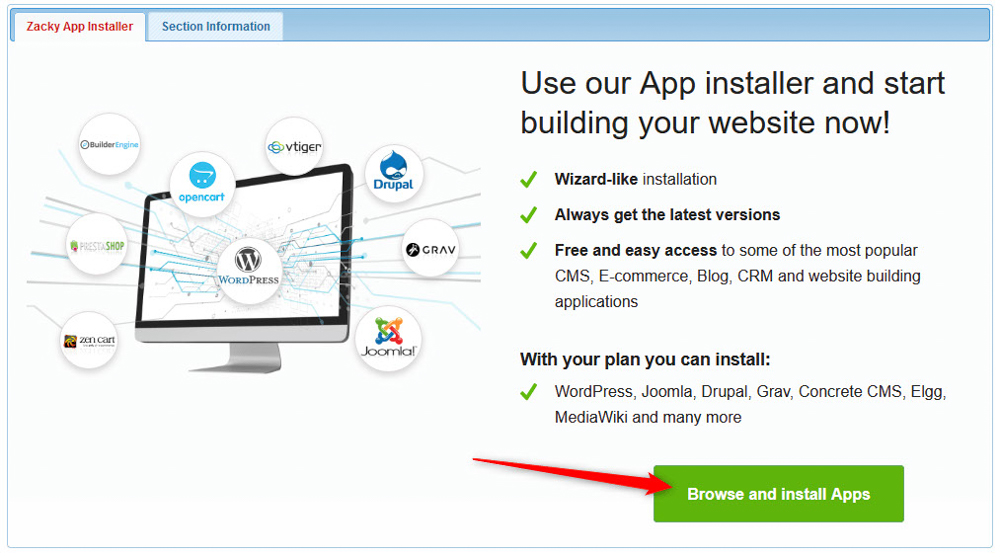
Once you click the Zacky App Installer, a new page will open – when you see it, click the green Browse and Install Apps:

Browse the AwardSpace CMS platforms to find and install MediaWiki


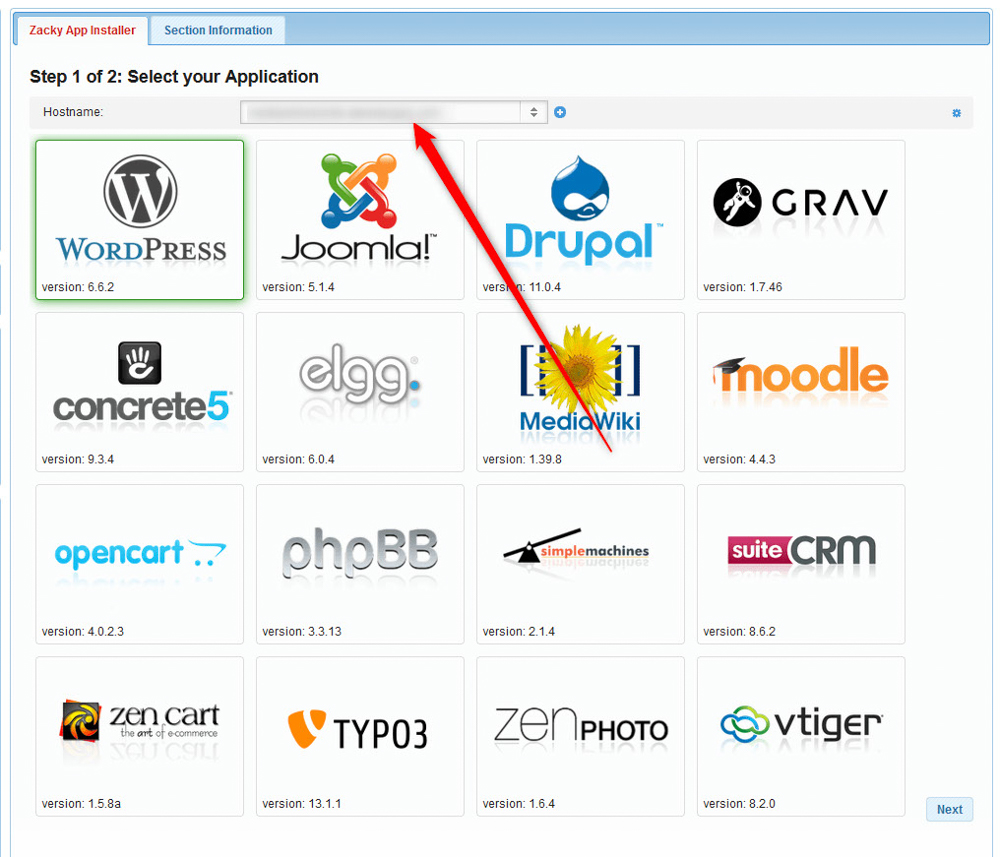
Then, from the new page that will open, select a domain name that would be associated with the MediaWiki installation:

Select a Domain Name to use with your MediaWiki website


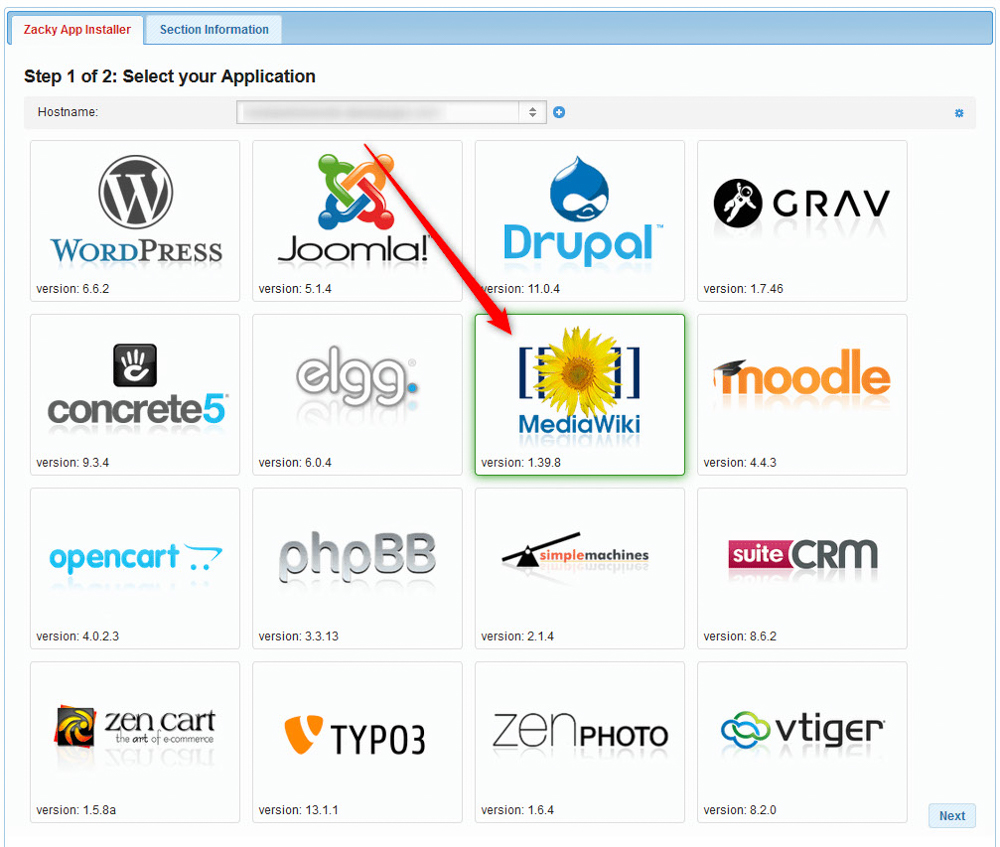
Then, click on the MediaWiki icon:

Select MediaWiki CMS to install


Now, choose a username, password, and email for your MediaWiki installation. Remember these credentials – you will use these to log in to your newly created MediaWiki website:

Choose credentials for your MediaWiki website


Once you fill in these credentials, follow the instructions and install the platform. The process should take no more than 2 minutes.

After the installation is complete, AwardSpace will send an email to the address you selected when choosing credentials.

Read the email thoroughly, as it contains important information about your AwardSpace account and login details about your MediaWiki website. It is advisable to save this email for future reference.

Now you have managed to install MediaWiki successfully.

Was this post helpful?

i

Relevant tags:

Connect

Latest posts:

How to Upload Files in Zenphoto

Knowing how to upload files in Zenphoto is a fundamental skill. In this guide, we share how to go through the process and manage your project and media library quickly and easily.   Step 1: Log in to Zenphoto The first step in the process is to log in to...

How to Back Up your TYPO3 Project

In this article, we outline the step-by-step process for backing up your TYPO3 project, ensuring that all your data, settings, and other essential information are safely stored. Regardless of your level of expertise, this method is simple to follow and provides...

How to Install Themes in TYPO3

Learning how to install themes in TYPO3 is essential, as it enables you to personalize your website fully. Whether you are working on a personal blog or a complex business website, the process of installing a theme in TYPO3 is the same. In this article, we share how...

How to Add Extensions to TYPO3

TYPO3 is a versatile platform that allows you to customize it any way you wish. One of TYPO3's strengths is the so-called extensions that enable you to add any kind of functionality to your website. In this article, we share how to add extensions to TYPO3. What are...

How to Add a Page in TYPO3

TYPO3 is a versatile platform that offers numerous features and an intuitive interface. If you're just getting started with the CMS, one of the first tasks you'll likely complete is creating a new page for your website. In this guide, we showcase how to do so and...


Create a website for free!


Free forever

Our Support Team is Here to Help


If you need any questions answered, don't hesitate and contact us. Click the button below and follow the instructions. You can expect an answer within an hour.


Contact AwardSpace


iNewest knowledge base articles

How to Upload Files in Zenphoto

Knowing how to upload files in Zenphoto is a fundamental skill. In this guide, we share how to go through the process and manage your project and media library quickly and easily.   Step 1: Log in to Zenphoto The first step in the process is to log in to...

How to Back Up your TYPO3 Project

In this article, we outline the step-by-step process for backing up your TYPO3 project, ensuring that all your data, settings, and other essential information are safely stored. Regardless of your level of expertise, this method is simple to follow and provides...

How to Install Themes in TYPO3

Learning how to install themes in TYPO3 is essential, as it enables you to personalize your website fully. Whether you are working on a personal blog or a complex business website, the process of installing a theme in TYPO3 is the same. In this article, we share how...

How to Add Extensions to TYPO3

TYPO3 is a versatile platform that allows you to customize it any way you wish. One of TYPO3's strengths is the so-called extensions that enable you to add any kind of functionality to your website. In this article, we share how to add extensions to TYPO3. What are...

How to Add a Page in TYPO3

TYPO3 is a versatile platform that offers numerous features and an intuitive interface. If you're just getting started with the CMS, one of the first tasks you'll likely complete is creating a new page for your website. In this guide, we showcase how to do so and...

How to Use Modules in TYPO3

TYPO3 is a CMS based on a modular architecture, meaning that users can use various built-in tools and add-ons to manage content, other users, configurations, and more. In this guide, we share how to use modules in TYPO3, so you get the most out of them.   What...

Even more web tutorials

Check out our web hosting knowledge base and the WordPress tutorials to learn more, and be better prepared for your website creation and maintenance journey.