Trouble Tickets

Home » Knowledge Base » Control Panel » Support Center » Trouble Tickets

There is one thing that every hosting company needs to help their clients and this is customer support and an easy method for communication.

In this article, we will go through the Trouble Ticket section, as this is the main method for communicating with our technical support.


How to access the Trouble Ticket section?

To access the Trouble Ticket section follow the steps below:

  1. Access the hosting control panel
  2. From the main menu navigate to Support and click on Trouble Ticket
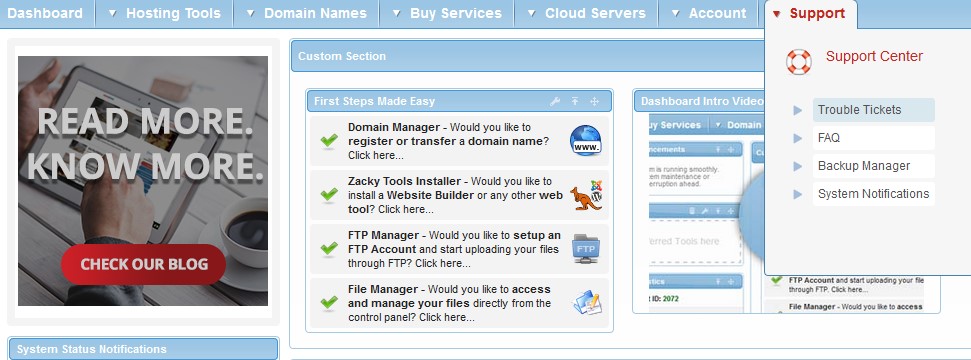
  3. Once there you will see the form for submitting Tickets


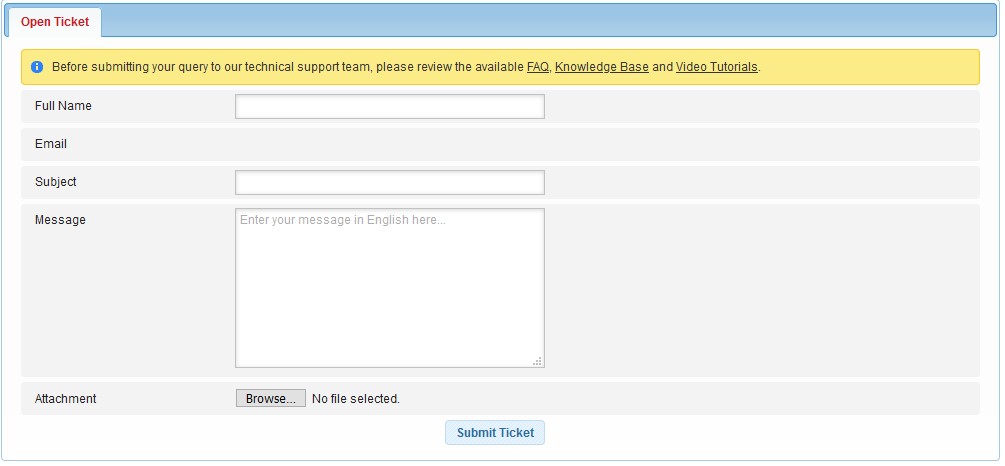
How to submit a ticket?

Once inside the Trouble Ticket section, you will see a form that you must fill out accordingly:

  • Full Name – Here you need to enter your name
  • Subject – Enter a subject that would describe your issue (e.g. Cannot establish FTP connection)
  • Message – Provide detailed information regarding your issue
  • Attachment – If necessary you can attach a screenshot of the issue which you are experiencing

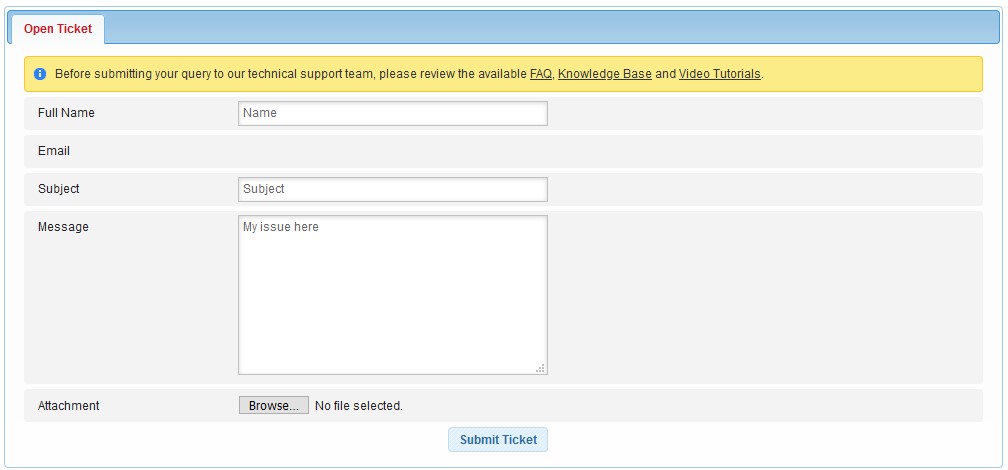
Once you are ready click the Submit Ticket button.


How to check a ticket that you have already submitted?

Under the form in the Trouble Ticket section, you will notice three tabs:

  • All Tickets
  • Open Tickets
  • Closed Tickets

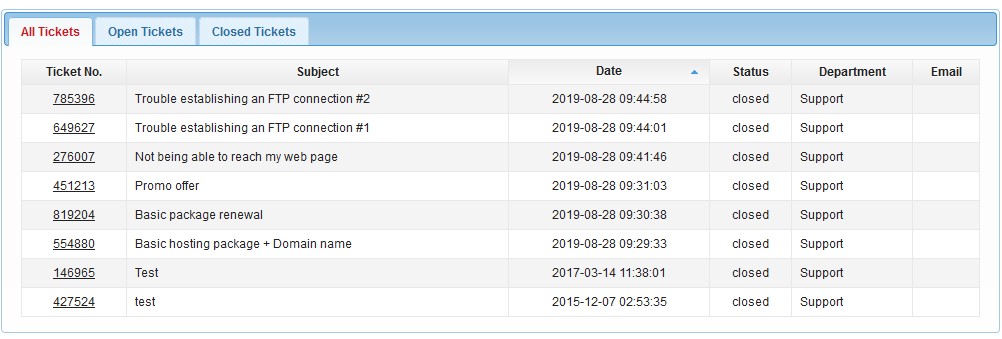
Every ticket that you open can be viewed in the All Tickets tab. Tickets are sorted by date. If you would like to view only the currently active tickets, you can choose the Open Tickets tab and for the closed tickets, the Closed Tickets tab.

The table that contains your tickets has the following information:

  • Ticket Number – The ID which we assign to each ticket
  • Subject – The subject which you have assigned to your ticket
  • Date – The date when your ticket was created
  • Status – The status of your ticket that lets you know if the ticket is closed or opened
  • Department – The department which is currently handling your ticket
  • Email – The email assigned for your ticket (usually this is the email which you have used to create the account)

To check a specific ticket simply click on the Ticket Number. This will open the ticket in a new tab. This way you can check if our Technical Support has replied.


Important things to know when submitting a Ticket

When submitting a Ticket you should know the following:

  • Please do not submit multiple tickets for a single issue. Keeping the conversation for your issue in a single ticket would help our Technical Support resolve the issue faster
  • Please note that by default tickets to which we have replied are automatically closed regardless if the issue is resolved. This is done so we can better track the tickets submitted by our users. If the issue was not resolved all you need to do is reopen the ticket
  • When submitting a ticket make sure to provide us with all the necessary information. For example, if you are not able to connect via FTP you should include the details which you are using (hostname, username, port) and the error which you are receiving. Adding an attachment of the error which you receive would also assist us in resolving the problem
  • Before submitting a ticket please make sure to check our FAQ and Knowledge Base to see if we have a tutorial on how to fix the issue


How to open a closed ticket?

To reopen a ticket all you need to do is send a new reply to it. Please follow the steps to do that:

  1. Click on the ticket number to open the ticket in a new tab
  2. Scroll to the bottom of the ticket and enter your new message
  3. When ready click on Post Reply

Was this post helpful?

i

Relevant tags:

Connect

Latest posts:

How to Customize Menus in SuiteCRM

SuiteCRM grants you the option to customise your website menus and control what modules appear in them, how they are grouped and in what categories. This customisation can help you improve user workflow and reduce clutter, especially if you are working on a large...

How to Add Charts to the Sidebar in SuiteCRM

Àlthough SuiteCRM doesn't support adding charts directly to the sidebar, there is a simple method that you can use to achieve the effect. In this guide, we share how to do so.   How to Add Charts to the Sidebar in SuiteCRM The process is comprised of a few...

How to Add Subpanel Filters in SuiteCRM

SuiteCRM's subpanels can be very useful in various situations, such as showing related records (like contacts under an account). However, as your database grows, so does the scrolling time through unfiltered subpanels. Fortunately, you can add filters to subpanels, so...

How to Display Fields in Different Modes in SuiteCRM

SuiteCRM allows for various customisations of fields. Such are the Detail View, Edit View and List View. Understanding how to customise these is important for tailoring your SuiteCRM project to your preferences. Whether you are streaming data entries or are trying to...

How to Add Grouped Fields to the Record View in SuiteCRM

SuiteCRM offers great versatility when it comes to customising modules, including how fields are displayed on record views. One powerful feature is grouping fields within sections for better layout and user experience. In this article, we share how to group fields in...


Create a website for free!


Free forever

Our Support Team is Here to Help


If you need any questions answered, don't hesitate and contact us. Click the button below and follow the instructions. You can expect an answer within an hour.


Contact AwardSpace


iNewest knowledge base articles

How to Customize Menus in SuiteCRM

SuiteCRM grants you the option to customise your website menus and control what modules appear in them, how they are grouped and in what categories. This customisation can help you improve user workflow and reduce clutter, especially if you are working on a large...

How to Add Charts to the Sidebar in SuiteCRM

Àlthough SuiteCRM doesn't support adding charts directly to the sidebar, there is a simple method that you can use to achieve the effect. In this guide, we share how to do so.   How to Add Charts to the Sidebar in SuiteCRM The process is comprised of a few...

How to Add Subpanel Filters in SuiteCRM

SuiteCRM's subpanels can be very useful in various situations, such as showing related records (like contacts under an account). However, as your database grows, so does the scrolling time through unfiltered subpanels. Fortunately, you can add filters to subpanels, so...

How to Display Fields in Different Modes in SuiteCRM

SuiteCRM allows for various customisations of fields. Such are the Detail View, Edit View and List View. Understanding how to customise these is important for tailoring your SuiteCRM project to your preferences. Whether you are streaming data entries or are trying to...

How to Add Grouped Fields to the Record View in SuiteCRM

SuiteCRM offers great versatility when it comes to customising modules, including how fields are displayed on record views. One powerful feature is grouping fields within sections for better layout and user experience. In this article, we share how to group fields in...

How to Back Up Your SuiteCRM Project

Making regular backups of your SuiteCRM project is crucial. Backups help keep any kind of data safe, and also provide a quick recovery after a crash, hacking attack, or any user error. Because of how important backups are for your SuiteCRM website, in this article, we...

Even more web tutorials

Check out our web hosting knowledge base and the WordPress tutorials to learn more, and be better prepared for your website creation and maintenance journey.