
Most websites nowadays incorporate advanced functionality, such as sending a confirmation message when a visitor registers on the site, emailing password reset links in case of a lost password and providing people with a way to get in touch with the site owner via a contact form. All of these features have one thing in common – they utilize a mail server to send email messages. But sometimes things can go wrong and your mail script may not be able to send any messages at all. In this article, we will examine some of the more common reasons why a mail script might fail to send emails. We will primarily focus on how to fix a broken contact form, but most of these suggestions can be used to fix a general email-sending script as well.
Disclaimer: The suggestions, contained within this article, cover only the most common issues that can cause a contact form to malfunction. We cannot guarantee that following this guide will fix your broken contact form in every single case.
1. Make Sure That You Have Created an Email Account in Your Hosting Space.
Our first recommendation is to make sure that there is at least one email account present in the Email Accounts section of the Control Panel. An email account is required as it is used to authenticate you with the mail server every time you attempt to send a message.
In order to create an email account, you need to have an active web hosting plan. The good news is that mail account creation is supported on both our free web hosting and premium shared hosting subscriptions. In addition to an active hosting plan, a fully-qualified domain name is also required. You can purchase a premium domain name or you can use the Domain Manager section of the Control Panel to register a free .DX.AM domain name.
Once you have met the two criteria listed above, you can create an email account right from the Email Account section. If you have trouble creating an email account, you may refer to our guide on how to create an email address for your website.
2. Make Sure That One of Your Email Accounts Is Set up as a Default Mail Sender for Scripts.
In addition to having at least one email account in your hosting space, you need to make sure that one of your email accounts is designated as the default e-mail for sending messages via scripts. You can easily distinguish whether this option is enabled or not by heading to the Email Accounts section of the Control Panel and checking if one of the email accounts has the label default e-mail associated with it, as is shown in the screenshot below:
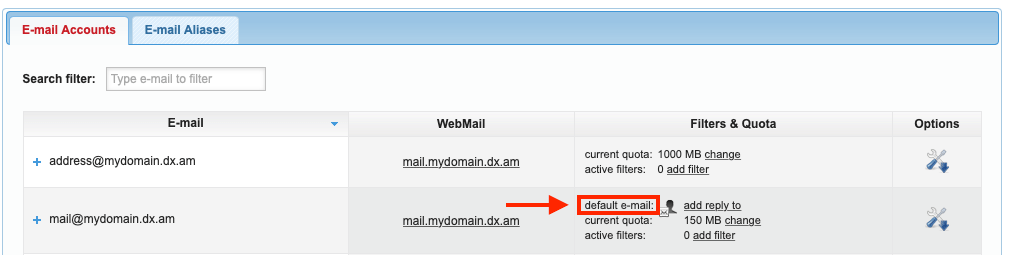
In case the default e-mail label is not present at all, or if you wish to change the email address that has the default e-mail label, follow the steps outlined below:
- Open the Email Accounts section of the Control Panel.
- Click on the email account which you would like to use to send messages via scripts.
- Open the Information tab.
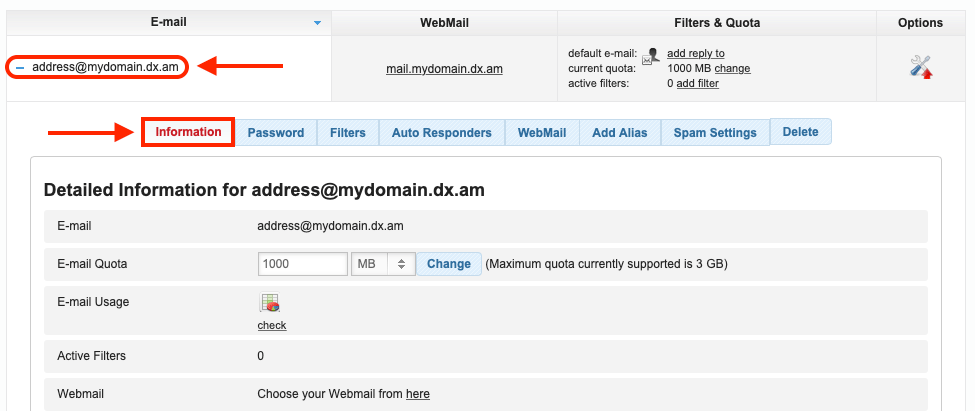
- Near the bottom of the Information tab, you will see a Set as Default for scripts option. Enable this option by clicking on the Set button.

3. Make Sure That You Have Not Exceeded Your Mail Sending Limits.
If your contact form used to function without issues in the past and then it suddenly stopped working it is possible that you have reached your mail-sending limits. Depending on the hosting plan you are using, a different mail-sending limit will apply to you:
- If you are using our free hosting service, you are allowed to send up to 31 messages each month. To increase your monthly sending limit, you should upgrade to one of our premium shared hosting packages. You can send up to 1000 messages per day with a paid shared hosting plan.
- If you are using a premium shared hosting plan already, you may be reaching the 1000 daily message limit. To further increase this limit, you can upgrade to Semi-Dedicated web hosting. Using a Semi-Dedicated server, you are allowed to send up to 2000 messages per day.
- If you are already using a Semi-Dedicated server and you are still reaching your mail-sending limits, you can upgrade to a Virtual Private Server package. When you use a VPS to send email messages, no sending limits will be imposed. Instead, your only consideration would be to get a VPS that is powerful enough to handle the volume of messages you are sending through it.
Note: in addition to the daily mail sending limits, some hosting plans also impose hourly limits in order to protect our mail servers from overload. To learn more about these limitations in greater detail, you should review the Terms of Service page for the hosting plan you are currently using.
4. Make Sure That the Mail() Function is Supplied to the Correct Headers.
Another fix you can try is to insert to following PHP code at the end of your broken contact form:
$myemail = 'your-email@your-domain.com';
$name = 'visitor-name';
$email = 'visitor-email@some-domain.com';
$subject = 'email-subject';
$message = 'email-message';

$headers = 'From: Contact Form <$myemail>\r\n';
$headers .= 'Reply-To: $name <$email>\r\n';

mail($myemail, $subject, $message ,$headers);
In order for the above code to work, you need to make the following adjustments:
- Ensure that you replace
your-email@your-domain.comon the first line of the PHP code with an email address that you have created in your hosting space. If you have not yet created an email address in the Email Accounts section of the Control Panel, you can follow our guide on how to create an email account. - On the second line, replace
visitor-namewith the name of the visitor. If your contact form does not collect the visitor’s name, you can write anything you like instead, like Contact Form for example. - On the third line, replace
visitor-email@some-domain.comwith the email address that your site visitor has provided. - On the fourth line, replace
email-subjectwith your preferred email subject. It can be something like Contact Form Submission from $name. - On the fifth line, you can customize the body of the email that will be sent to you by replacing the
email-messagetext. You will likely wish to include the message that was submitted through the contact form.
5. Contact Your External Mail Provider.
Your contact form can be powered by either our own mail service or an external mail provider of your choosing. If you are using the services of a third-party mail provider to power your contact form, it is recommended that you contact them and ensure that their mail servers are operational and are able to send email messages. You should also confirm that you are using the correct mail settings to connect to the external mail server.
6. Contact Your Web Developer for Further Assistance.
If your broken contact form is a part of a web application that you have purchased from a third-party developer, it may be a good idea to contact the developer directly regarding this issue. In most cases, the creators of the website software will be able to assist you in getting your contact form up and running.
7. Rebuild the Contact Form from the Group Up.
If our suggestions until this point have not been successful, you should consider rebuilding the broken contact form from the ground up. We have two excellent articles on the subject. You can either follow our article on how to create a contact form using the PHP Mail() function or you can check our article on how to build a contact form using PHPMailer 6. Both guides will provide you with a basic, yet fully operational, contact form.
8. Contact the AwardSpace Technical Support Team.
Our last recommendation is to contact the AwardSpace Technical Support Team. You can do so using the Trouble Tickets section of the Control Panel. The Support team will be able to offer assistance with basic mailing scripts and contact forms. If you are using a sophisticated contact form, developed by a third party, it is best to contact the original developers, as discussed earlier in this article.
Conclusion
Providing an easy way for your visitors to get in touch can benefit you regardless of the type of website you have. Whether it’s an online store, a portfolio site, or even just a site dedicated to your favorite hobby, a contact form will allow you to connect with your audience and may even lead to new opportunities. As such, we wholeheartedly recommend following the suggestions above in order to fix your broken contact form.
