
One of the easiest ways to build a loyal following for your website is to give your site visitors a quick and convenient way to get in touch with you. And while simply listing your email address on a contact page will get the job done, the experience will not be very seamless. Not to mention that the email address which you publish will be scraped by bots and you will find yourself on countless SPAM mailing lists.
A better solution is to integrate a contact form into your website. A contact form has two major advantages over giving your visitors your email address. On one hand, filling out a contact form is quicker and more convenient than opening a mail program and composing a message there. And on the other hand, you never share your email address publicly, thus protecting your own privacy. In this tutorial, we will show you how you can create a simple contact form using PHPMailer.
What Is the Difference Between PHPMailer and the PHP Mail() Function?
If you have spent any time researching how to create a PHP mailer script online, chances are that you have come across the terms PHPMailer and PHP Mail() function. These two terms sound remarkably similar, but in reality, they refer to different pieces of technology.
The PHP Mail() function is a part of the vanilla PHP installation and is available for use right out of the box. It is fully capable of powering a simple PHP mail script for a contact form. If you are interested in using the PHP Mail() function, you should check our article on how to create a working PHP Mail() script for a contact form. We also have an article that explains how to create a general-purpose mailing script that is powered by the PHP Mail() function.
PHPMailer, on the other hand, is a third-party library written in PHP, which makes the sending of email messages much easier. Moreover, it allows advanced functionality that is not found in the stock PHP Mail() function, such as the sending of attachments and using HTML/CSS to add custom formatting to your messages.
In this guide, we will focus on PHPMailer as the technology that will power our free email form script. More specifically, we will use the latest version of PHPMailer which at the time of writing is PHPMailer version 6.0.7. We will also provide a free download link for our PHP email contact form example.
What Are the Requirements for a PHPMailer Form to Send Email Messages Successfully?
We wish all of our clients to have successful websites regardless of the hosting plan they use. As a result, creating a contact form using PHPMailer is possible on all of our hosting plans, including our free hosting package. The only requirement is to have an email account created through the Email Accounts section of the Control Panel. This email account will act as the sender of the messages created through our free form-to-email script example.
In order to create an email account, you need to be hosting a fully-qualified domain name. You can opt to purchase a premium domain name or you can get a free .DX.AM domain name through the Domain Manager section of the Control Panel. If you are not sure how to use the Email Accounts section of the Control Panel, you can check our in-depth guide on how to create an email account.
How to Create a PHPMailer Contact Form?
Once you have a working email account in your hosting space, you can start building your PHPMailer form-to-email script. Follow along as we show you how to set up a PHP contact form on your website:
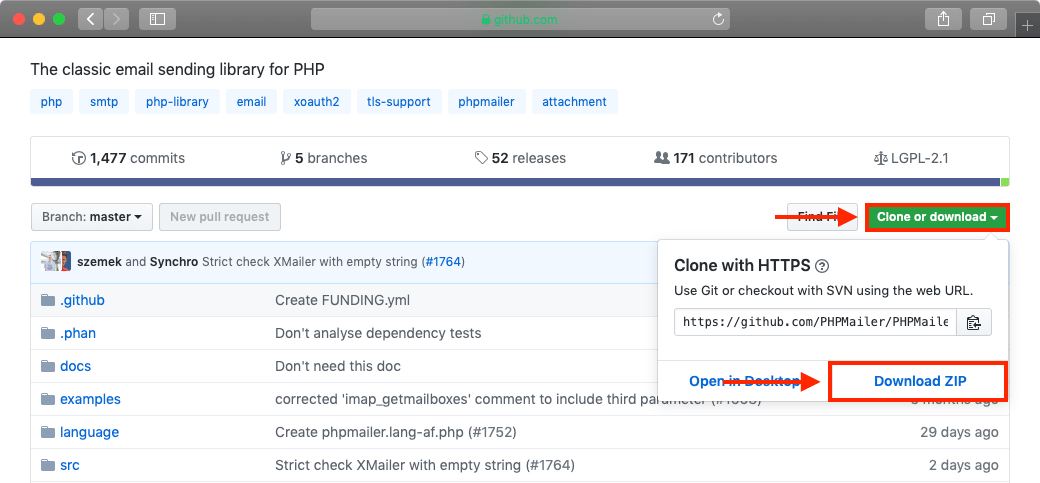
- Head over to the official Github page for the PHPMailer project.
- Click on the Clone or download button.
- Choose Download ZIP, as shown in the screenshot below:
- Once PHPMailer finishes downloading, extract the downloaded ZIP archive, so you have direct access to all files and folders contained therein.
- Open the File Manager section of the Control Panel.
- Double-click on your domain folder in order to open it.
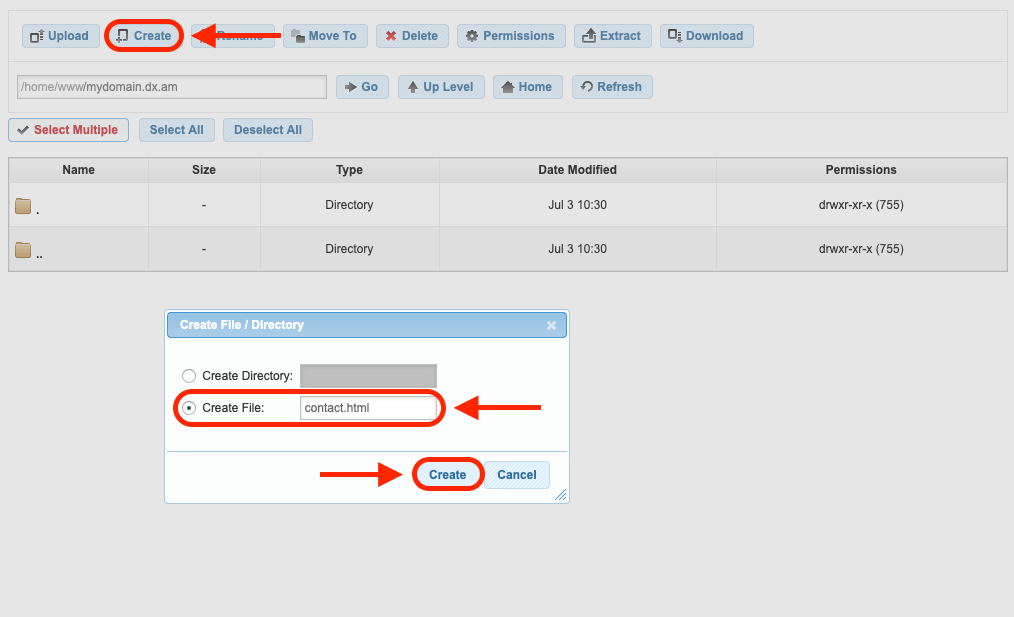
- Click on the Create button in order to make a new file. From the popup menu choose to create a file and name it contact.html as shown below:
- Double-click the newly created contact.html file in order to open it.
- Copy the code below and paste it inside of the contact.html file. This code will create a contact form page that your visitors will later fill in order to get in touch with you.
<html>
     <head>
         <title>
             Contact Form
         </title>
     </head>
     <body>
         <center>
             <font size="5">
             <b>Contact Form</b>
             <br/>
             <br/>
             </font>
             <form method="POST" action="mail-script.php">
                 Subject:
                 <input type="text" name="subject" size="20">
                 <br/>
                 <br/>
                 Name:
                 <input type="text" name="name" size="20">
                 <br/>
                 <br/>
                 E-mail:
                 <input type="email" name="email" size="20">
                 <br/>
                 <br/>
                 Message:
                 <br/>
                 <textarea rows="9" name="message" cols="30">
                 </textarea>
                 <br/>
                 <br/>
                 <input type="submit" value="Send" name="submit">
             </form>
         </center>
     </body>
 </html>
- Save your changes and close contact.html.
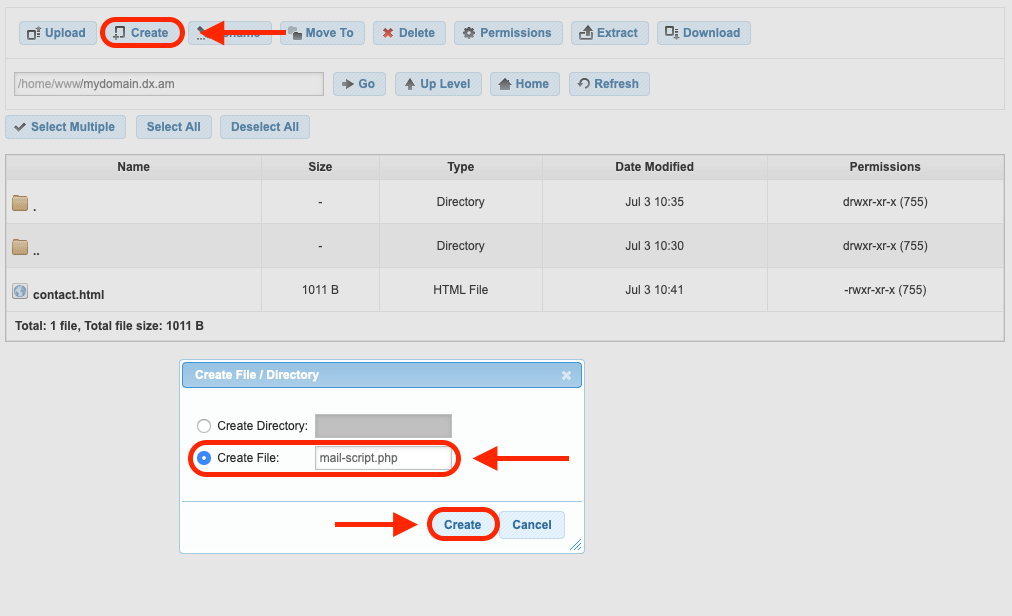
- Use the Create button one more time to make a new file. This time, call the file mail-script.php, as is shown in the screenshot below:
- Open the newly created mail-script.php file by double-clicking on it.
- Copy the code below and paste it into the mail-script.php file.
<?php

    use PHPMailer\PHPMailer\PHPMailer;
    use PHPMailer\PHPMailer\Exception;

    $myAwardSpaceEmail = "your-AwardSpace-email-goes-here";
    $myAwardSpaceEmailPassword = "your-AwardSpace-email-password-goes-here";
    $myPersonalEmail = "your-personal-email-goes-here";

    require './src/Exception.php';
    require './src/PHPMailer.php';
    require './src/SMTP.php';

    if(isset($_POST['submit'])) {

        $mail = new PHPMailer(true);

        $mail->SMTPDebug = 0;

        $mail->Host = 'smtp.mboxhosting.com';
        $mail->SMTPAuth = true;
        $mail->Username = $myAwardSpaceEmail;
        $mail->Password = $myAwardSpaceEmailPassword;
        $mail->SMTPSecure = 'tls';
        $mail->Port = 587;

        $mail->setFrom($myAwardSpaceEmail, 'Mailer');
        $mail->addAddress($myPersonalEmail);
        $mail->addReplyTo($_POST['email'], $_POST['name']);

        $mail->isHTML(true);
        $mail->Subject = $_POST['subject'];
        $mail->Body = $_POST['message'];

        try {
            $mail->send();
            echo 'Your message was sent successfully!';
        } catch (Exception $e) {
            echo "Your message could not be sent! PHPMailer Error: {$mail->ErrorInfo}";
        }

    } else {
        echo "There is a problem with the contact.html document!";
    }

?>
- Near the start of the file, you will notice the following three lines of code:
$myAwardSpaceEmail = "your-AwardSpace-email-goes-here";
$myAwardSpaceEmailPassword = "your-AwardSpace-email-password-goes-here";
$myPersonalEmail = "your-personal-email-goes-here";
These lines will need to be edited a bit:
- on the first line, you need to replace
your-AwardSpace-email-goes-herewith the email address that you previously created through the Email Account section of the Control Panel. - on the second line, you need to replace
your-AwardSpace-email-password-goes-herewith the password that you set for your AwardSpace-hosted email address (the one you entered on the previous line). Entering your password here is necessary so that you can authenticate yourself successfully with the mail server. If you are worried that including your password may expose it to your site visitors by accident, we would like to reassure you that PHP scripts are processed on the server only and are never sent to your visitors’ web browsers. - on the third line, you need to replace
your-personal-email-goes-herewith the email address where you would like to receive the emails generated by the contact form. If you wish, you can receive these emails in the inbox of your AwardSpace-hosted email.
- Once you have made the above changes, you can click on the Save button and close the mail-script.php file.
- Click the Create button. This time we will create a new directory called src as shown in the screenshot below:
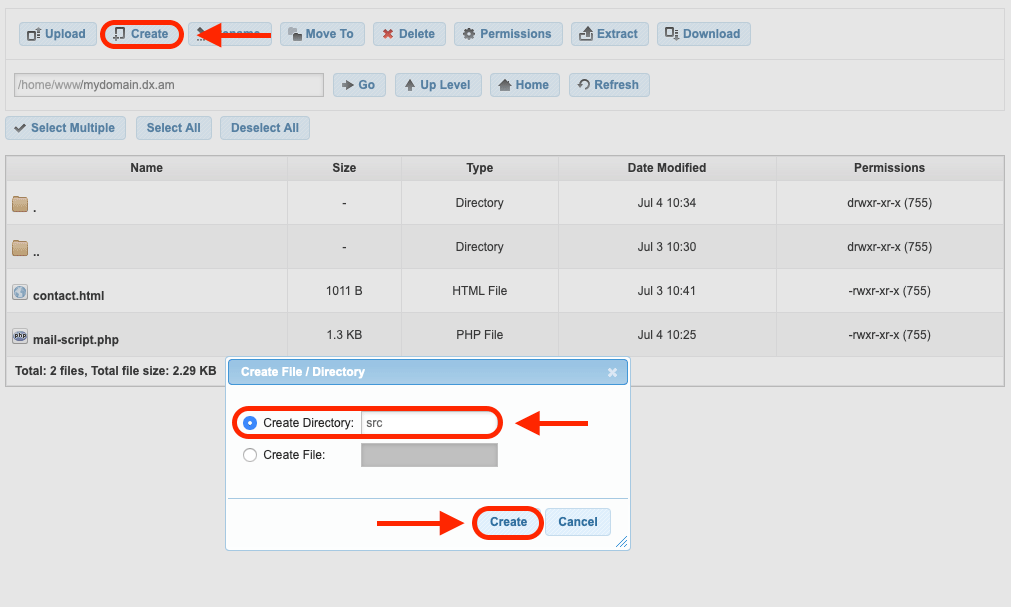
Important: in order for the contact form to work properly, make sure that the src folder is placed in the same directory as the contact.html and mail-script.php files.
- Double-click the newly created src directory in order to open it.
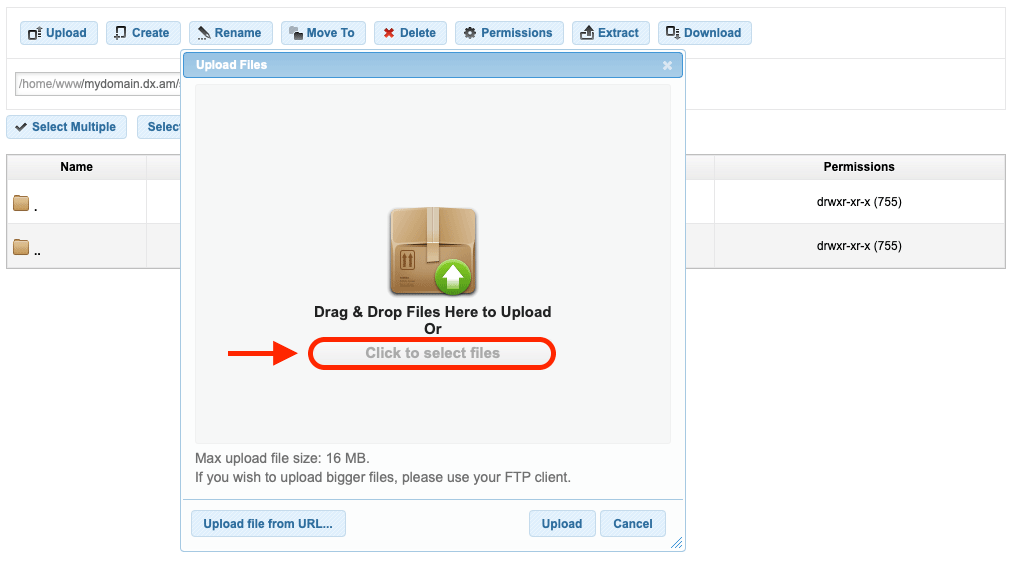
- Click on the Upload button in order to add files from your local computer.
- In the window that appears, click on the button that says Click to select files as shown in the screenshot below:
- A file picker window will pop up. Navigate to the place on your computer where you extracted the PHPMailer files (the action you performed in Step 4).
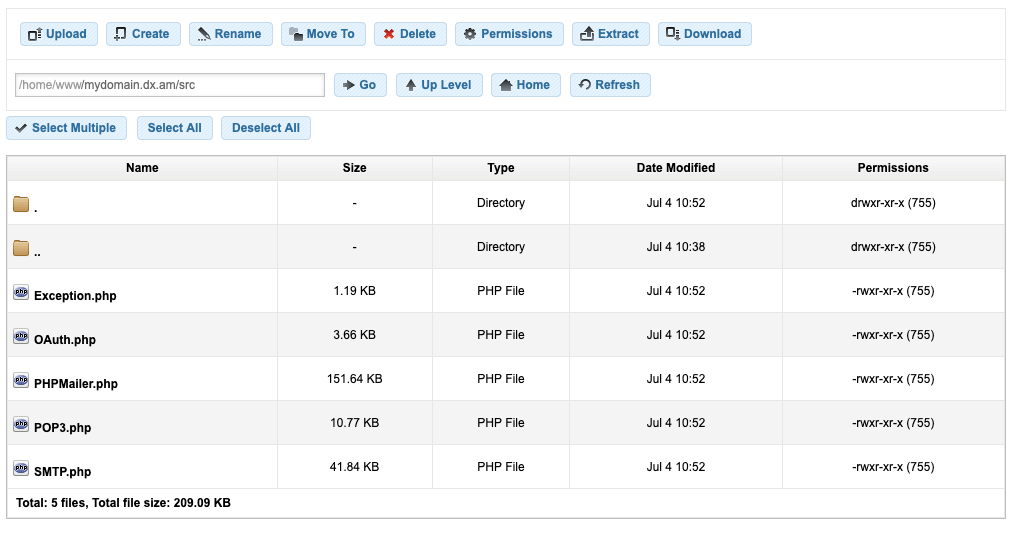
- Open the src directory contained within the extracted PHPMailer files on your computer. The src directory you should contain five files – Exception.php, OAuth.php, PHPMailer.php, POP3.php, and SMTP.php.
- Select all five files in the file picker window and choose to upload them.
- The files should now be added to the Upload window in our File Manager. Click on the Upload button in order to upload all five files at the same time.
- Close the Upload window. At this point the src directory in the File Manager should contain the five files as shown in the screenshot below:
- That’s it! At this point, you should have a fully functional PHP email script and HTML form! Continue reading to see how you can test your contact form.
How Do I Verify That the Free PHP Mailer Script Works as Expected?
Now that the free PHP email script and all accompanying files have been successfully uploaded, you can try testing your script. To do so, follow these steps:
- Open your web browser and navigate to the contact.html document. You can do so using the URL
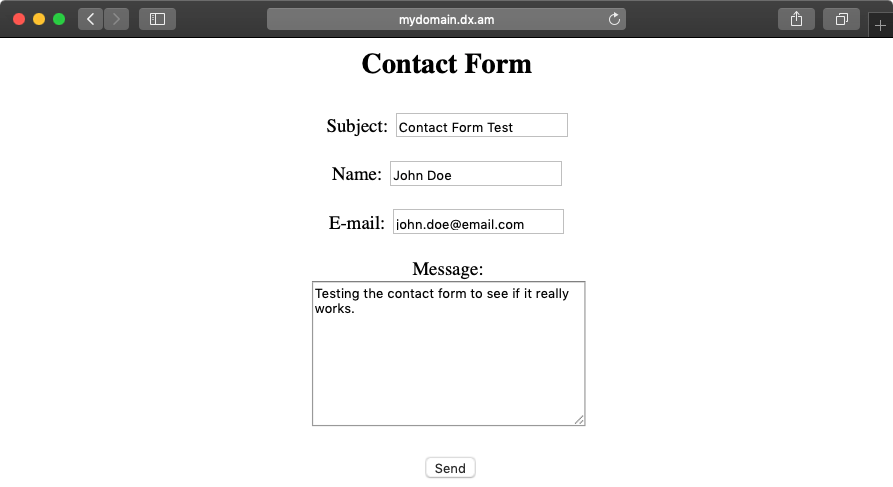
http://your-domain.com/contact.html. Make sure that you replaceyour-domain.comwith your actual domain name. - Fill in the contact form fields as shown in the screenshot example below and click on the Send button:
- If all goes well, you should see Your message was sent successfully! displayed on the screen.
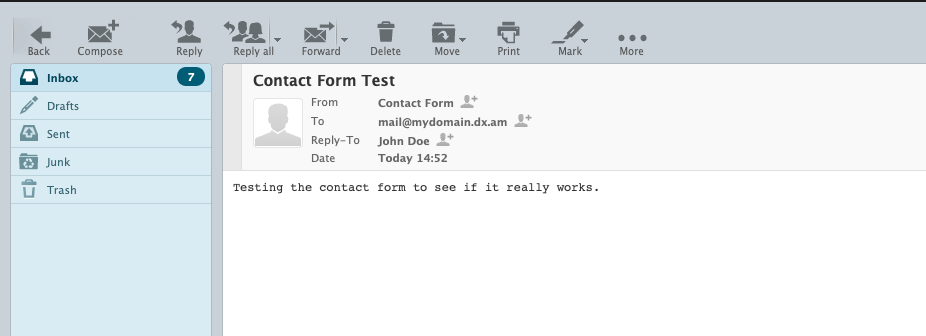
- All that is left to do now is to check whether the contact form submission has actually sent a message to your inbox. Check your personal email for new messages:
Where Can I Download the PHPMailer Example Form?
If you don’t have time to manually create and upload all files necessary for your contact form to function, you can download the complete PHP email contact form example as a ZIP archive. This PHPMailer example form is fully functional, you just need to enter your email address and password, as outlined in Step 14 above.
How Can I Make the PHPMailer Example Form Send Messages Using an External Mail Server over SMTP?
Unlike the stock PHP Mail() function, PHPMailer makes is super easy to send email messages using an external mail server over SMTP. In fact, the whole process of creating a contact form is nearly identical to the one we previously discussed in this article. The only major difference is that a modified version of the mail-script.php file needs to be used.
Note: the ability to contact external mail servers requires advanced server functionality which is only possible if you are using one of our paid hosting plans. If you are already on a paid plan, contact the 24/7 Technical Support Team and ask them to enable SMTP outgoing connections for your hosting account if you haven’t done so already.
If you would like to have a contact form that uses external mail servers to send messages, follow the same steps as the ones outlined above. The only two steps that are different are Step 13 and Step 14, so return here when you get to them. Here are the two modified steps:
- Copy the code below and paste it into the mail-script.php file.
<?php

    use PHPMailer\PHPMailer\PHPMailer;
    use PHPMailer\PHPMailer\Exception;

    $myPersonalEmail = "your-personal-email-goes-here";

    $externalMailHost = "your-external-mail-server-address-goes-here";
    $externalMailAddress = "your-external-email-address-goes-here";
    $externalMailSMTPAuth = true;
    $externalMailUsername = "your-username-for-the-external-mail-server-goes-here";
    $externalMailPassword = "your-password-for-the-external-mail-server-goes-here";
    $externalMailSMTPSecure = "tls";
    $externalMailPort = 587;


    require './src/Exception.php';
    require './src/PHPMailer.php';
    require './src/SMTP.php';

    if(isset($_POST['submit'])) {

        $mail = new PHPMailer(true);

        $mail->SMTPDebug = 0;
        $mail->isSMTP();

        $mail->Host = $externalMailHost;
        $mail->SMTPAuth = $externalMailSMTPAuth;
        $mail->Username = $externalMailUsername;
        $mail->Password = $externalMailPassword;
        $mail->SMTPSecure = $externalMailSMTPSecure;
        $mail->Port = $externalMailPort;

        $mail->setFrom($externalMailAddress, 'Mailer');
        $mail->addAddress($myPersonalEmail);
        $mail->addReplyTo($_POST['email'], $_POST['name']);

        $mail->isHTML(true);
        $mail->Subject = $_POST['subject'];
        $mail->Body = $_POST['message'];

        try {
            $mail->send();
            echo 'Your message was sent successfully!';
        } catch (Exception $e) {
            echo "Your message could not be sent! PHPMailer Error: {$mail->ErrorInfo}";
        }

    } else {
        echo "There is a problem with the contact.html document!";
    }

?>
- Near the start of the file, you will notice the following lines of code:
$myPersonalEmail = "your-personal-email-goes-here";

$externalMailHost = "your-external-mail-server-address-goes-here";
$externalMailAddress = "your-external-email-address-goes-here";
$externalMailSMTPAuth = true;
$externalMailUsername = "your-username-for-the-external-mail-server-goes-here";
$externalMailPassword = "your-password-for-the-external-mail-server-goes-here";
$externalMailSMTPSecure = "tls";
$externalMailPort = 587;
These lines represent your mail connection settings and you will need to update them. Below we will list the changes that need to be made on each line:
your-personal-email-goes-hereshould be replaced with the email address where you would like to receive your contact form submissions.your-external-mail-server-address-goes-hereshould be replaced with the outgoing (SMTP) address of the mail server that you are using.your-external-email-address-goes-hereshould be replaced with the email address that you have registered with the external mail server.$externalMailSMTPAuth = true;indicates whether authentication is required to send messages. Only change this line if instructed to do so by your email provider.your-username-for-the-external-mail-server-goes-hereshould be replaced with your username for the external mail server. Oftentimes, your username is the same as your email address on the server.your-password-for-the-external-mail-server-goes-hereshould be replaced with your external mail server password.$externalMailSMTPSecure = "tls";indicates the type of security which will be used. Only change this value if instructed to do so by your mail provider.$externalMailPort = 587;is the default port for sending messages. Only change this value if instructed to do so by your mail provider.
That’s it, these are all the custom changes that you need to make in order to enable SMTP functionality in PHPMailer 6. You can now continue following the original guide starting at Step 15.
Note: Please keep in mind that external mail servers may be configured differently than the ones, provided by AwardSpace. As such, if your contact form submissions are not delivered successfully to your inbox, it is best to contact the external mail provider’s support team for further assistance. To aid in the troubleshooting process, locate the line of code $mail->SMTPDebug = 0; and change it to $mail->SMTPDebug = 2;. Doing so will provide a detailed event log when trying to send a message using the external mail server.
Where Can I Download the Version of the PHPMailer Example Form Which Uses an External Mail Server to Send Messages over SMTP?
If you wish to grab a copy of the PHPMailer example form that uses SMTP to connect to external mail servers, you can download the PHP mailer script for free as a ZIP archive. The contact form contained within the ZIP archive is fully operational and ready for use. You just need to update your personal email address and enter the SMTP details for your external mail server in order to be able to receive contact form submissions.
Conclusion
When compared to the standard PHP Mail() function, PHPMailer provides a lot of additional functionality without sacrificing ease of use. If you intend to build upon your contact form and implement additional features, such as allowing your site visitors to send you attachment files, PHPMailer is definitely the way to go. Last, but certainly not least, being able to use an external mail server with your contact form provides a level of freedom that is very difficult to achieve with the stock PHP Mail() Function.
