
In the past, SSL was something that only owners of large websites and online stores had to worry about. These days, however, things are different. We are rapidly moving into a world where the majority of websites are SSL-protected and, in fact, unsecured sites are starting to get penalized by search engines and web browsers alike.
As such, if you own a website, even if it is a small one, you should consider securing it with SSL. In this article, we will show you how to do so by examining the various features that the SSL Manager section in the Hosting Control Panel has to offer.
You can read through the entire article to familiarize yourself with all functions of the SSL Manager, or you can jump to a specific topic that interests you:
- What Is an SSL Certificate and How Does It Work?
- Which Hosting Plans Support SSL Certificates?
- How Can I Tell Whether My Website Has an SSL Certificate Installed?
- How Can I Install an SSL Certificate?
- What Is a Private IP Address for SSL and How Does It Work?
- How Can I Purchase a Private IP for My SSL Certificate?
- What Would Happen If My SSL Certificate Expired?
- How Do I Renew My SSL Certificate?
- How Can I Renew My Private IP for SSL?
- How Can I Uninstall an SSL Certificate?
- How Can I Replace an SSL Certificate?
- Where Can I View and Manage My Purchased SSL Certificates?
- How Do I Generate a CSR?
- Where Can I View My Existing CSRs?
What Is an SSL Certificate and How Does It Work?
Secure Sockets Layer, or SSL, is a security protocol that facilitates the use of HTTPS on a website. HTTPS allows you to access the contents of a webpage safely and privately without any third parties monitoring your web traffic. Most modern web browsers indicate that a connection is secure by placing a padlock icon in the address bar.

This high level of protection and privacy is achieved by using data encryption. In fact, when you are browsing a website via a secure connection, only your web browser and the server can decode the data that is transmitted back and forth. Any other person who might intercept your Internet traffic will not be able to gain any information from the captured data.
Which Hosting Plans Support SSL Certificates?
The use of SSL encryption is considered an advanced web hosting feature. As such, it is available on our premium shared hosting plans as well as our Semi-Dedicated web servers. If you happen to be using our free website hosting plan, the SSL Manager will not be available to you and you should consider upgrading to one of our premier plans.
How Can I Tell Whether My Website Has an SSL Certificate Installed?
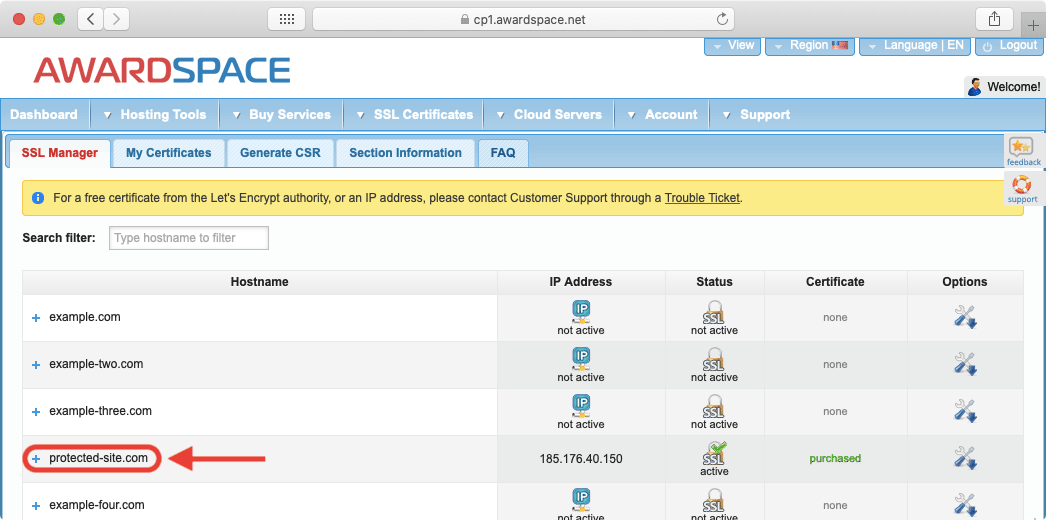
If you are using one of our paid shared hosting plans, you can head to the SSL Manager section of our Control Panel. There, you will see a list of all domain and subdomain names that are part of your hosting account.
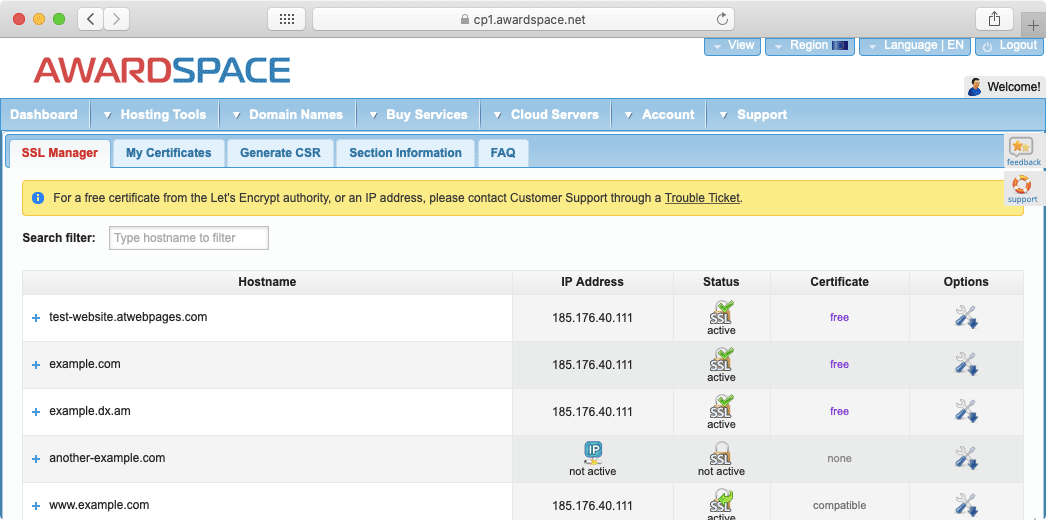
You can check the Status column for information on whether a certificate is active for the hostname in question. If there is an active certificate, you can learn more about the type of SSL certificate that is used in the Certificate column.
Why Is My Domain Listed Twice in the SSL Manager?
If you own a domain name, you may have noticed that the SSL Manager lists your domain two times – once with the “www” prefix and once without the “www” prefix.
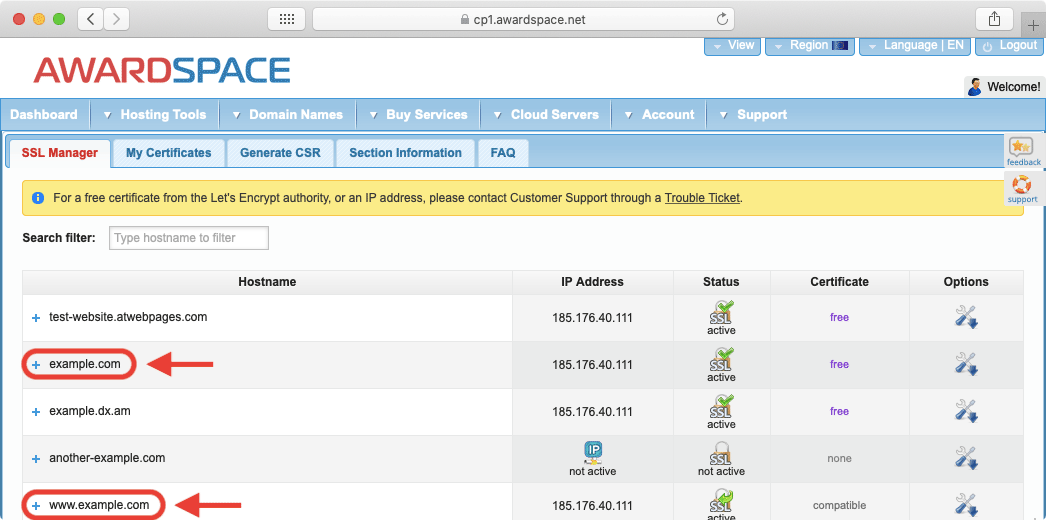
The SSL Manager is designed to list all domain and subdomain names that are hosted on your account. The “www” version of your domain name is technically a subdomain and as such, it is also included.
How Can I Install an SSL Certificate?
The SSL Manager supports three methods of SSL installation depending on the SSL that you wish to install. Currently, it is possible to:
- purchase a premium SSL certificate through the SSL Manager.
- get a free SSL certificate provided by Let’s Encrypt.
- upload a custom certificate that was issued by a third party.
You can learn more about the differences between the three types of SSL certificates that you can install on our platform in our dedicated guide on getting an SSL certificate.
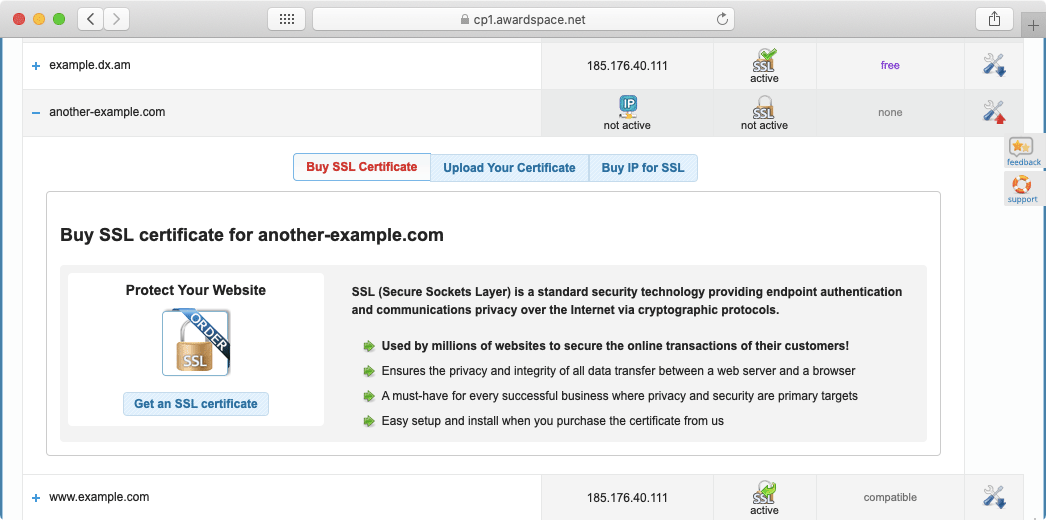
How Can I Purchase and Install an SSL Certificate Through AwardSpace?
To purchase an SSL certificate through AwardSpace, follow the steps below:
- Go to the SSL Manager section of the Control Panel.
- Click on the domain name that you wish to secure.
- Open the Buy SSL Certificate tab that appears.
- Click on the Get an SSL Certificate button.
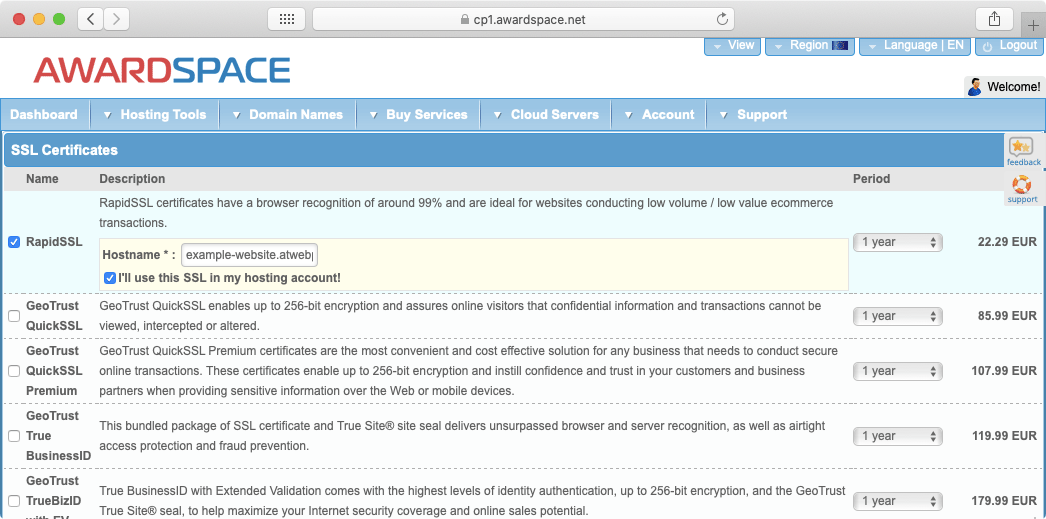
- You will be taken to a page where you need to pick your preferred SSL certificate. Place a checkmark before the type of SSL certificate that you wish to purchase. You can read our dedicated guide on buying an SSL certificate to learn what the differences are between the various certificates that we offer.
- Enter your domain name in the field that appears.
- Scroll down the page and place a checkmark before the IP for SSL option.
- Enter the exact same domain name in the field next to the IP for SSL option.
- Proceed by clicking on the Continue button.
- Choose a payment method and fill in your payment details in order to complete the purchase.
- Once the payment is made successfully, allow a few hours for the Sales team to process your order and install your SSL certificate.
You can learn even more about the SSL purchasing process by reading our step-by-step tutorial on how to buy an SSL certificate from AwardSpace.
How Can I Install a Free SSL Certificate?
There are only two requirements that you need to meet in order to install a free SSL certificate on your domain name:
- you must be using one of our paid hosting plans.
- your domain needs to be hosted with us and must be using our nameservers.
If you meet both of the criteria above, follow these steps to set up a free Let’s Encrypt SSL certificate on your domain name:
- Go to the SSL Manager section of the Control Panel.
- Click on the domain name that you wish to secure.
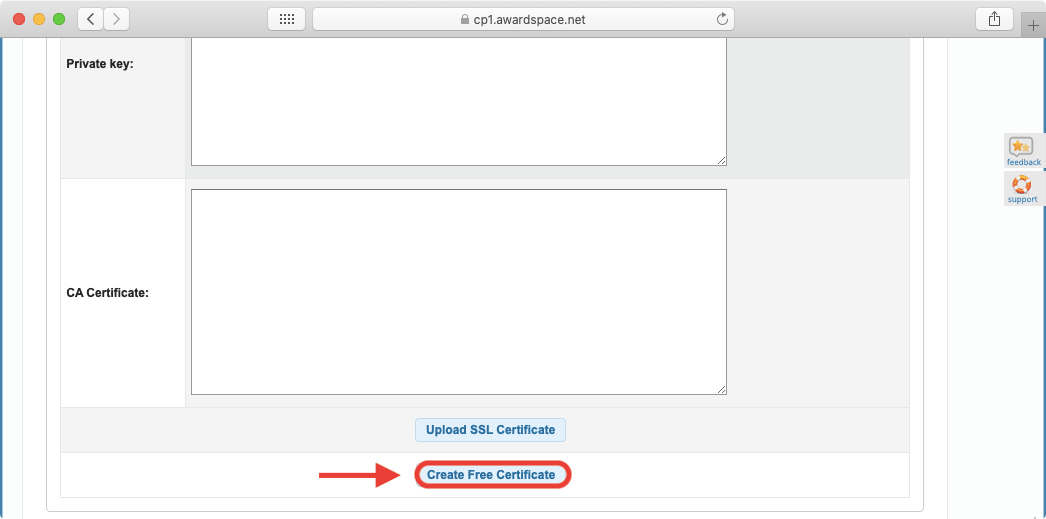
- Open the Upload Your Certificate tab.
- Scroll to the bottom of the page and click on the Create Free Certificate button.
At this point, you should see a notification message informing you that your free SSL certificate was successfully installed on your domain name. If you are curious about how a free SSL differs from its paid counterparts, you can view our comparison between free and paid SSL certificates.
How Can I Install a Custom SSL Certificate?
The great thing about our SSL Manager is that it is fully compatible with certificates issued by third parties. To manually upload your custom SSL certificate, follow the steps below:
- Go to the SSL Manager section of the Control Panel.
- Click on the domain name that you wish to secure.
- Open the Upload Your Certificate tab.
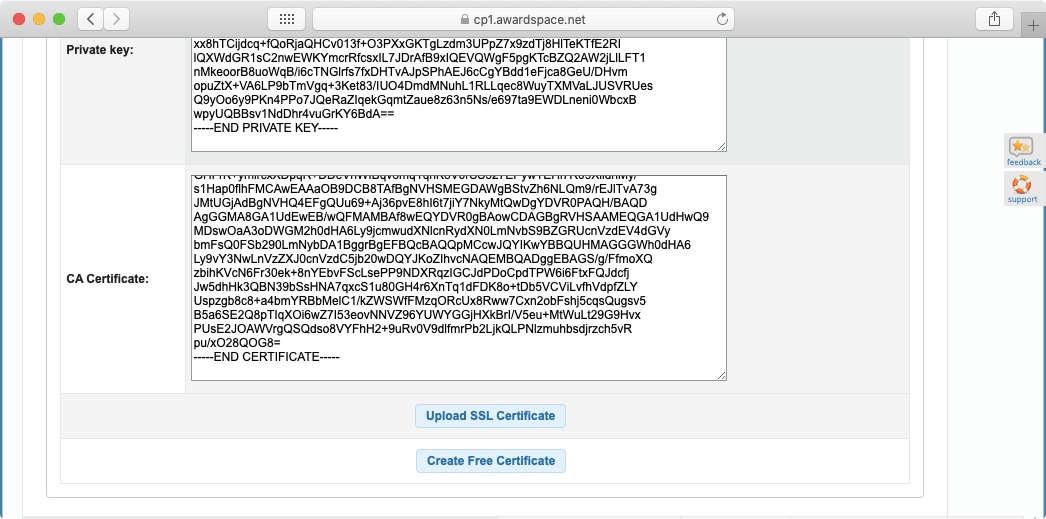
- You will notice three large text fields – Certificate, Private Key, and CA Certificate. Fill in those fields using the information provided to you by your SSL issuer. You may optionally learn more about the CA Certificate by reading our article on what is the purpose of the Intermediate Certificate Authority.
- Press the Upload SSL Certificate button to complete the installation process.
At this point, your custom SSL certificate should be successfully uploaded to the server. But you may notice that it is not active. To activate your SSL certificate, you also need to purchase a private IP address.
What Is a Private IP Address for SSL and How Does It Work?
The core premise behind shared hosting is to have one server powering the websites of multiple clients. This is great when it comes to cost savings, but it also presents a few problems when trying to secure a website with SSL.
To work around these technical issues, we allow the purchase of Private IP addresses. These IP addresses are made available exclusively to clients who wish to protect their websites with SSL. Once a Private IP for SSL is purchased, your website will start using this new IP address in place of the old one that is shared among multiple clients.
How Can I Purchase a Private IP for My SSL Certificate?
You can buy an IP for SSL at any time through the SSL Manager. To do so, follow these steps:
- Go to the SSL Manager section of the Control Panel.
- Click on the domain name where you wish to set up the IP for SSL.
- A row of tabs will appear. Open the Buy IP for SSL tab to proceed.
- To start the order process, click on the Get an IP for SSL button.

- Scroll past the premium SSL certificates that we offer for sale until you reach the Private IPs (SSL) section. Place a checkmark before the IP for SSL option.
- In the hostname field, enter the name of the domain where you wish to add an IP for SSL. Do not include the http:// or https:// prefixes.
- Press the Continue button to proceed.
- Choose a payment method and fill in your payment details in order to complete the purchase.
- After the payment is made, please allow a few minutes for the Sales team to process your order.
One thing to keep in mind is that all of our IPs for SSL are products that need to be renewed annually. If you forget to renew your IP for SSL, your website will start showing a security error. As such, it is important to renew your IP for SSL on time. If you ever find yourself with an expired IP for SSL, you can read our article on what to do when an IP for SSL expires where you will learn how to rectify this problem.
What Would Happen If My SSL Certificate Expired?
Similar to an expired IP for SSL, once the validity of an SSL certificate ends, your website will display a warning message. In most modern web browsers this warning will be shown before any of your site content loads and people will be encouraged not to visit your website.
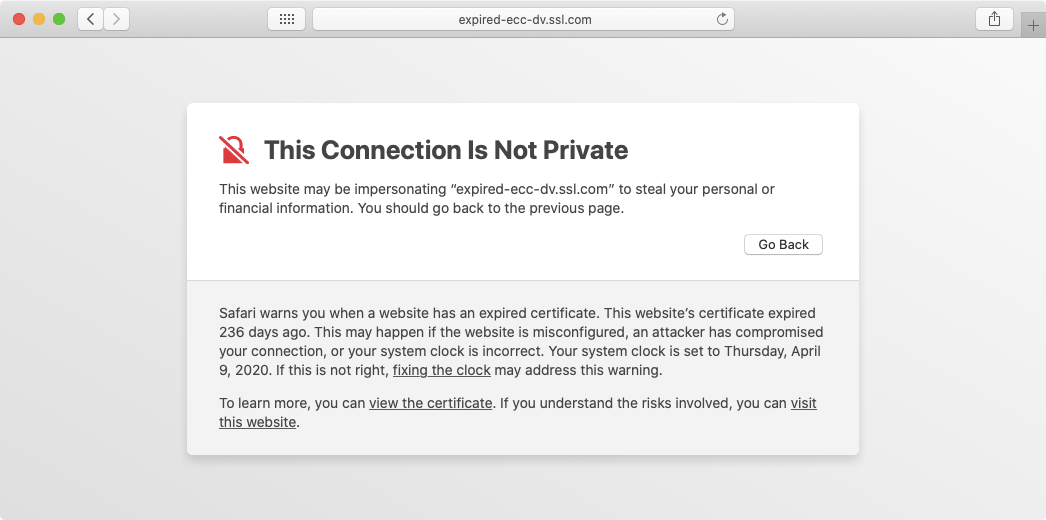
An expired SSL certificate can seriously undermine user trust and such issues should be resolved as quickly as possible. The best way to fix a problem like this is to consider renewing your SSL certificate.
How Do I Renew My SSL Certificate?
SSL renewal is carried out differently depending on the type of SSL that is in use. Below, we will examine how to renew a premium SSL certificate that you have purchased through AwardSpace, how to renew a free Let’s Encrypt certificate, and how to renew a certificate from a third-party SSL vendor.
How Do I Renew an SSL Certificate Purchased From AwardSpace?
To renew an SSL certificate that you have purchased from us, follow the steps below:
- Go to the SSL Manager section of the Control Panel.
- Click on the domain name where the SSL that is due for renewal is located.
- A couple of tabs will appear. Open the Renew Certificate tab.
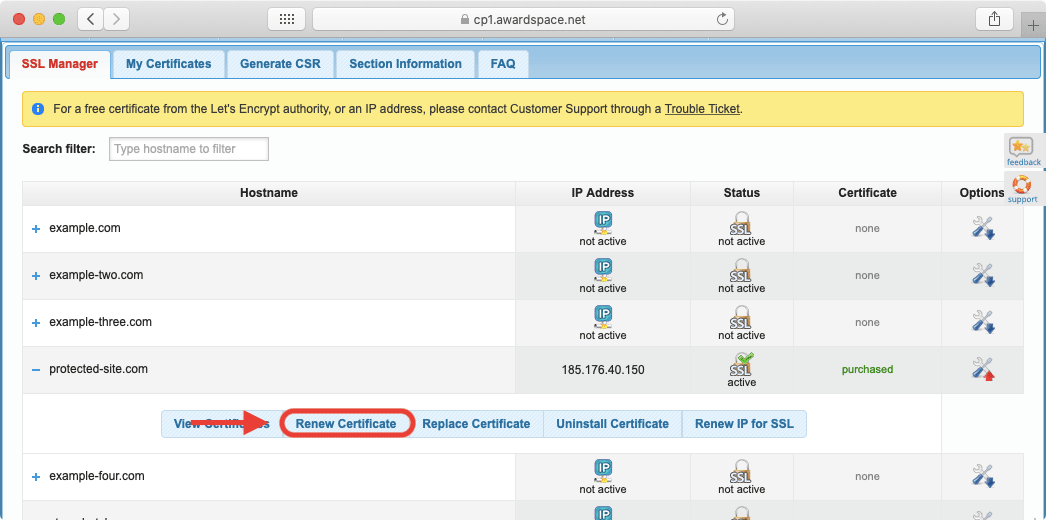
- You will be presented with a single option prompting you to renew your SSL certificate. To proceed, click on the Renew SSL Certificate button.
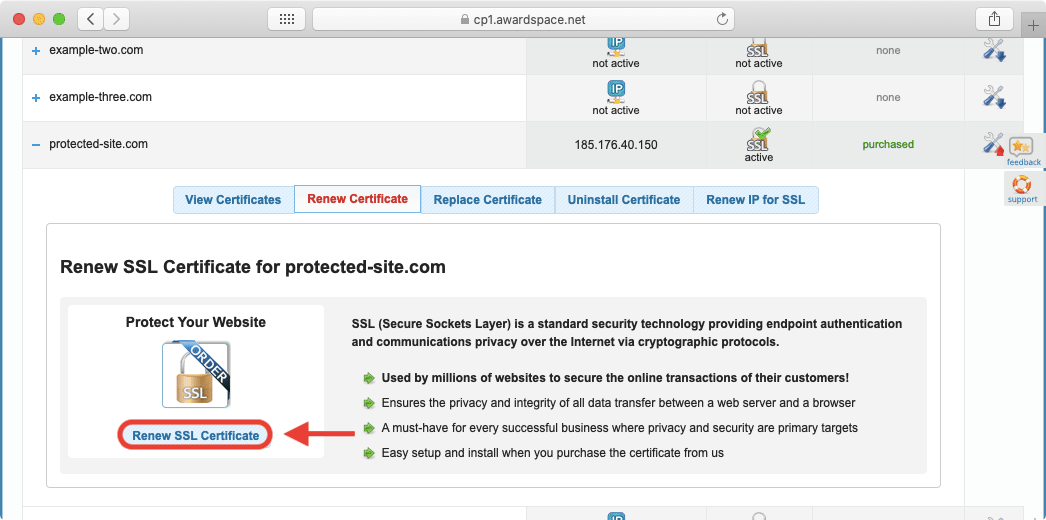
- You will be taken to our services renewal page. Place checkmarks before the SSL certificate that you wish to renew as well as the Private IP for SSL that is assigned to your domain name.
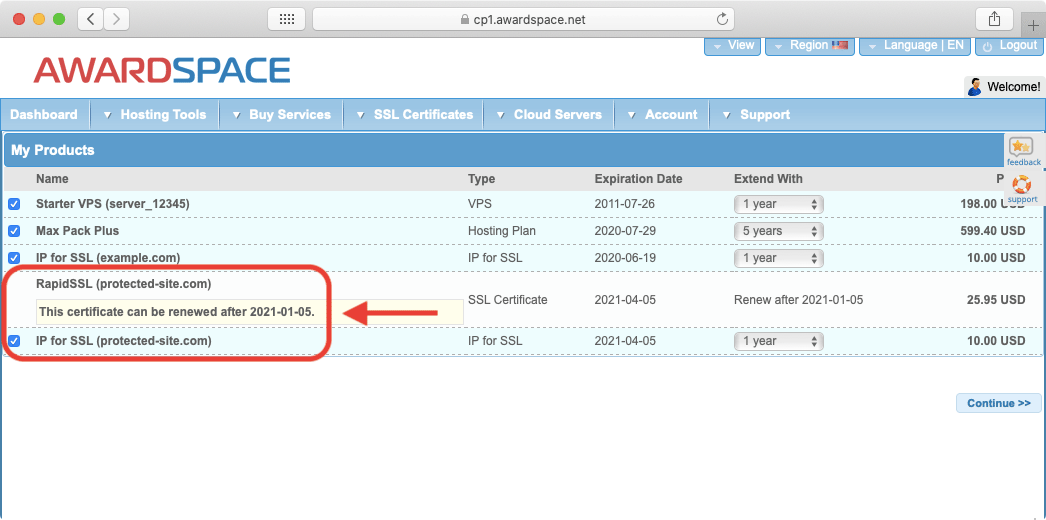
- Proceed by clicking on the Continue button.
- Choose a payment method and perform the payment.
- Once the payment has been processed, please allow a few hours for the Sales team to issue a new SSL certificate for you and to install it on your domain name.
To help you avoid any accidental SSL renewals, we allow you to renew your SSL certificate only if it has already expired or is about to expire. More specifically, the SSL’s expiration date should be less than three months away for you to renew it.
How Do I Renew My Free SSL Certificate Provided by Let’s Encrypt?
Our system is designed to automatically renew the free Let’s Encrypt certificates that we offer. As such, if you have opted to install a free SSL certificate on your domain name, you should never have to manually renew it. If for some reason your free SSL fails to work properly, you can contact our 24/7 Technical Support Team and they will assist you with this issue.
How Do I Renew an SSL Certificate Purchased From a Third Party?
If you have purchased your SSL certificate from a vendor other than AwardSpace, you would need to follow these steps to properly renew your SSL certificate:
- You should contact the SSL issuer and ask them to renew your SSL certificate. For best results, generate a CSR (Certificate Signing Request) and present it to the SSL issuer. Also, specify that the SSL should be issued for a server running Apache + MOD SSL.
- Once the new SSL has been created, request your Certificate and CA Certificate from the SSL issuer.
- Next, you need to uninstall the SSL certificate that has expired or is about to expire.
- And finally, you need to install the new SSL certificate that was provided to you. For the installation, you need to use the Certificate and CA Certificate from the SSL issuer as well as the Private Key from the CSR.
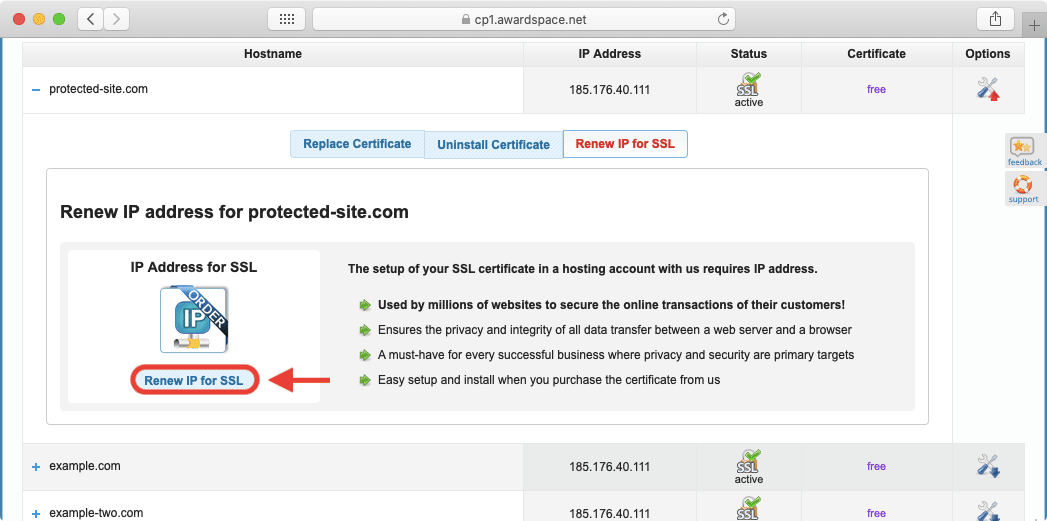
How Can I Renew My Private IP for SSL?
It is important to note that all of our IP for SSL purchases are valid for one year. As such, you need to make sure that your IP for SSL is renewed every year in order to keep your SSL certificate active at all times. You can read our article on what happens when a Private IP for SSL expires for further details.
To renew your Private IP for SSL, follow the steps below:
- Go to the SSL Manager section of the Control Panel.
- Click on the domain name where you wish to renew your Private IP for SSL.
- A row of tabs will appear. Click on Renew IP for SSL to proceed.
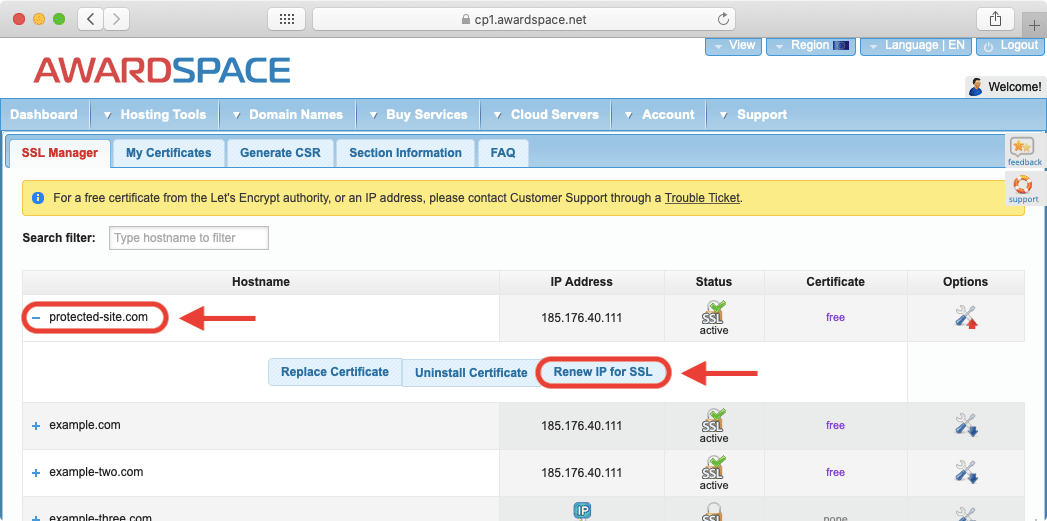
- To start the renewal process, click on the Renew IP for SSL button.
- Scroll past the premium SSL certificates that we offer for sale until you reach the Private IPs (SSL) section. Place a checkmark before the IP for SSL option.
- In the hostname field, specify which domain should have its IP for SSL renewed by entering the name of the domain. Do not include the http:// or https:// prefixes.
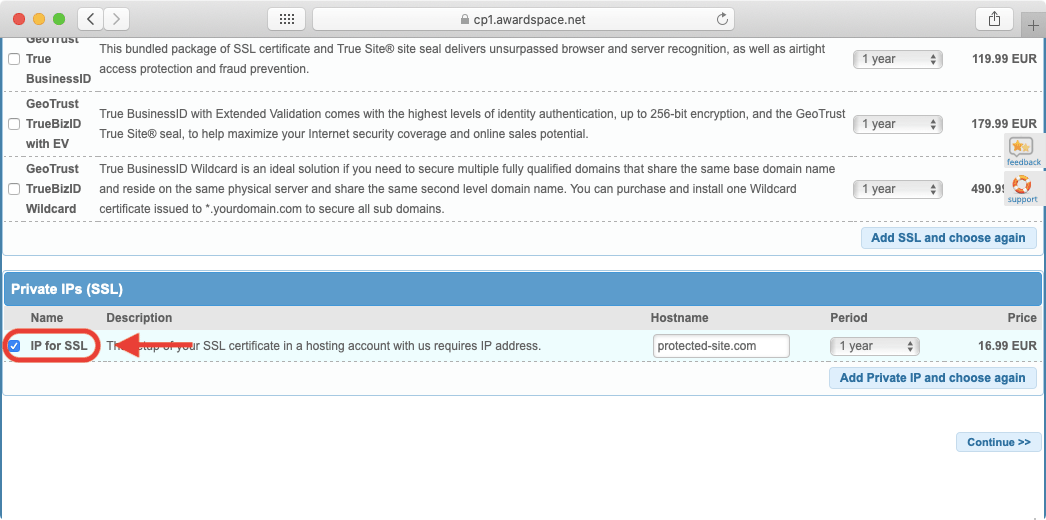
- Press the Continue button to proceed.
- Choose a payment method and fill in your payment details in order to complete the purchase.
- After the payment is made, please allow a few minutes for the Sales team to process your order.
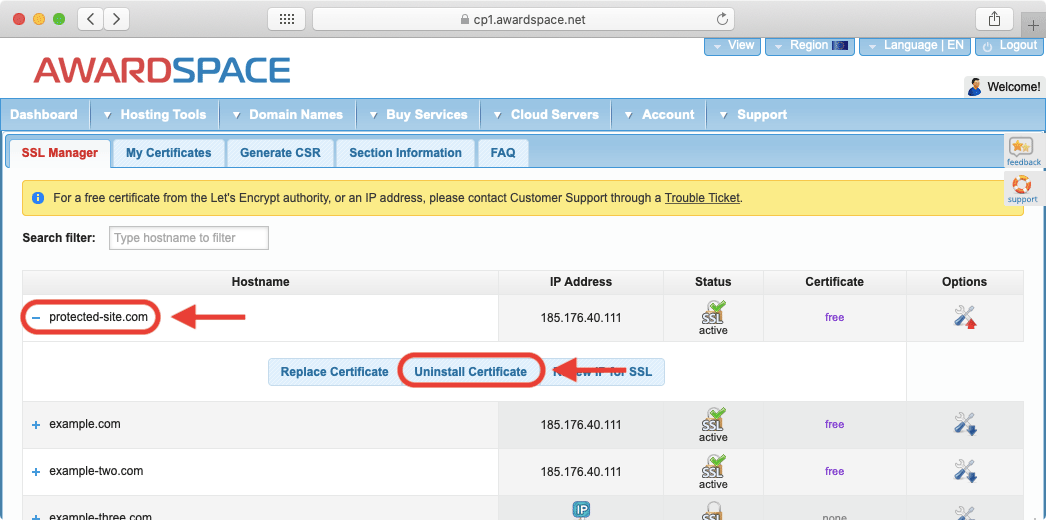
How Can I Uninstall an SSL Certificate?
From time to time, it may be necessary to remove an SSL certificate from your domain. The most common reason for uninstalling an SSL certificate is the expiry of the currently installed certificate, but you will also need to uninstall the current certificate if you wish to start using a different one. To remove an SSL from your domain name, follow these steps:
- Go to the SSL Manager section of the Control Panel.
- Click on the domain name that holds the SSL that is to be uninstalled.
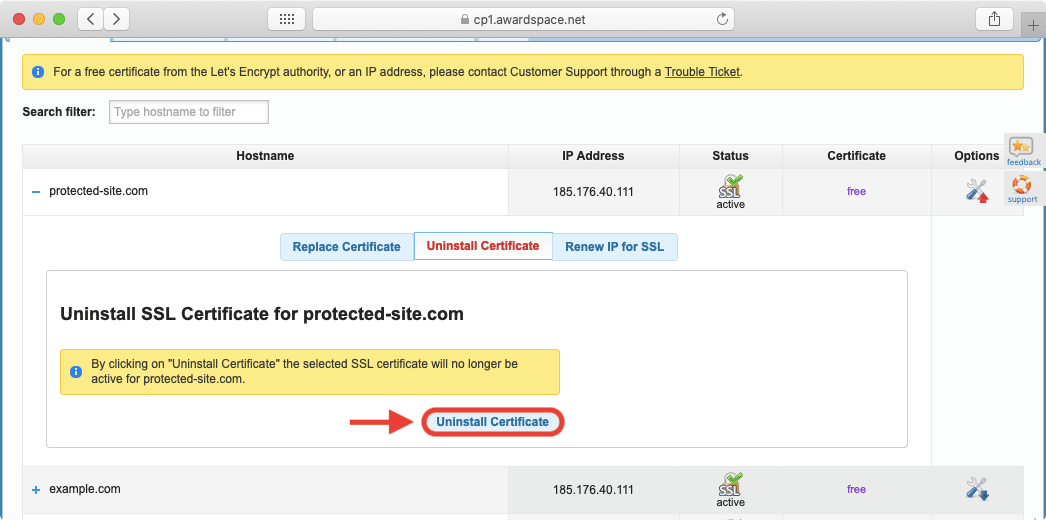
- Choose the Uninstall Certificate tab.
- Confirm that you wish to uninstall your SSL certificate by clicking on the Uninstall Certificate button. Make sure that you are removing the correct SSL certificate, as this action cannot be undone!
How Can I Replace an SSL Certificate?
The SSL Manager offers a handy feature that allows you to replace the current SSL certificate for a domain name with a new one. The ability to replace an SSL certificate is a one-click solution to the process of uninstalling one certificate and then installing a different one in its place. The only caveat is that the new certificate needs to be purchased through AwardSpace.
To take advantage of this certificate replacement feature, follow the steps below:
- Purchase an SSL certificate through AwardSpace.
- Go to the SSL Manager section of the Control Panel.
- Click on the domain name that holds the SSL which you wish to replace.
- From the list of tabs that appear, choose the Replace Certificate tab.
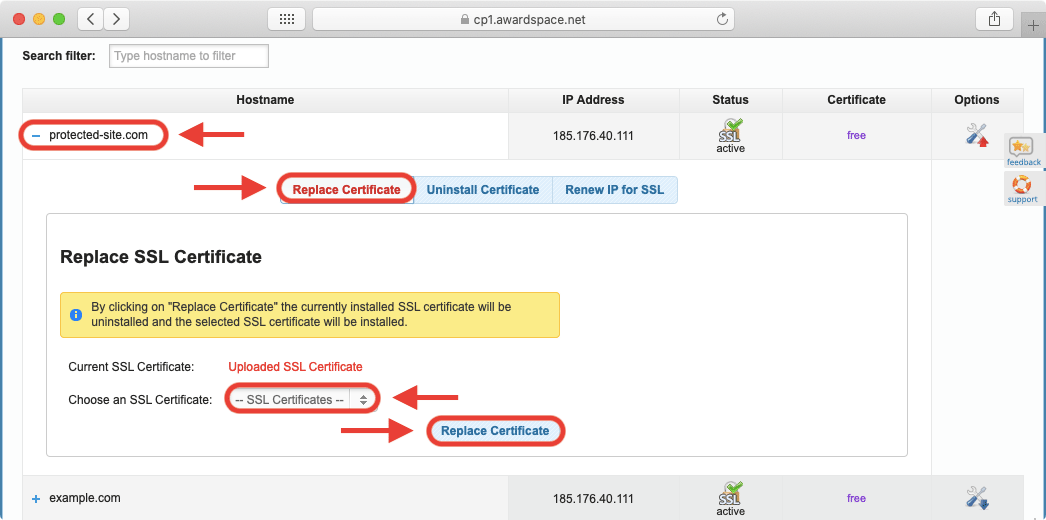
- Use the Choose an SSL Certificate dropdown menu to select your new SSL certificate. This dropdown will only list premium SSL certificates that have been purchased from AwardSpace for this particular domain name. All listed certificates will be active as the expired ones are omitted automatically.
- Once you have chosen the new certificate for the domain name, click on the Replace Certificate button.
Where Can I View and Manage My Purchased SSL Certificates?
The SSL Manager comes with a dedicated section where you can view and manage all of the SSL certificates that you have purchased through AwardSpace. To access this dedicated section, follow the steps below:
- Go to the SSL Manager section of the Control Panel.
- Click on the My Certificates tab at the top.
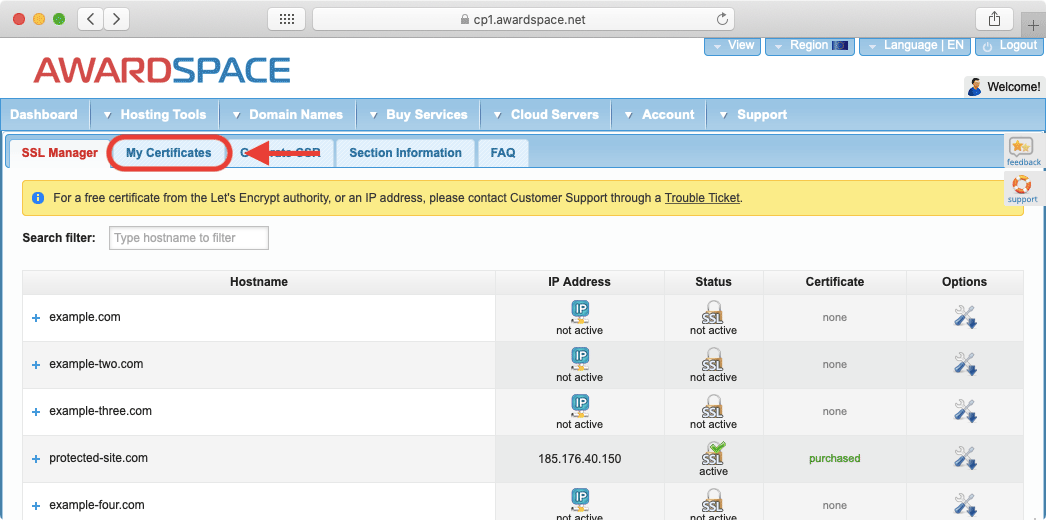
You will be presented with a list of all purchased SSL certificates. The list will include the SSL certificates for all domain names and it will also include any expired SSL certificates that are still associated with your hosting account. If you wish to have the expired SSL certificates removed from your hosting account, you can contact our 24/7 Technical Support Team.
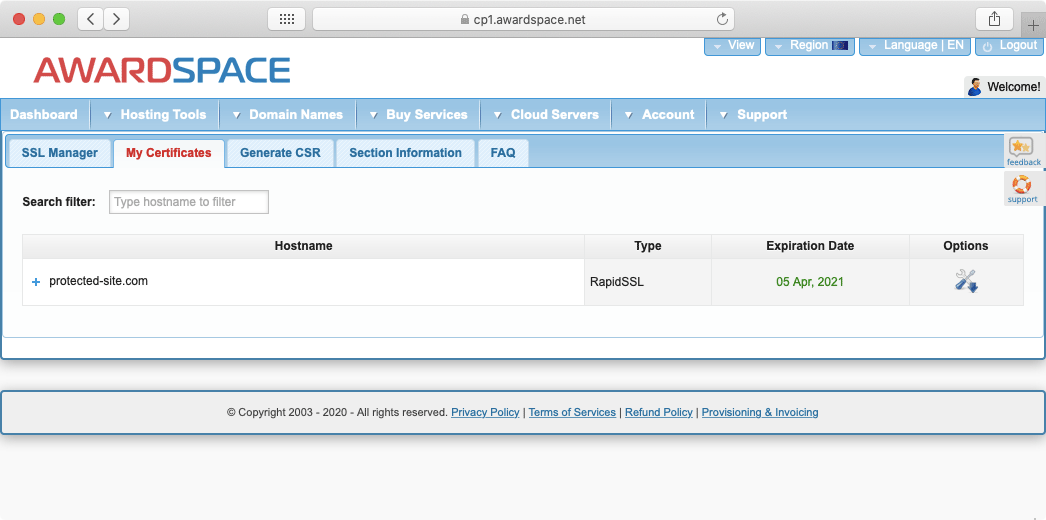
In this section of the SSL Manager, you can perform basic SSL management operations. These include:
- the ability to get more information about a specific SSL certificate.
- the option to export the SSL certificate for use on a different platform.
- the ability to renew your SSL certificate.
- if supported by the SSL, the option to integrate an SSL seal into your website.
We will look at those options in greater detail below.
How Can I View Detailed Information About My SSL Certificate?
If you have purchased your SSL certificate through AwardSpace, you can get in-depth information on the certificate through the SSL Manager section of the Control Panel. To view the available information for your SSL, follow the steps below:
- Go to the SSL Manager section of the Control Panel.
- Click on the My Certificates tab at the top.
- Click on the SSL certificate that you wish to learn more about.
- From the list of tabs that appear, choose the Information tab.
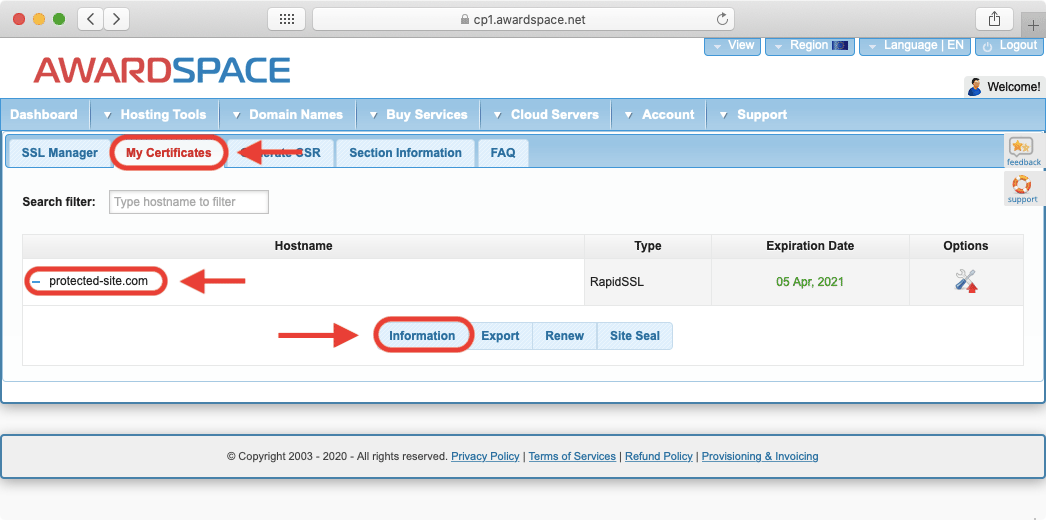
In the Information tab, you will find your SSL certificate’s details. We will list the data that you will find in the next few screenshots below:
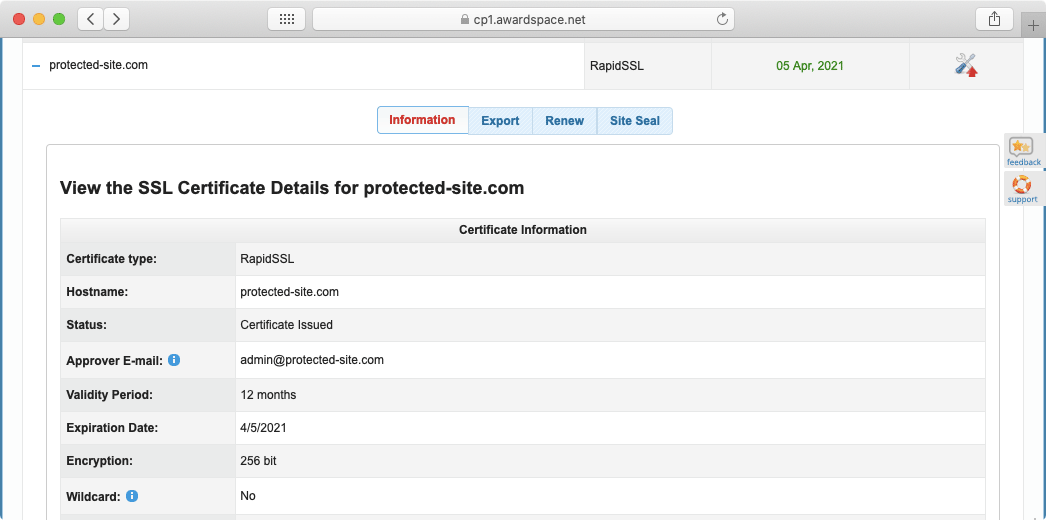
- Certificate Type is the type of SSL certificate that you have purchased.
- Hostname is the domain or subdomain that the SSL is issued for.
- Status represents the SSL’s current status.
- Approver Email is the email address that is used to manage and initially approve the SSL certificate.
- Validity Period is the duration of the SSL certificate.
- Expiration Date lists the day on which the SSL will expire.
- Encryption is the level of protection that the SSL certificate affords. Currently, 256 bit is the industry standard.
- Wildcard denotes whether the SSL can be used on multiple hostnames. Normally, only the most premier certificates come with wildcard functionality.
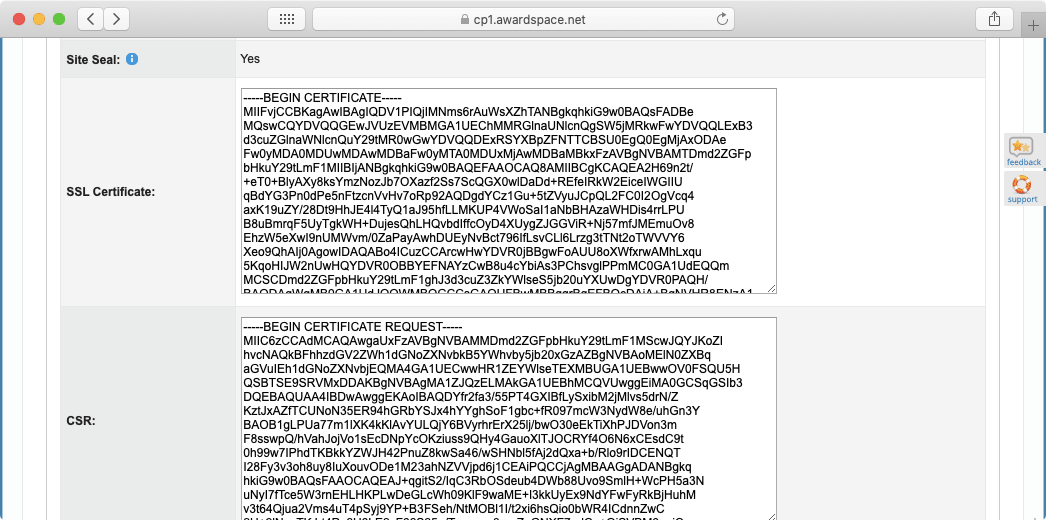
- Site seal is a special image that can be embedded on your website. This seal aims to emphasize the fact that you are using an SSL certificate and that all sensitive information that your visitors enter will be protected.
- SSL Certificate is your actual SSL certificate in text form.
- CSR is the Certificate Signing Request that was initially used to issue your SSL certificate.
- Private Key is the private key that is assigned to your SSL certificate.
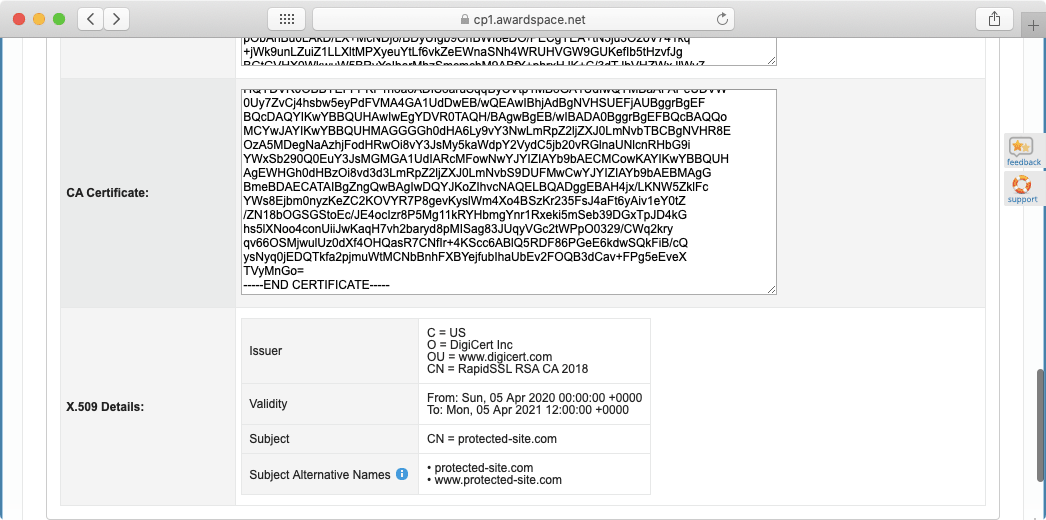
- CA Certificate is the intermediary certificate that increases your SSL’s compatibility with different web browsers.
- X.509 Details are the details contained within your certificate’s public key. This is the information your site visitors will be able to view through their web browsers if they choose to do so.
How Can I Export My SSL so That I Can Use It With a Different Hosting Provider?
The great thing about buying an SSL certificate from AwardSpace is that you are free to use this certificate on any third-party hosting platform and even in other environments. There are two major ways you can export your SSL certificate – either as raw text or as files.
If you are interested in obtaining a textual representation of your SSL certificates, head to the Information tab and copy the contents of the SSL Certificate, Private Key, and CA Certificate fields. You may optionally also copy the contents of your CSR.
Apart from a raw text backup, you can also export your SSL certificate. To do so, follow these steps:
- Go to the SSL Manager section of the Control Panel.
- Click on the My Certificates tab at the top.
- Click on the SSL certificate that you wish to export.
- From the list of tabs that appear, choose the Export tab.
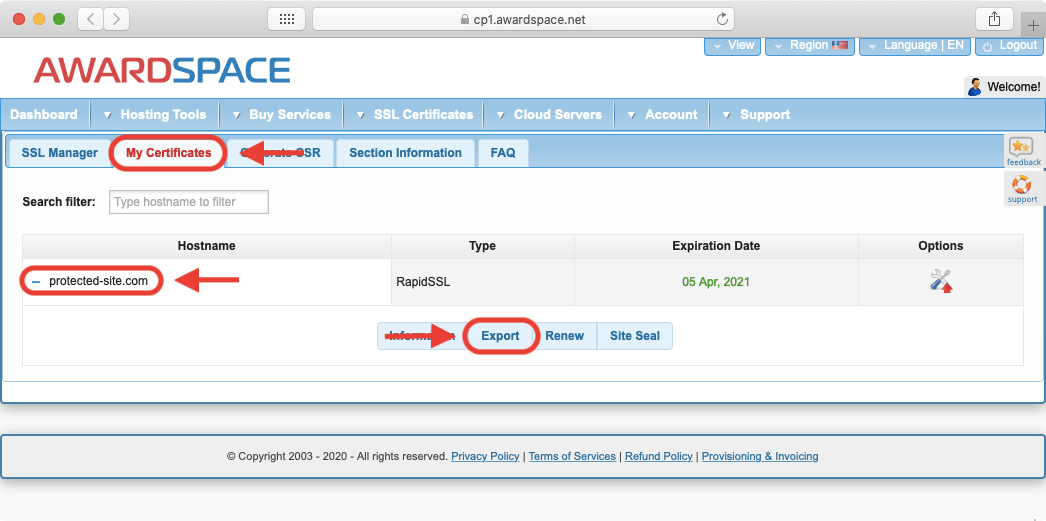
- Choose your preferred Export Format. If you are not sure which format is most appropriate for your needs, it is best to contact the company where you will be uploading your SSL certificate for further details.
- Choose your preferred File Extension. Like with the Export Format option, you can consult with the company where you will be uploading your SSL certificate to learn which is their preferred file extension.
- To begin the exporting process, click on the Export Certificate button.

At this stage, your web browser should prompt you to download your SSL certificate in the format you have just specified.
How Can I Show My Visitors That My Site Is Using an SSL Certificate?
An important part of having an SSL certificate is making sure that your visitors know that their connection is secure. One way to communicate this to your visitors is by using a site seal. A site seal is a special image that lets people know that your website is using encryption and that any sensitive data that is entered will remain private. Site seals are most useful on order checkout and user login pages.
Depending on the SSL certificate that you have ordered, you may be eligible to use a site seal. Follow the steps below to download your site seal, if you have one:
- Go to the SSL Manager section of the Control Panel.
- Click on the My Certificates tab at the top.
- Click on the SSL certificate whose site seal you wish to view.
- From the list of tabs that appear, choose the Site Seal tab. If you do not see this tab, then your SSL certificate does not come with a site seal.
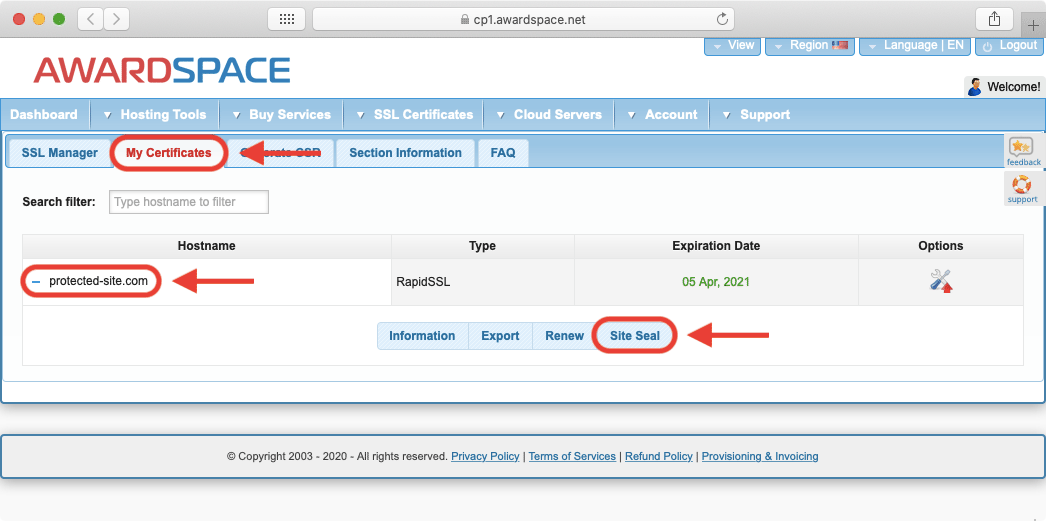
- On the Site Seal tab, you will notice your site seal, as is shown in the screenshot below:
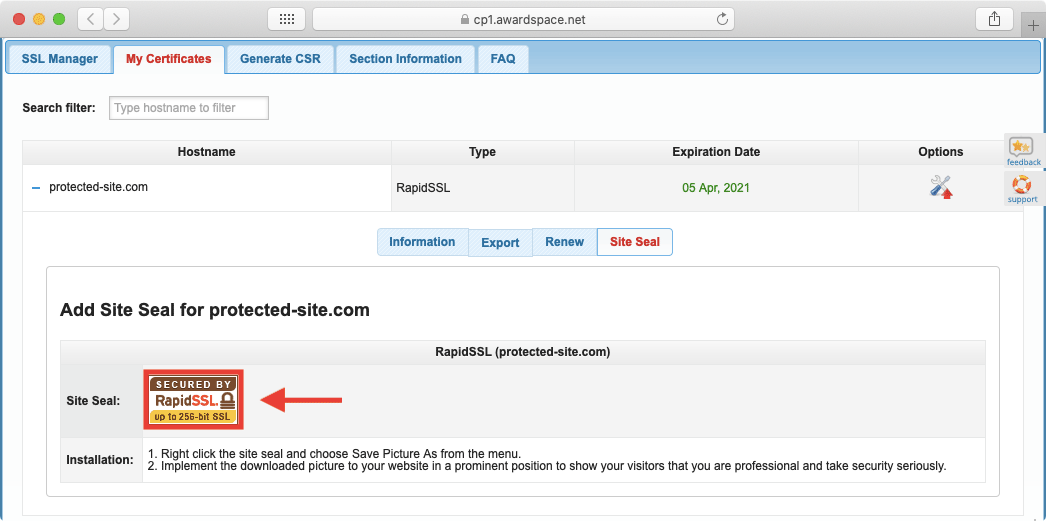
You can implement this site seal into your website by first downloading it. Just right-click on the site seal image and save it to your computer. Then, incorporate this image into your website’s design, placing it in a prominent position, so your visitors know that their data is protected.
How Do I Generate a CSR?
A CSR, or a Certificate Signing Request, is a special string of text that is used when generating an SSL certificate. The CSR holds the SSL owner information as well as the name of the domain or subdomain that the SSL is issued for.
CSR generation is only necessary when you decide to purchase an SSL certificate through a third party. If you opt to get an SSL certificate through AwardSpace, then we will handle the CSR generation and we will even install your SSL certificate for you.
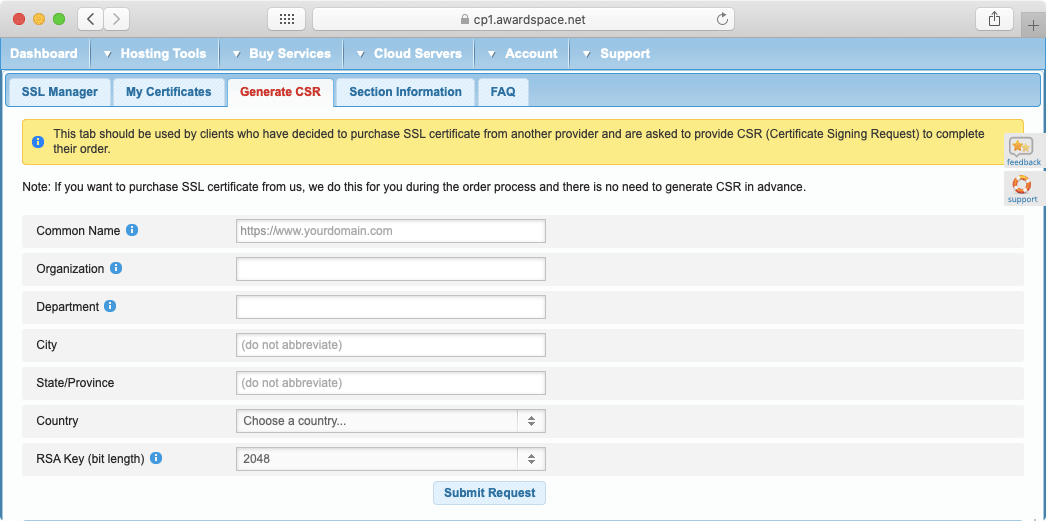
To generate a new CSR through our SSL Manager, follow the steps below:
- Go to the SSL Manager section of the Control Panel.
- Click on the Generate CSR tab at the top.
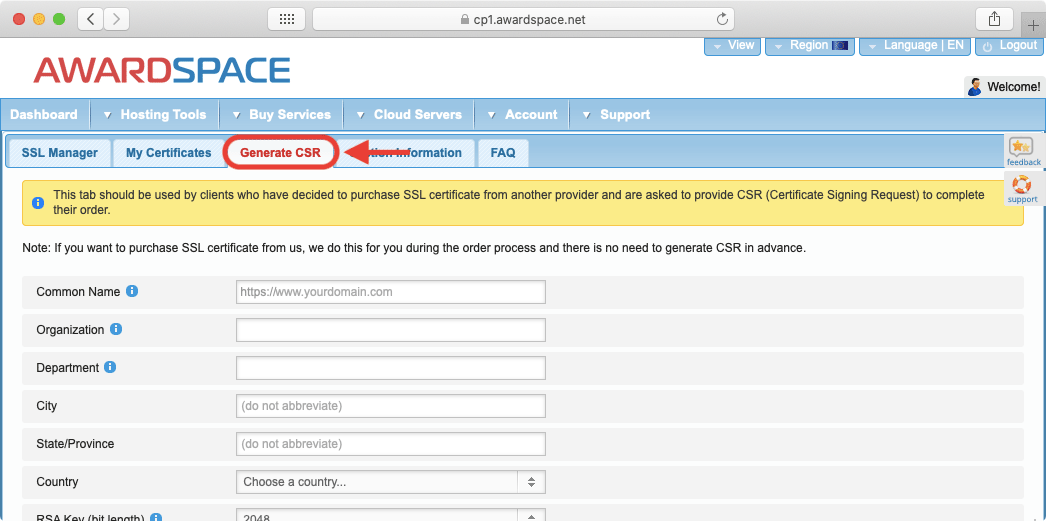
The first thing that you will note is the CSR generation form:
To create your CSR, make sure that all fields are filled in:
- Common Name is the name of your domain. You must ensure that you own a fully-qualified domain name if you wish to generate a CSR for it. An example of a fully-qualified domain name is www.example-domain.com.
- Organization is the name of your company. The listed organization must also be the legal registrant of the domain name in the certificate request. If you are enrolling as a small business or a sole proprietor, please enter the certificate requester’s name.
- Department can be used to differentiate between the different divisions in the organization. For example, you can enter Engineering or Human Resources. If you are enrolling as a small business or a sole proprietor, please enter your DBA (doing business as) name here.
- City should list your city. Do not use abbreviations or shorthands.
- State/Province should list your state or province. Do not use abbreviations or shorthands.
- Country should list your country. Use the dropdown list to make your selection.
- RSA Key (bit length) is the level of security your SSL certificate will provide. The higher the value, the better.
When you have filled all of the fields above, press the Submit Request button. Doing so will generate your CSR. To view your newly created CSR, move on to the next section.
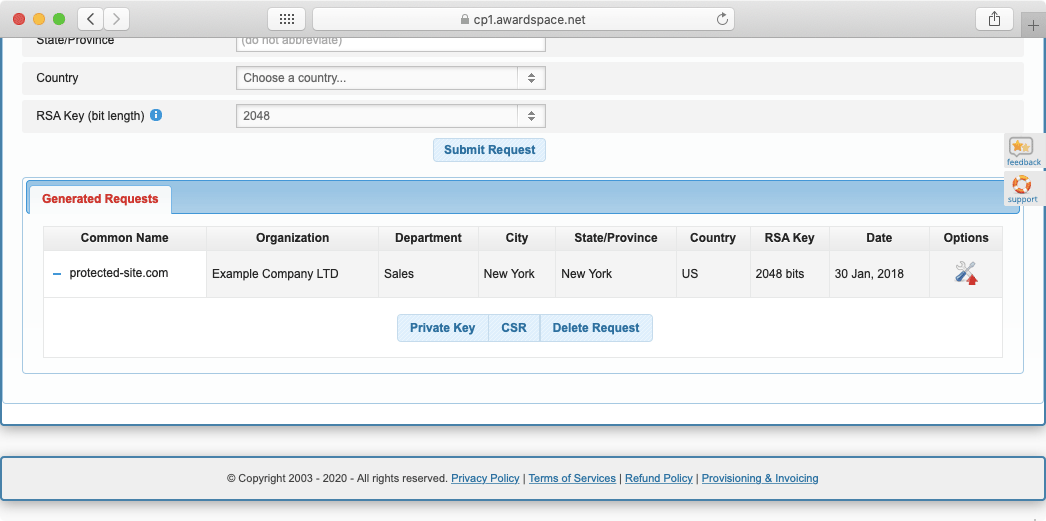
Where Can I View My Existing CSRs?
You can view your existing Certificate Signing Requests right below the CSR generation form in our SSL Manager. To access your existing CSRs, do the following:
- Go to the SSL Manager section of the Control Panel.
- Click on the Generate CSR tab at the top.
- Scroll past the CSR creation form until you reach the list of your existing CSRs. Click on the Common Name for the CSR that you wish to view in greater detail.
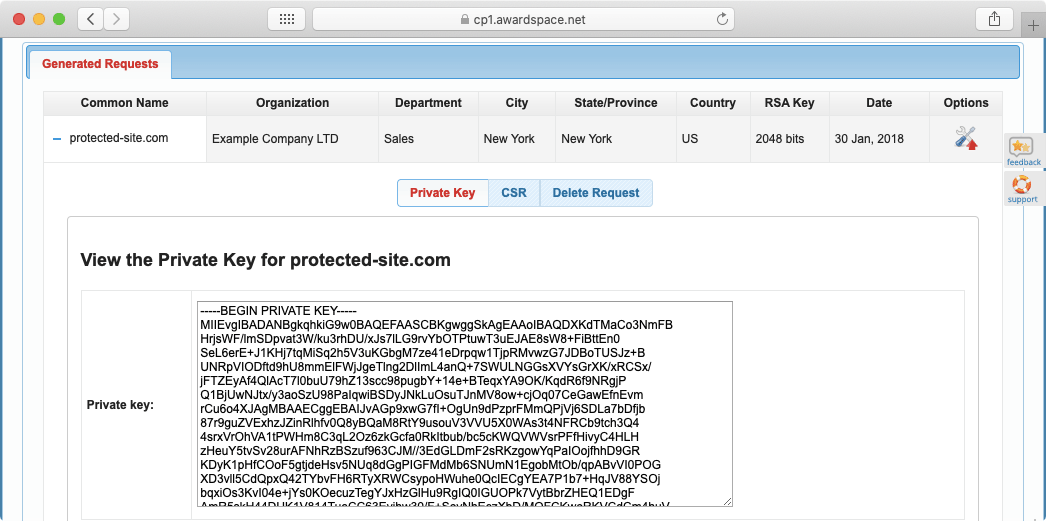
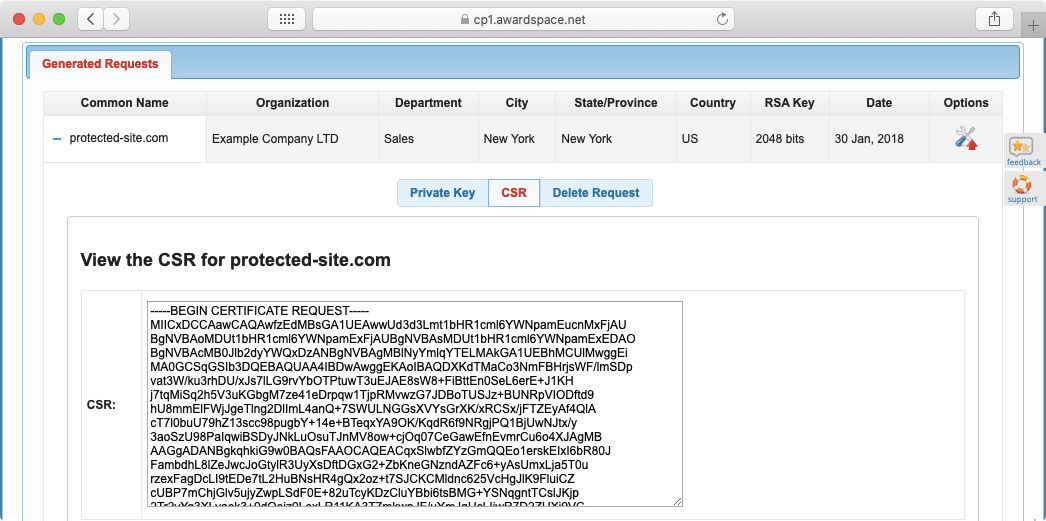
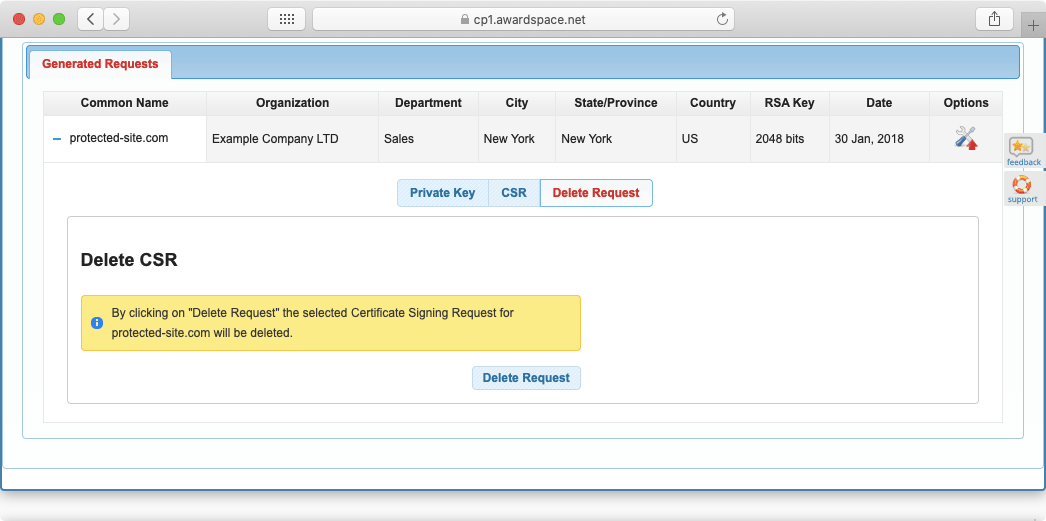
You will be presented with three tabs: Private Key, CSR, and Delete Request.
Clicking on the Private Key tab allows you to view the Private Key for your future SSL certificate. This key will be necessary when installing your SSL certificate.
The second option called CSR actually contains your CSR. You need to present the CSR to the SSL issuer so they can generate the SSL for you. The great thing is that you can reuse your CSR when it comes time to renew your SSL certificate, providing all of the details you initially entered when creating the CSR are still valid.
The last option you have available is Delete Request. Use this option whenever a CSR is no longer necessary and you wish to remove it.
Conclusion
The SSL Manager is a paid feature that offers robust tools for working with your SSL certificates. As long as you are using a premium shared hosting plan, you will be able to take full advantage of our SSL Manager. Through it, you can purchase an SSL certificate for your website, upload your own SSL certificate, and even get a free SSL provided by Let’s Encrypt.
