
With each passing year, we are storing more and more of our personal information on the web. From social media to online banking, to medical records, an increasing number of websites hold sensitive information about ourselves that should remain protected at all times.
One of the main ways website owners protect our data is by using SSL certificates. In this article, we will examine what exactly an SSL certificate is, what benefits it brings, and how to secure a website by installing an SSL certificate on it.
What Is an SSL Certificate?
The term SSL stands for Secure Sockets Layer and it enables the HTTPS protocol. This is a security protocol that allows information to be sent securely over the web. Most web browsers confirm that a connection is secure by adding a padlock icon to the address bar.

SSL achieves this higher level of security by encrypting all data that is transmitted between the server and the visitor’s web browser. Once the data is encrypted, only the server itself and the visitor’s web browser can decipher it. If a third party, such as a hacker or an advertising company, gets a hold of the information, all they would see is gibberish that makes no sense to them.
What Are the Advantages of an SSL Certificate?
When you visit a website that employs an SSL certificate, you can rest assured that the information you supply will not be intercepted by a third party. As such, your data remains confidential and it cannot be altered by someone along its route.
If you own a website that collects sensitive information about your visitors, such as their passwords or bank details, you should definitely install an SSL certificate on your website. That said, it is highly advisable to have an SSL certificate even if you do not collect any personal information.

Offering a secure connection instills confidence in your site visitors and makes it more likely that they will return in the future. What is more, popular search engines like Google are likely to give you a boost in search ranking when they detect that you have installed an SSL certificate and are offering a secure connection to your visitors.
What Are the Parts of an SSL Certificate?
Each SSL certificate is comprised of three parts: the root certificate, the CA (intermediate) certificate, and the private key. All three parts are necessary to properly install the SSL certificate. Most SSL issuers allow you to download the SSL certificate data as a small .ZIP archive.
How Can I Obtain an SSL Certificate?
There are three main ways you can obtain an SSL certificate on our hosting platform:
- you can purchase an SSL certificate through the AwardSpace website.
- you can get a free SSL certificate provided by Let’s Encrypt.
- you can purchase your SSL certificate through a third-party SSL provider.
To learn more about the three ways of obtaining an SSL certificate for your website, you can read our dedicated article on how to get an SSL certificate.
Where Should I Install the SSL Certificate?
If you mostly work with your website through a content management system like WordPress, you may be tempted to think that you can install the SSL certificate directly through the CMS. That, however, is not the case.
SSL installation needs to be carried out in the SSL Manager section of our Hosting Control Panel if you are using one of our shared hosting packages. The shared hosting plans that include SSL functionality are our premium shared hosting and our Semi-Dedicated web servers. Due to its advanced nature, the ability to install an SSL certificate is not possible on our free website hosting.
The only notable difference is found with our Virtual Private Server packages. If you own a VPS, then you need to perform the SSL installation manually through the command line. Since all VPS instances are standalone servers, they do not have access to our Hosting Control Panel and the SSL Manager in particular.
How Do I Install an SSL Certificate?
Installing an SSL certificate on our shared hosting platform may sound like a daunting task, but it is actually quite simple thanks to our SSL Manager. Below, we will look at the three different ways you can install an SSL certificate on your domain.
Option 1: Purchase an SSL Certificate Through AwardSpace.
If you opt to purchase your SSL certificate through us, we will handle the entire installation process for you! To purchase your SSL certificate, follow the steps below:
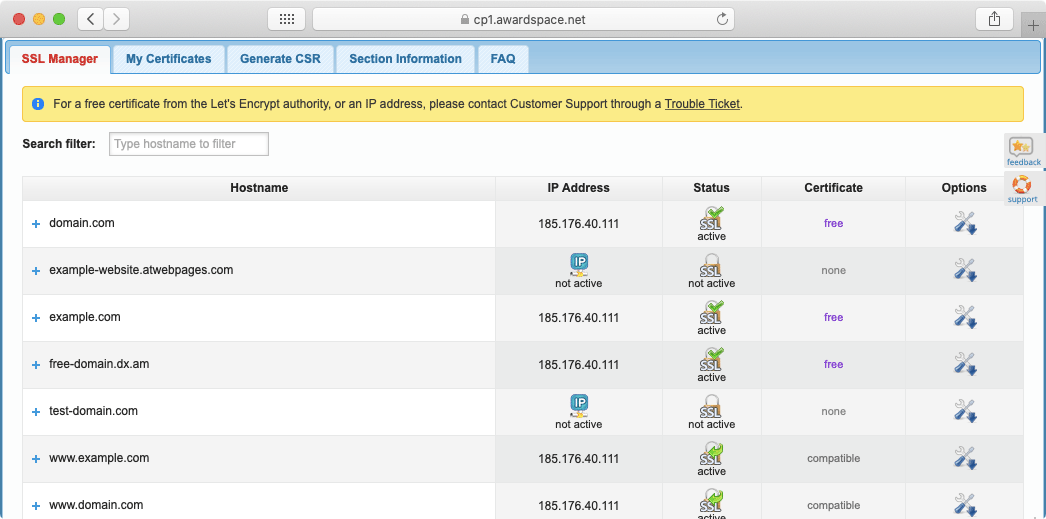
- Open the SSL Manager section of our Control Panel.
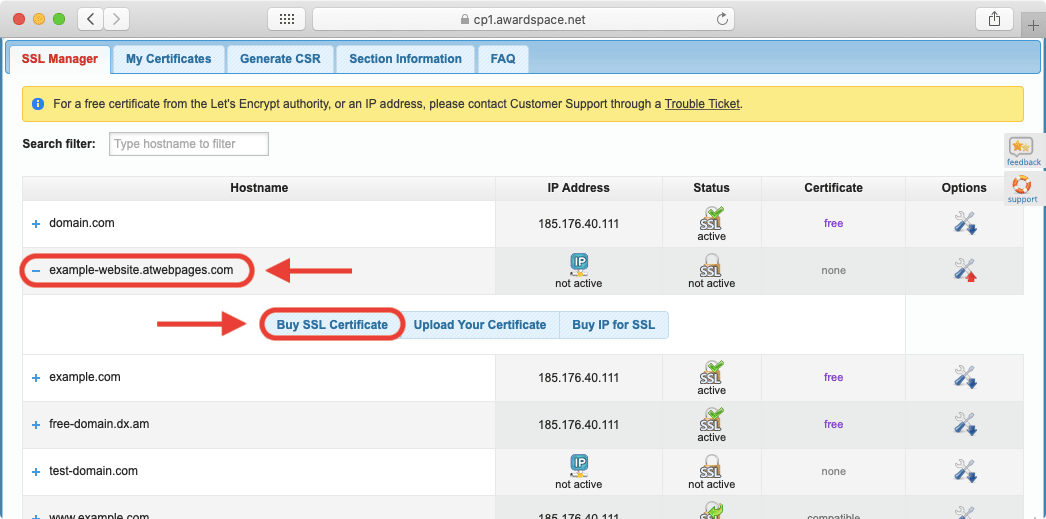
- Click on the name of the domain that you wish to secure with SSL.
- From the three tabs that pop up, open the Buy SSL Certificate tab.
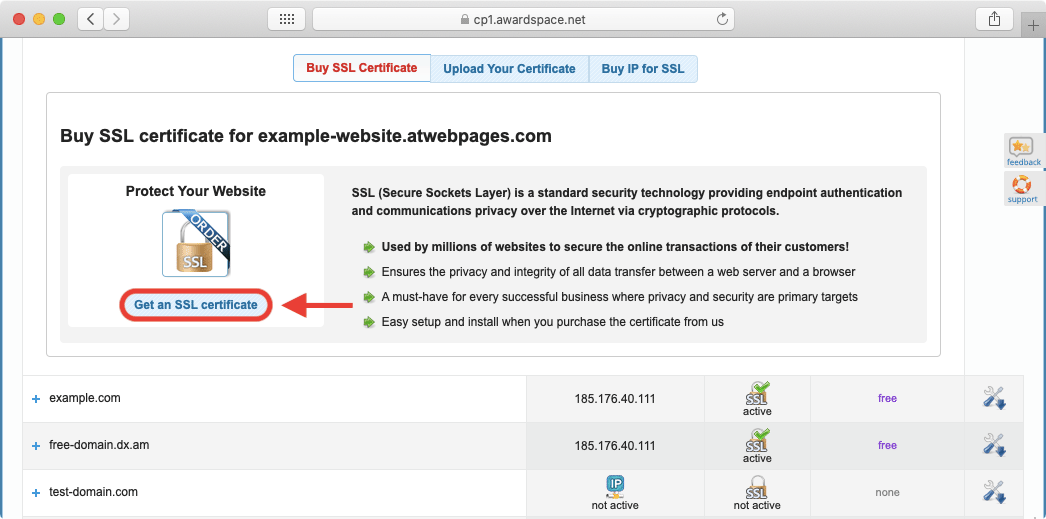
- In the Buy SSL Certificate tab you will be presented with a brief overview of the benefits you will gain when you install an SSL certificate. To proceed, click on the Get an SSL Certificate button.
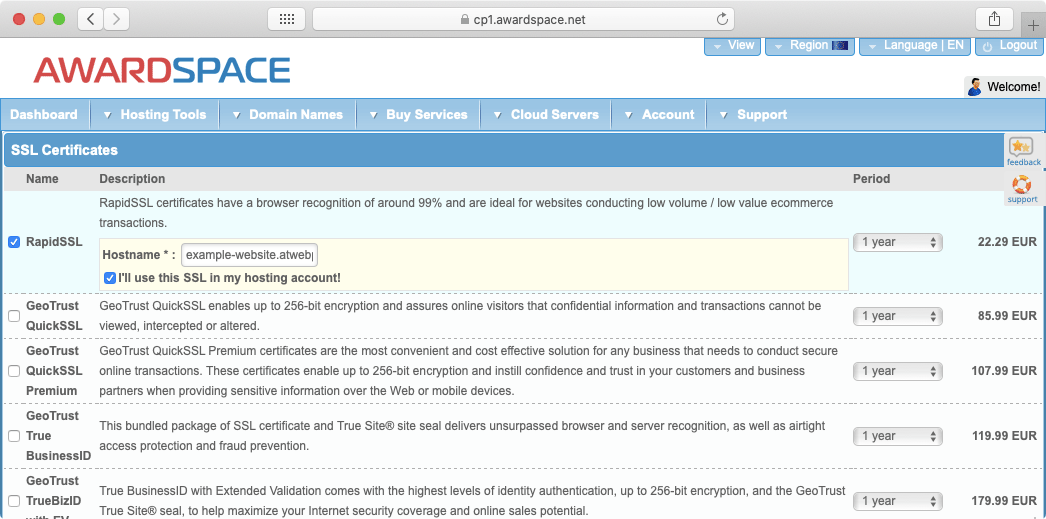
- You will be presented with the list of premium SSL certificates that we offer. Select your preferred one by placing a checkmark before its name. To learn more about the various SSL certificates that we offer, you can read our dedicated guide on getting an SSL certificate.
- When you place the checkmark, an additional Hostname field will appear. In this field, you should enter the name of the domain or subdomain that the SSL will be issued for. In our example, we will be securing example-website.atwebpages.com, so we will enter simply example-website.atwebpages.com. Do not enter the http:// or https:// prefixes.
- Place a checkmark before the I’ll use this SSL in my hosting account. option.
- Scroll further down the page and you will arrive at the Private IP (SSL) section. A Private IP address is necessary for the proper installation of the SSL certificate, so place a checkmark before the IP for SSL option.
- In the Hostname field you need to enter the name of the domain or subdomain that you are securing. You should enter the exact same domain/subdomain as you did three steps ago for the SSL certificate field itself.

- Press the Continue button to proceed.
- Finish the order process by selecting a payment method and entering your payment details.
Once the payment is made, simply allow a couple of hours for the Sales team to process your order, issue the SSL certificate, and then install it on your domain name on your behalf. If there are any issues with the SSL installation, the Sales team will contact you via email with more information.
Option 2: Get a Free SSL Certificate Provided by Let’s Encrypt.
Apart from our premium SSL certificates, we also provide a free SSL alternative, courtesy of Let’s Encrypt. As long as you are using a paid hosting plan, you will be able to take advantage of our free SSL option. To get your website secured with an SSL certificate for free, follow the steps below:
- Open the SSL Manager section of our Control Panel.
- Click on the name of the domain that you wish to install a free SSL certificate.
- From the three tabs that appear, choose the Upload Your Certificate tab.
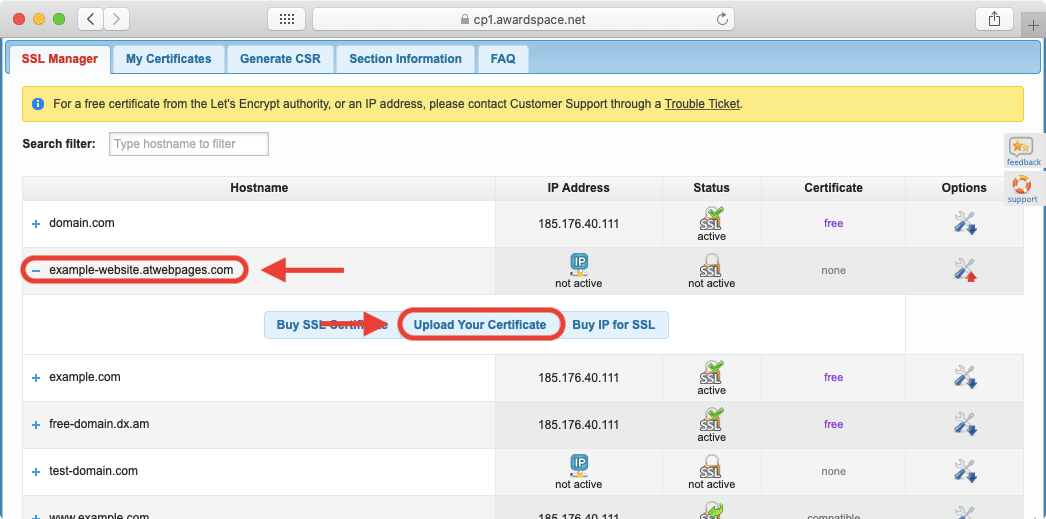
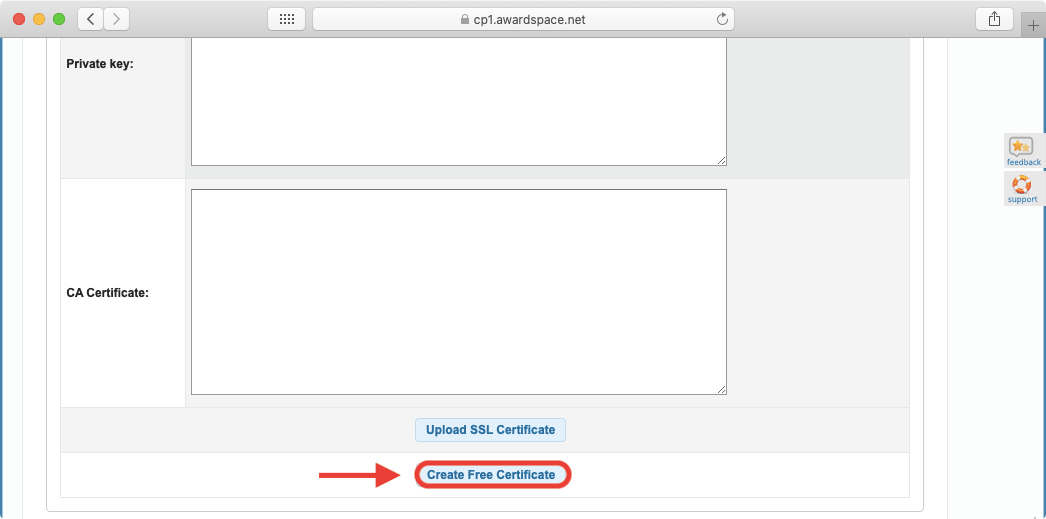
- Scroll down to the bottom of the options list and you will find a button called Create Free Certificate. Click on it.
That’s it! At this point, you should see a confirmation message that your free SSL certificate was installed successfully. You can read our article on the differences between free and paid SSL certificates if you wish to learn more about how the SSL certificate provided by Let’s Encrypt differs from the premium options that we have available.
Option 3: Upload Your Own Certificate.
The last option that we have available when it comes to installing an SSL certificate is the ability for you to upload your own SSL certificate that is issued by a third party. To perform this task, follow the steps below:
- Open the SSL Manager section of our Control Panel.
- Click on the name of the domain where you wish to upload your own custom SSL certificate.
- From the three tabs that appear, choose the Upload Your Certificate tab.
- You will notice three text fields: Certificate, Private Key, and CA Certificate. You need to enter your certificate information into these fields. If you have trouble doing so, contact your SSL issuer or read our overview of the SSL Manager to get more information. Additional information on the CA Certificate can be found in our article on what is the purpose of the Intermediate Certificate Authority.
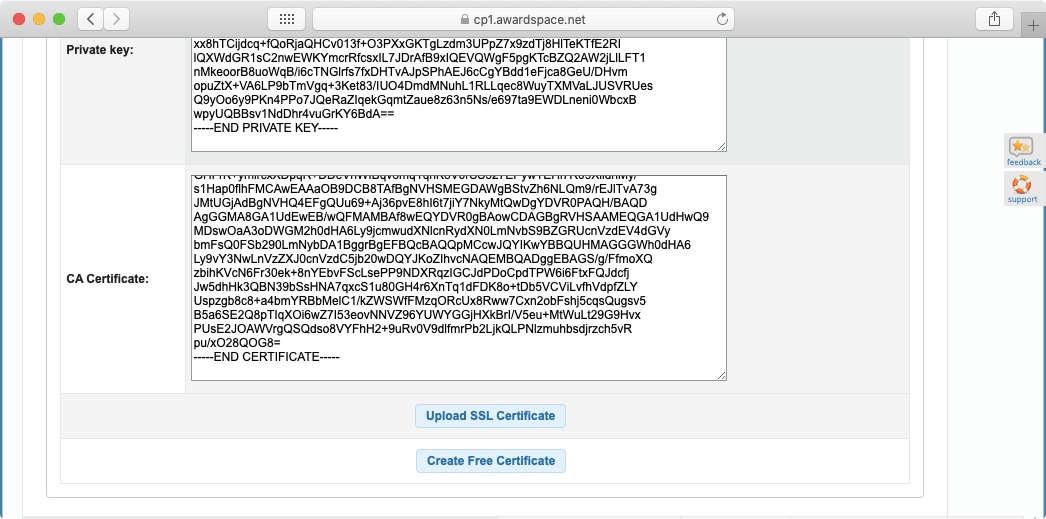
- Once all fields have been filled, press the Upload SSL Certificate button.
Your SSL certificate is now installed on the server! But in order to activate it, you need to also purchase a Private IP address. Continue reading to learn how to do so.
How Can I Purchase a Private IP for My SSL Certificate?
If you opt to upload your own SSL certificate, you will still need a Private IP to activate it. To obtain a Private IP address, follow these steps:
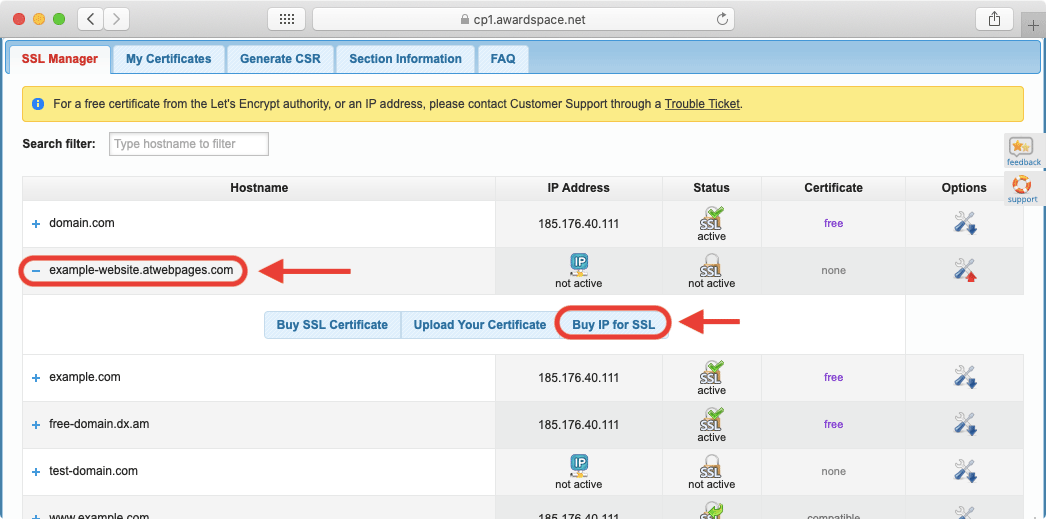
- Open the SSL Manager section of our Control Panel.
- Click on the name of the domain where the Private IP address should be added.
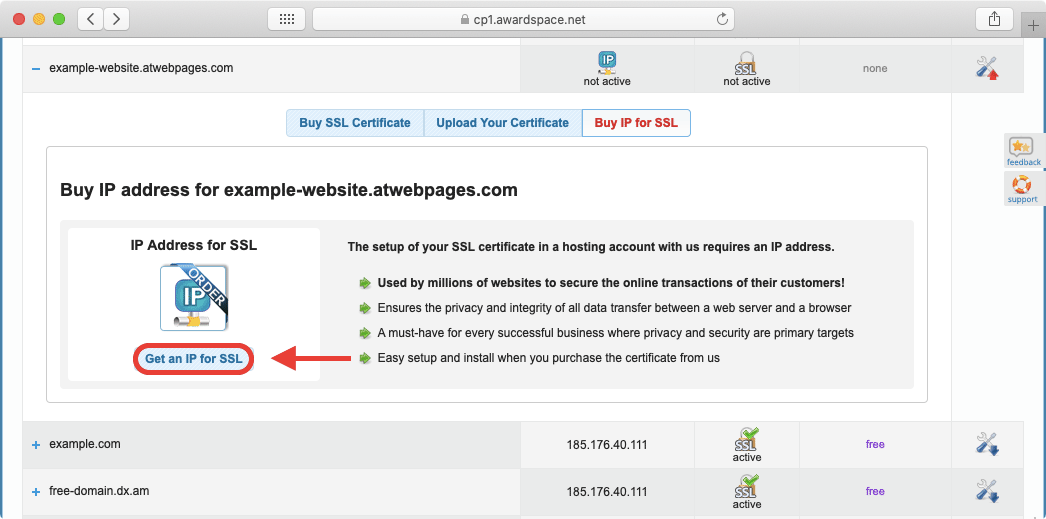
- From the three tabs that appear, choose the Buy IP for SSL tab.
- You will be presented with a brief description of what a Private IP is. To get started with the purchase process, click on the Get an IP for SSL button.
- You will be taken to our SSL/IP ordering page. Just scroll past our premium SSL offers until you reach the Private IPs (SSL) section.
- Place a checkmark before the IP for SSL option.
- In the Hostname field, you need to enter the name of the domain or subdomain that you will be securing. The value that you enter here must match exactly the hostname that the SSL is issued for.
- Proceed by clicking on the Continue button.
- Finish the order process by selecting a payment method and entering your payment details.
Keep in mind that your IP for SSL needs to be renewed every year. Otherwise, your website may stop functioning as expected. To learn more, read our article on what happens when a dedicated IP for SSL expires.
Why Is My Website Not Loading Securely Now That I Have SSL?
Even after you successfully install an SSL certificate on your domain name, you may still see a Not Secure warning when visiting your website in a browser. This could be due to three main reasons which we will outline below:
- The most likely reason is that your website is not configured to force a secure connection. In other words, unless your site visitors explicitly type https:// before the start of your domain name, your website will not load securely. This is fixed by setting up the server or your CMS to automatically redirect all unsecured traffic to the secure versions of the requested URLs.
- The second reason you could be experiencing security warnings is if some of your website elements like images or CSS files are loaded by a plain HTTP connection rather than HTTPS. As a rule of thumb, we recommend all connections, links, and resources on secure pages be loaded via HTTPS.
- Lastly, the reason could be as simple as your browser keeping an outdated copy of your website in its cache for faster loading. Try clearing your browser cache as this can fix the issue.
If you need additional help getting your pages to load securely, you can read our in-depth guide on how to force a secure connection to a website.
Conclusion
Nowadays, having an SSL-enabled website is more important than ever. A website secured with an SSL Certificate will have increased user trust, enhanced security, and better search ranking. You can get all of those perks and more by purchasing a premium SSL certificate or even just using our free SSL option.
