
It has become a part of us. When we enter a website we are instinctively looking at the top of the page, so we can orient ourselves. It is an attempt to understand what the site is about and what the other pages would look like if we use the menu.
The menu of the website is the main (and often the only) way for users to navigate and move throughout the web estate.
Like almost everything in the CMS, the WordPress menu may look a lot scarier than it really is. But that is ok. We are usually confused when we face something we aren’t familiar with. This is normal.
Still, you may want to skip that try-and-error process.
And that, of course, requires knowledge.
If you want to create a website with WordPress, you might want to check out our step-by-step guide on building a WordPress website.
On the other hand, if you are confused just about the topic of the WordPress menu, you can continue reading the present tutorial.
WordPress Menu
WordPress comes with a well-structured and efficient menu-building system. By using it, you can create not only a navigation menu (the one on the top of the page), but also sidebar menus, and footer menus.
There are WordPress themes that will provide you with more than one menu type. And some even do have in-theme menu building logic. But for most of the themes out there, the default WordPress menu building page will be more than enough.
At one time or another, you’ve probably landed on a website that has more than on the navigational menu. Usually, they are two. One that is bigger and more important than the second. And, of course, the second which is more often than not, on the top, with a smaller font and overall size. If the theme that you are using has the potential of using two menus, they’ll usually have names that are way too apparent for you to mistake one of the menus for the other.
Usually, these names are Primary and Secondary, but they can also be named otherwise.
And if you want to use a menu different from the Primary and Secondary in the sidebar of your website, you need to create that menu. After that without assigning a role to it (Primary or Secondary), you’ll need to use the sidebar widget…
But we are getting ahead of ourselves.
How to Create a WordPress Menu
Creating a menu in WordPress is fairly easy. You need to enter your WordPress Admin Panel. Chances are that by now, you are familiar with the admin panel.
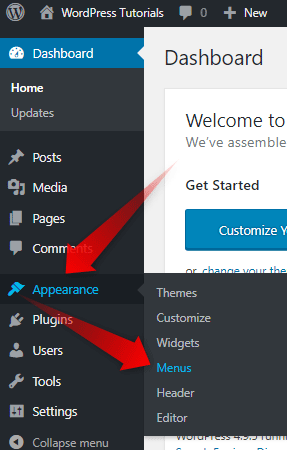
You need to look for the Appearance option in the sidebar menu. And then go for the Menus option.
If you haven’t seen it already, here is how it looks:
After you click on the Menus button, you’ll land on the menu creation page. It looks like this:
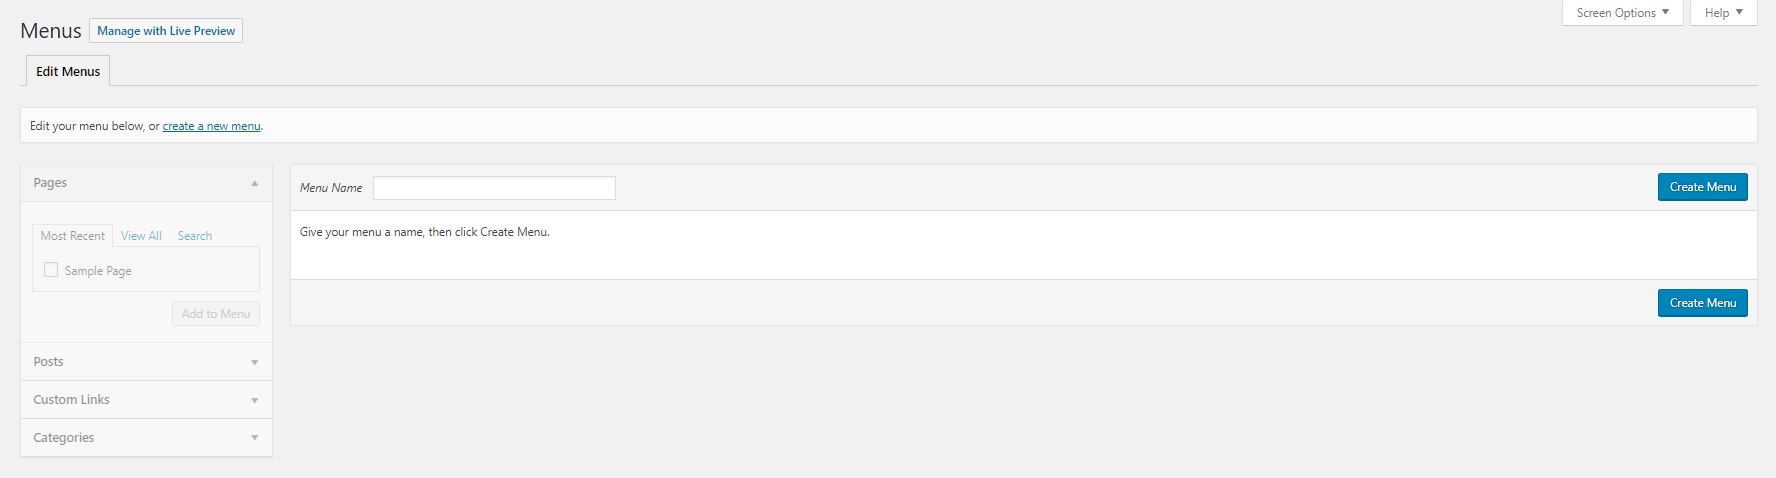
As you can see, you are not presented with many options. To change this, you need to create a menu.
Doing this is a simple task.
You need to name your menu, and just click one of the Create Menu buttons, located in the right part of the page.
Now that you’ve created your first menu, you need to choose the pages that you want to be presented in it. There are two things that you need to bear in mind when creating a menu.
First, the pages, posts, or categories that you want to add to the menu should be already published.
Second, the elements that you are adding to the menu from top to bottom, will be presented from left to right on the front end of your website.
Now that we took this out of the way, we may proceed to discover the functions of the WordPress menu.
To add elements to the menu you need to first choose them, by clicking on the empty squares on the left of the elements.
Mark the elements you want to add to this menu and click the Add to Menu button.

Arrange your WordPress Menu Elements
As we’ve mentioned already, the added components of the menu will be presented top to bottom in the menu creation page, but on the front end will be arranged from left to right.
And while you can be cautious of the sequence in which you are adding the units to the menu, there is an easy way to rearrange them, once they are added.
Simple drag and drop.
Hovering an already added unit with your mouse, will transform your pointer into a drag and drop arrow.
Now, you can just click on the element and move it all around. Changing its position in the menu, or making it a part of a drop-down menu.
How to Create a Dropdown Menu in WordPress
You’ve probably seen it on other websites when you hover your mouse over some of the menu elements, a sub-menu emerges. Achieving this effect in WordPress is one of the easiest tasks that you may need to attain.
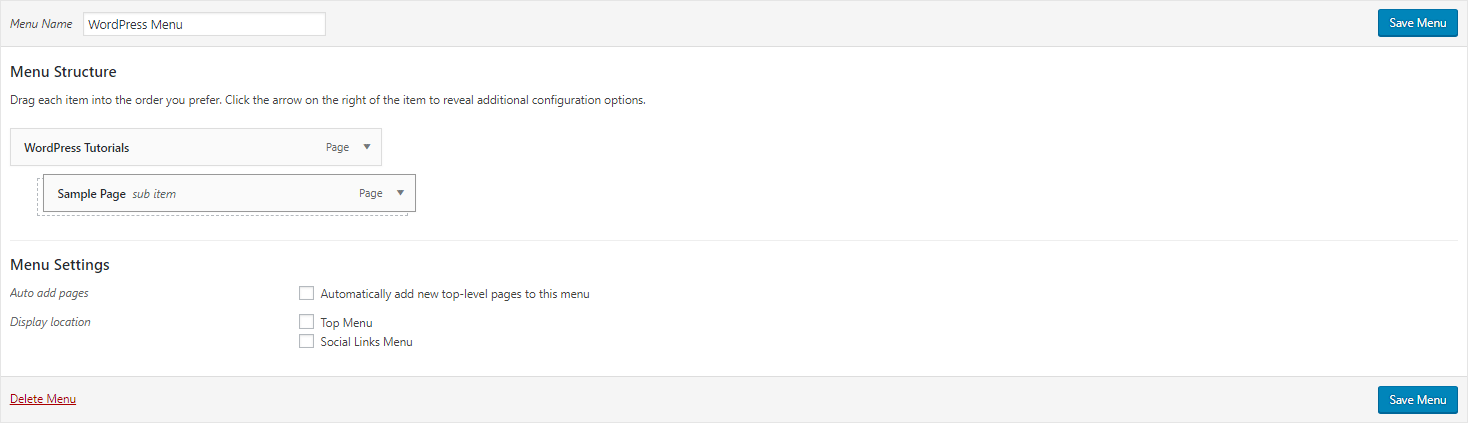
You need to arrange the units that you want to put in a sub-menu right below the one that will be shown on the menu.
To do so, drag and drop them on just a bit on the right.
Like so:
You can nest menu elements eleven levels deep when using the pre-installed Twenty Seventeen theme. Yet, there may be themes that have more or fewer levels.
Keep in mind that even if the theme is presenting you with that option, you probably shouldn’t go with it, because going so many levels deep in the menu, can and will irritate the users of your website.
Once you’ve arranged the elements of your menu, click the blue Save Menu button, which you’ll find above and below the menu on the right part of the Menu Structure window.