
Starting a website with WordPress can prove to be a difficult task. In this full WordPress tutorial, we will show you how to create a WordPress website for free. But before we start, some questions should be answered. In the following few paragraphs we’ll answer some interesting questions about WordPress. Yet, if you want, you can simply jump to the How to Install WordPress section of this full tutorial and start your new website with the CMS.
What do I Need to Create a WordPress Website?
To create a WordPress website you’ll need:
- A domain name – a domain name is the name of your website. com is a domain. AwardSpace.com is also a domain.
- WordPress Hosting – Web Hosting is the service that you use to store your website files, and when someone wants to see your website, our servers are sending them the information needed. WordPress Hosting is a hosting service, specifically created to support WordPress websites better. That is why this type of hosting service is the most recommended for a WordPress website.
- Give or take, 40 minutes.
How Much Does a WordPress Website Cost?
The truth is every website has a different price. Equalizing the price to different websites is impossible.
On the other hand, there are a few, more or less fixed, costs that you’ll have when creating a website.
But as to create a website and host it, has a different price, which depends on the scale of the website.
If you decide to use our free web hosting service, you can, of course, create a WordPress website for free.
Yet, we would highly encourage you to choose the WordPress Hosting Plan that is most appropriate for your project. Adding a domain name is also highly recommended.
If you want to create your WordPress website alone, by following this tutorial, the costs will be less than $70.
So, we can easily say that this tutorial is also a tutorial on how to create a website for less than $100.
Is WordPress the Best Website Building Option?
As you go through this tutorial, we hope you’ll find out why WordPress is the most used CMS in the entire world. Whether it is the best, you are the one to decide for yourself. For one thing, it is the most used. It is arguably the easiest one to use, as well.
Although there are a vast number of known and unknown website builders, WordPress is surely the most versatile option. There are too many options, that are not presented to a website builder’s users. And on top of that, with a self-hosted WordPress website, you have the possibility to take your website files and go whenever you want.
But a comparison between WordPress and a site builder you’ll find a little further in this material.
Let’s start!
In this WordPress Tutorial:
- What is WordPress
- Why WordPress
- WordPress.org vs. WordPress.com
- WordPress vs. Web Site Builder
- WordPress Hosting
- How to Install WordPress
- How to Enter The WordPress Admin Panel
- WordPress Themes
- WordPress Plugins
- Before You Start Posting
- How to Post on WordPress
- WordPress User Roles
- How Does WordPress Menu
- Frequently Asked Questions Regarding WordPress
Although we’ve tried to gather as much information, as possible in this WordPress website creation tutorial, the truth is that you’ll have to go through just four steps:
- Choosing a Hosting Plan to Host Your Website
- Install WordPress
- Design Your Website
- Start Adding Content to Your Website
In today’s economy, the chances are that, whatever your walk of life, you may find yourself in a situation where you need to create your own website. Whether it is a personal blog, a business website or to find out whether you are capable of achieving it, a project in school, or for some other reason, to achieve that goal, you need to know how to create a website.
And the truth is, it’s not that hard. It is getting easier and easier.
The problem starts when you, as we all do, google “how to create a website” and find all those options. And with the wide range of methods and website building variations, you could easily find yourself confused, and discouraged.
The more option we have, the more we, people, tend to get scared about whether we’ll make the right decision.
Creating a WordPress website might not be for everybody. On the one hand, it is fairly easy to create a WordPress website, but on the other, if one has the time, and money to spend for an in-house web developer team, you probably will want to go with a custom solution.
It is possible to create a website like Facebook (although not recommended) with WordPress, and a lot of large and famous companies, are putting their trust in WordPress.
But let’s not get ahead of ourselves.
Although the process that we’ll go through is simple, it might take some time for you to create your own WordPress website fully. In this tutorial we’ll cover all the important factors that you need to consider while creating a website, so you won’t be surprised or disappointed in the near future when your skills get better, and you discover that you’ve missed something, while you were making your first steps with WordPress.
That is exactly why, we highly encourage you to go through every step of this tutorial, so you won’t find your site with, say, the wrong structure, or random permalinks.
What is WordPress
In a word, WordPress is an Open Source Content Management System or CMS.
The technological industry in most, if not all, of its realms, is striving to make more and more of its products usable to everyday people.
The greatest example of that probably is personal computers. We all know that before the graphic interface, the only thing that people were seeing on their monitors, was code, code, and more code.
And because coding was, and is not, the comfort zone for most of us, the graphics interface was created, and along with it, the market for personal computers, and the rest is history.
A similar shift happened in the web industry when the so-called Content Management Systems started to emerge.
These Content Management Systems(CMSs) are the graphics interface of web development. A simple, visual way to create, and manage web content.
As visible from the plural in ‘Systems’, WordPress is not the only CMS.
Why WordPress
If you are considering creating your website and you want to create it by yourself, WordPress is the way to go. Don’t take our word for it.
Let’s give the stats a word:
- WordPress usage and popularity
As of today, WordPress is running roughly 32% of the Internet. That is a third of all the websites that you engage. A third of them are using WordPress. - Content Management Systems are a lot. We have Joomla, Drupal, Magento, Grav, and much more others. In this, so-called ‘red sea’ with that number of competitors, WordPress has around 60% of the CMS market, which makes it the most popular Content Management System for the 7th year in a row.
- What is more, every day more than 500 new websites are created with WordPress.
- A little over 14% of the top 100 websites in the world are using WordPress
- Also, 8% of the top 100 blogs are using WordPress
Not enough? Here is a list of websites, that are using WordPress:
- New York Observer
- New York Post
- TED
- USA Today
- CNN
- com
- com
- Spotify
- TechCrunch
- NBC
- National Geographic and
- AwardSpace
But why are all those brands putting their trust in WordPress? And why you should too?
Well, for starters, as we mentioned, WordPress is an Open Source CMS. Which, in a word, means it is free.
And with the vast number of free themes, plugins, and other add-ons, WordPress is becoming more and more a simple rational choice.
On top of all that, WordPress is versatile, and you can create whatever website you want, as long as you have the skills and discipline needed.
The best part of using this CMS, when you compare it to other options like the website builders is the fact that most website builders are property to a company. Meaning that if you’ve created a website by using a website builder, and suddenly you no longer want to use their services, you won’t be able to make the website you’ve created.
You’ll probably be able to take the domain, but not the website, not the content, not the images. Once your account is disabled, all this hard work will be gone. Forever. On the other hand, you can use WordPress with one hosting provider, and once you want to move, you can migrate your WordPress website.
WordPress is so famous, because it is free, and is not making you stay in a place you don’t want to be.
It is just the perfect solution for everyone that wants to create their own website.
WordPress.org vs. WordPress.com
Although a lot of services are created on the core of this CMS, WordPress has two main denominations.
Namely, WordPress.org and WordPress.com.
WordPress.org is the WordPress. This is the main site of the organization, and here you can download the latest version of the software for free. Most plugins and themes are created for this version of WordPress.
WordPress.com, on the other hand, is some of the full packages. There you can get a domain, and hosting, and run your website.
But…
But WordPress.com has a policy where, if you are not paying for hosting, even if you are paying for the domain, they’ll run ads on your website. What is more, you won’t be able to get your website and go to another hosting, as their version of WordPress is different. That is not to say it is not possible at all, but it is harder than it should be.
And that is done on purpose. They don’t want you to go.
Whichever hosting provider you choose, we highly encourage you to go with the WordPress.org version. You will get the software for free, as well as all of its future updates. And what is more important, you will have the freedom to download your website and move.
Something more, you can run WordPress on Free Hosting With No Ads.
WordPress vs. Site Builder
Site builders are great. They really are. They are making the building of your website as easy as possible. You can simply click on an element of your choice and drag it to the location that you want it to be located. Once there, you simply drop it and customize it. And you are ready to go to the next one.
Then why so many people are choosing WordPress to create their websites instead of website builders?
For one thing, WordPress also has website builders. Yes, most of them are paid, but it is a one-time investment that will surely pay you off over time. Also, with the latest big upgrade of WordPress – 5.0 “Bebo” – the Gutenberg editor was presented to all WordPress users for free. And Gutenberg is extremely close to a website builder.
The chances are, one day Gutenberg will be the same as the site builders, if not better.
WordPress is also more versatile. With the plugins and themes, and website builders, WordPress has a ton of options, that are not available with a website builder.
A self-hosted WordPress website, that is, a WordPress website, located on a WordPress Hosting server of your choosing, gives you the opportunity to get your website files and move to another hosting company or even to host it on your own computer.
On top of that, if a company that offers only a website builder as a service, could close doors at one point in time or another. If that happens, your website will be no longer available. At all. You won’t be able to just go to another company, upload your files, and call it a day. The process of website creation will have to start all over again. From scratch.
WordPress is not only a better option compared to all the other CMS’s and website builders.
WordPress is probably the best website creation platform that exists.
WordPress Hosting
With the rise of the CMS, and the demand for a reliable hosting service to run a WordPress website, the natural need for a cheap WordPress Hosting Service emerged. Although using the services of AwardSpace, you can create a WordPress website for free, we recommend that you get a premium WordPress hosting solution, as it can prove to be more reliable and secure.
Like every other site, your to-be-created WordPress website needs hosting. And even though, you can run it even on a free hosting service, getting a WordPress optimized solution is probably the best option available.
Why?
Well, the WordPress hosting services are, of course, capable of running other websites, and other CMSs, as well. But what is more important is the fact, that they are created with the purpose of running WordPress.
This hosting plan is optimized for this CMS.
To get yourself a hosting plan for the website that you want to create, you need to choose a WordPress Hosting Plan.
Go through the three steps of our signup. Once the process is completed, if you are not automatically redirected to your Hosting Control Panel, use the AwardSpace Login Page, where you need to enter your Username and Password.
You’ll be redirected to your hosting control panel, and the next step is to install WordPress.
How to Install WordPress
This is the first step of this tutorial. Here we will show you how to make a WordPress installation for free.
As we’ve already covered how to install WordPress, in this part of the article we’ll just rediscover what we already know.
In case you’ve already got yourself a WordPress Hosting account, to install WordPress, you need to:
- Start the Zacky Installer.
- Choose WordPress as the CMS you want to install.
- Pick any themes and plugins that you want to install with the CMS.
- Configure the website settings.
- Install WordPress.
- Enjoy!
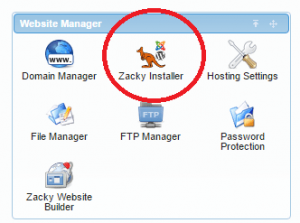
Step #1: Get into the Hosting Control Panel and Start the Zacky Installer
When you enter the hosting control panel, you’ll be presented with various options to tweak your account. But to install WordPress, you need to start the Zacky Installer.
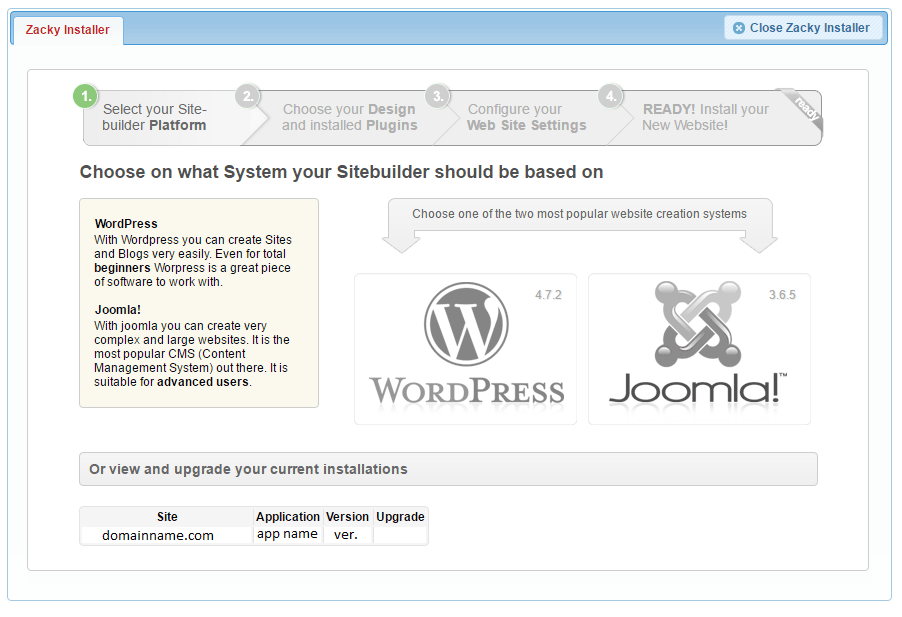
Step 2: Choose WordPress
The Zacky Installer will present you with the opportunity to choose between different CMSs, not only WordPress.
But as this is a tutorial on how to create a website with WordPress, we’ll choose the WordPress Image, to start the installation process.
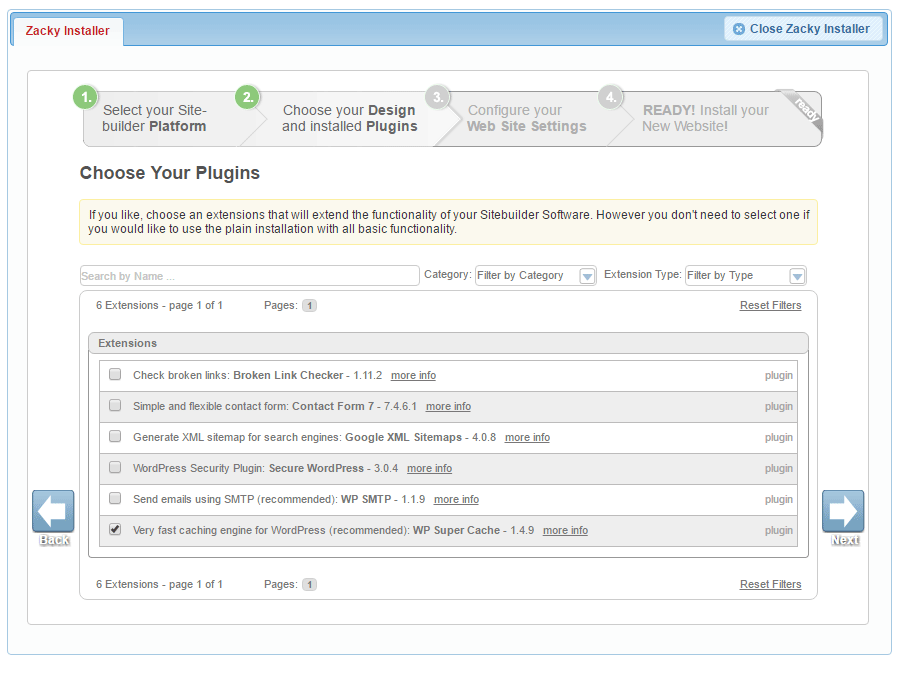
Step 3: Choose Design & Plugins
In our installer, we’ve made an effort to integrate some themes and plugins, which you could install simultaneously with WordPress. Of course, you could skip that part by clicking Next. If you want to install a theme – click on the one that you prefer. And click Next afterward.

Next, there are plugins. You can follow the instructions above. If you like some of them mark them and they’ll be installed automatically. Afterward, click Next.
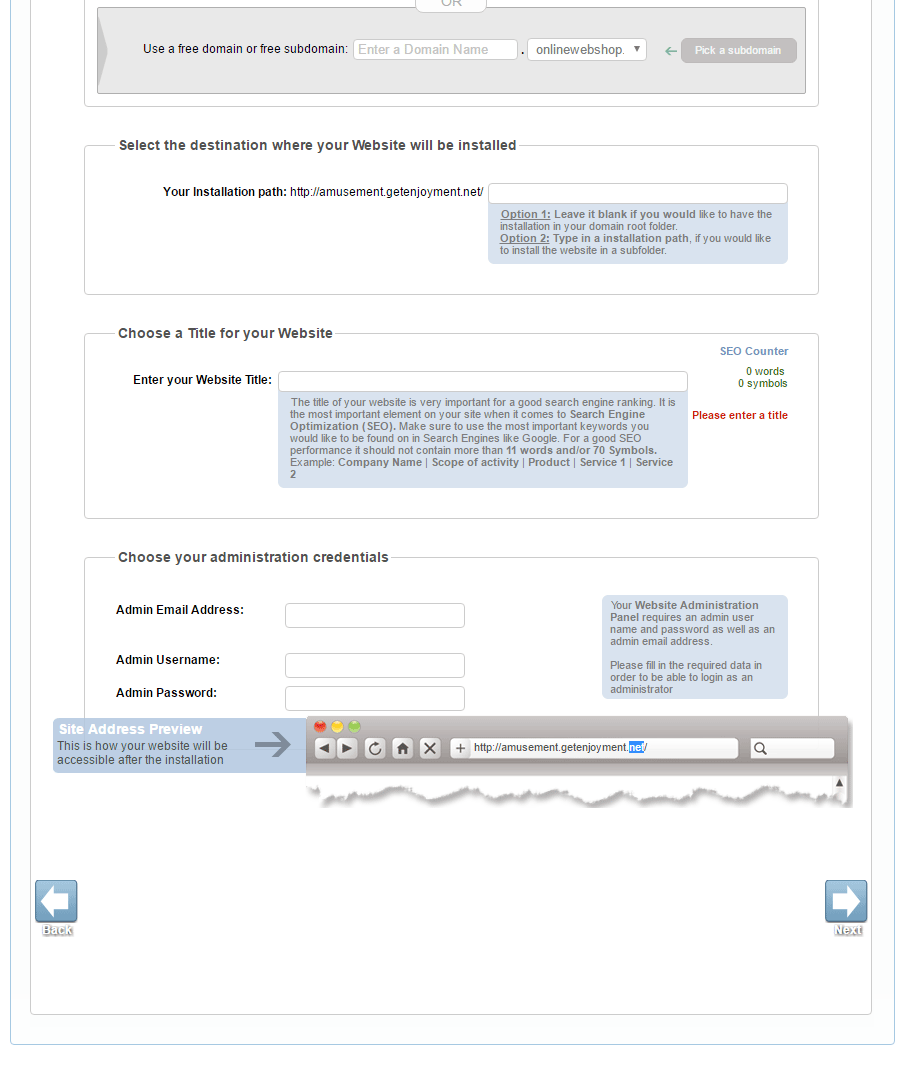
Step 4: Configure Your Web Site Settings
Here you’ll be able to choose your domain, register a new one, or pick a free subdomain.
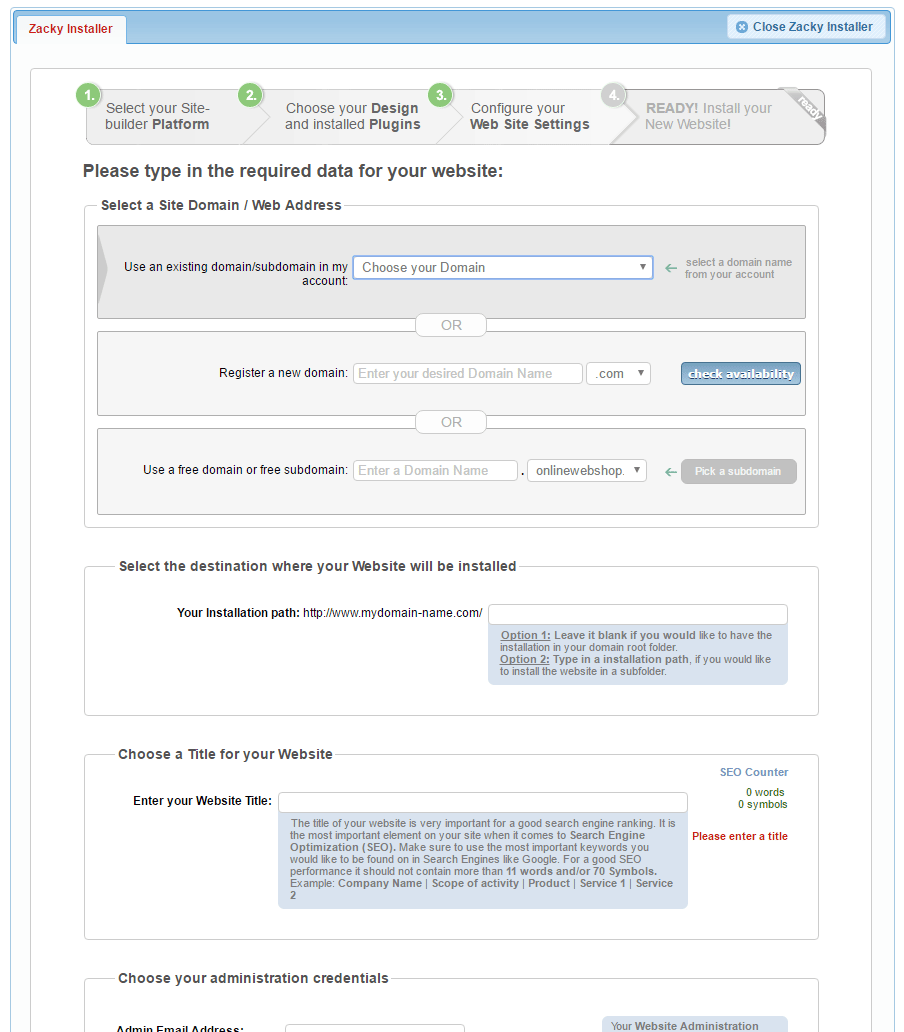
If you already have a domain, you can use the falling menu to choose it, as shown in the picture.
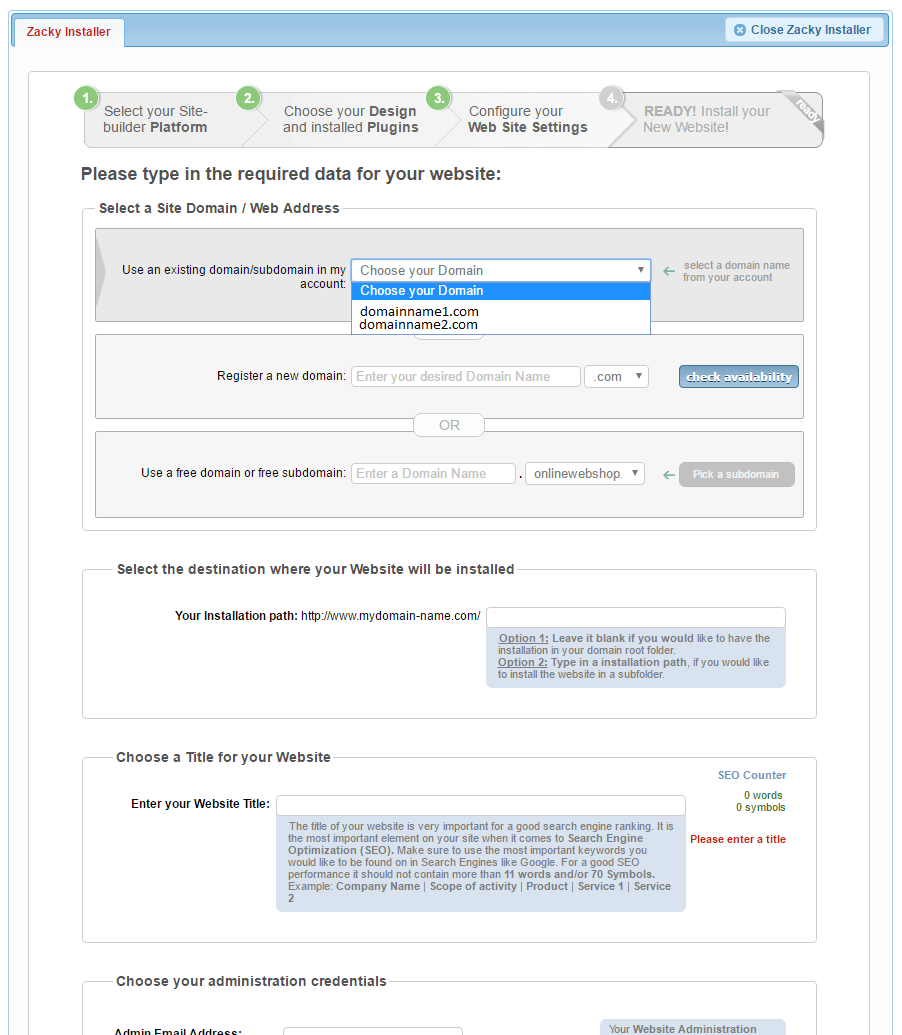
Choose your Site name, fill in the Admin profile details and click Next.
Step 5: Install WordPress
Check and double-check the information you’ve entered, so you won’t have to re-install the CMS. After you are sure, everything is as it should be, click the Install Now! button.
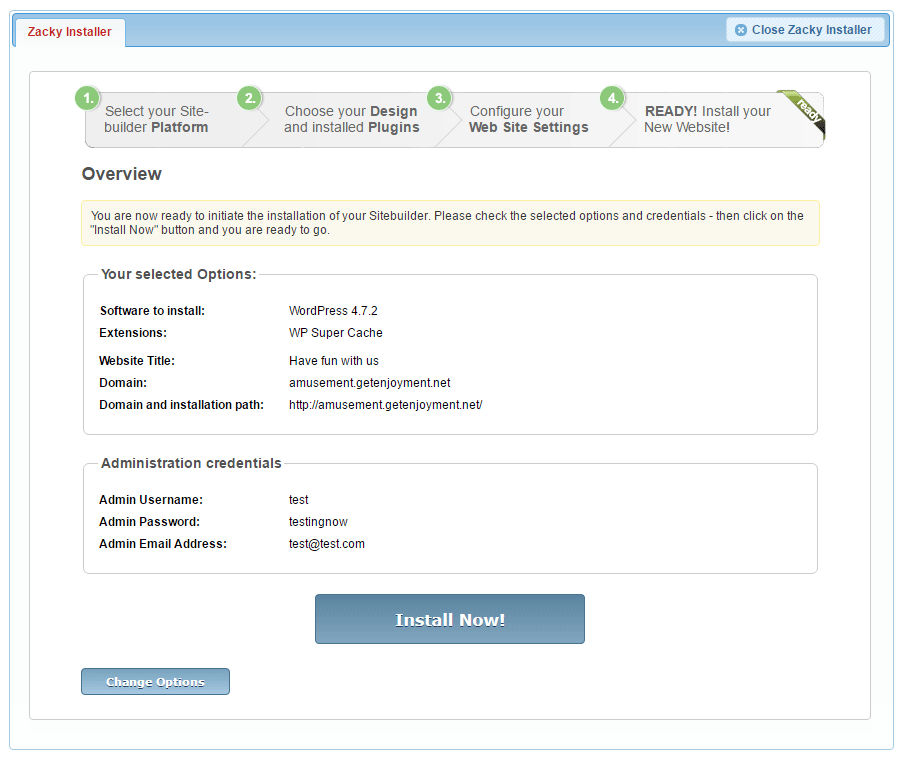
Bear in mind that once you’ve installed WordPress, you’ll need to keep the CMSs updated.
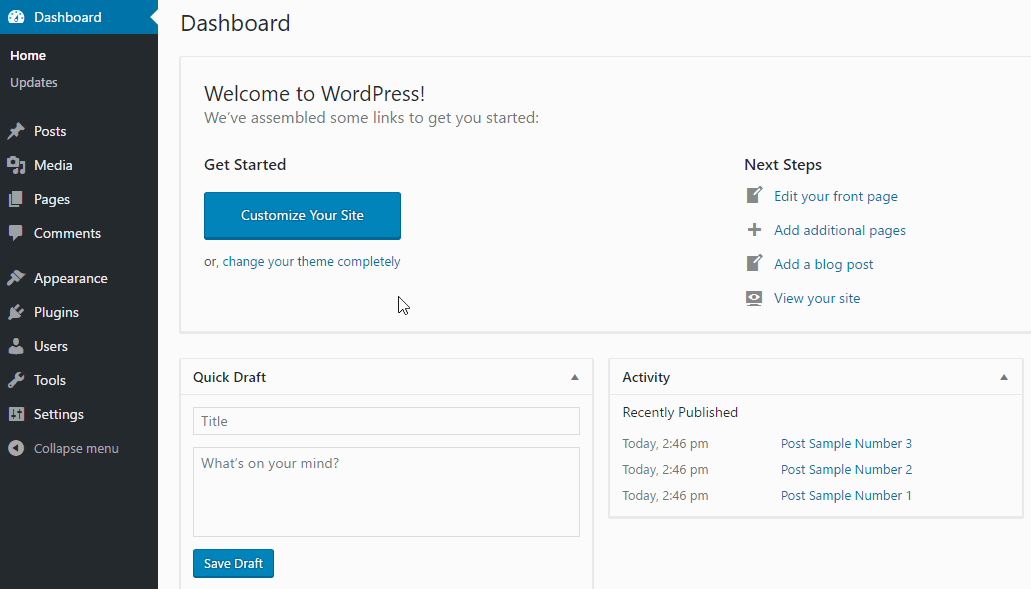
How to Enter the WordPress Admin Panel
The WordPress Admin Panel (a.k.a. Dashboard) is where you’ll make all the magic. Here, not only you’ll tweak the design of your website, but will create your posts, pages, menus, and so much more. The admin panel is, essentially, where you’ll create everything that users will see and interact with.
Thus, it is essential to know how to enter the WordPress Dashboard.
To enter the WP Dashboard and start creating your website, you’ll need the following information:
- WordPress Installation URL
- WordPress Username
- WordPress Password
To enter the Dashboard of WordPress, which we’ve already covered, you need to take the following steps:
Step 1: Enter your domain name and add the /wp-admin at the end.
NB! If you installed WordPress in different than the root directory, you’ll have to insert it between the domain name and /wp-admin.
Step 2: To access your WordPress admin panel, type in the username and the password that you’ve chosen in the WordPress installation process.
Now that you’ve entered your WordPress Dashboard, you’ll probably want to limit the access of other people to your WordPress website.
Install WordPress Theme
As you probably already know or found out through the installation process, WordPress, as most if not all CMS is working on the basis of themes. That is, WordPress itself does not have any layout or look. It all depends on what theme you decide to use. The latter is not to say that WordPress does not have any tale-tell signs for one to understand whether a website is created with the CMS. It only means that there is no default look of WordPress.
Still, WordPress has a default theme. As of today, it is the Twenty Nineteen.
Although it is beautiful, you’ll probably want to install another WordPress theme, and thus, create a specific feeling for your website.
In AwardSpace’s WordPress Tutorials, we’ve already covered the WP installation process. And you can either go to the already published tutorial or follow the present one, where we’ll go through the process once again.
Method 1: Installing a WordPress Theme from the WordPress.org Theme Directory
Step 1: Enter the Theme Options
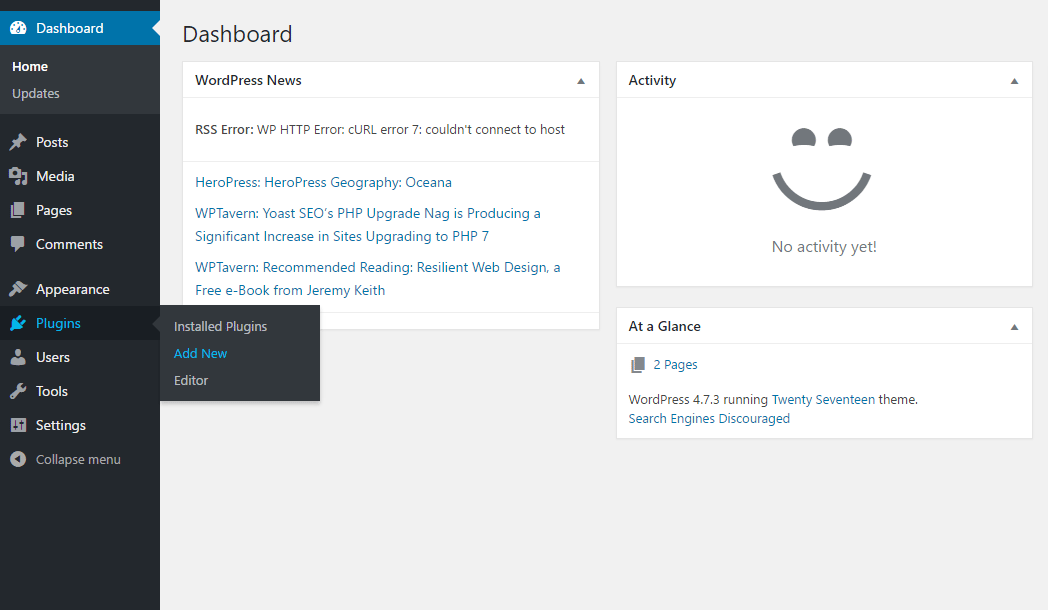
To do so, you can either hover the mouse pointer over the Appearance button, then choose Themes, or just click on Appearance.
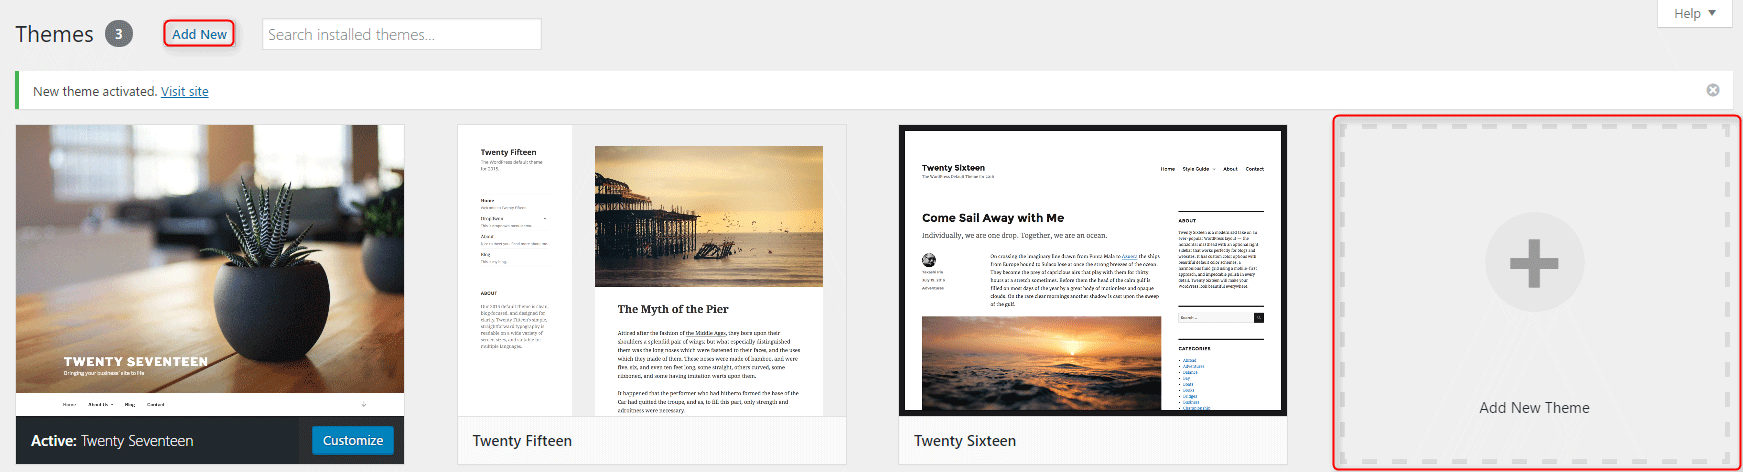
Step 2: Add New Theme
Here, you should see two or three already installed WordPress themes. The CMS installs them automatically. You can either delete the unnecessary WordPress themes or just go for the installation of the one that you want to use.
Click on the Add New button above the other themes.
Or, of course, you can click on the huge Add New Theme button.
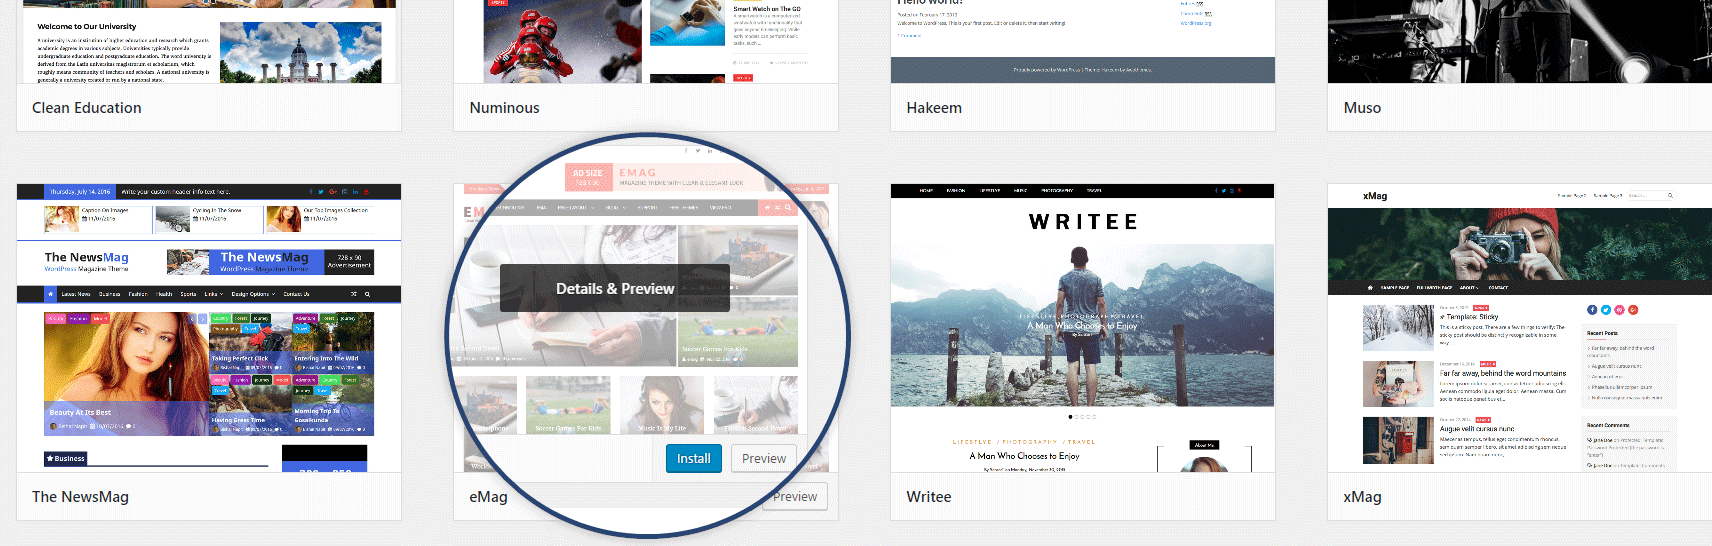
You will be given a list of themes. And again, you are presented with two options to choose from:
- You can use the search field and type the name or the purpose you want the theme to have.
- Also, you can find a theme by using the Featured, Popular, Latest, Favorites, or the Feature Filter sections.
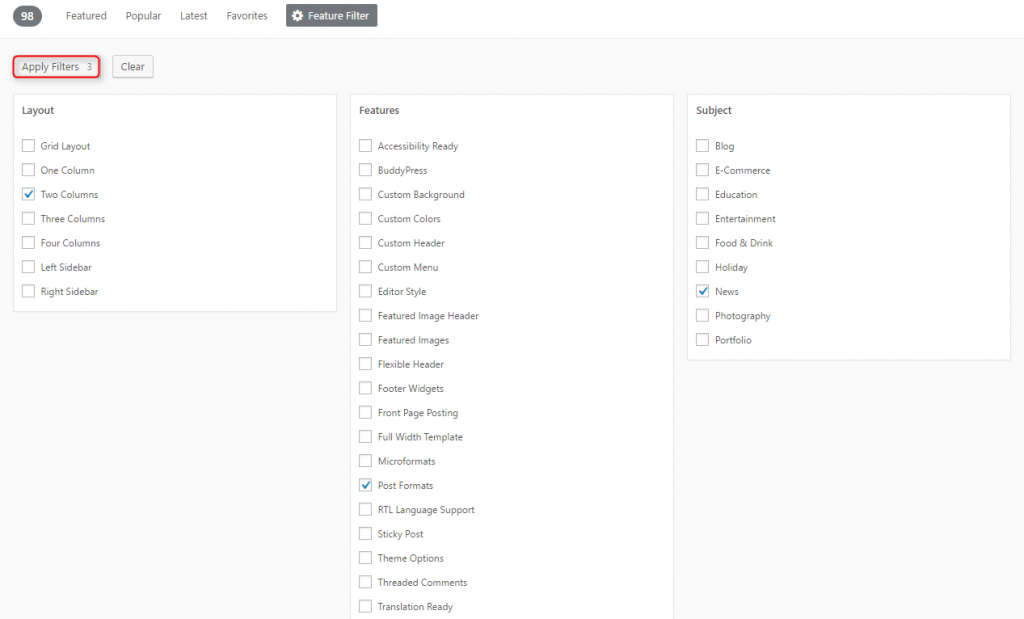
In the filter results, you will see all the themes from the WordPress.org theme directory that meet your criteria. As we already covered – Find what you like -> Hover over it -> Click Install -> Click Activate.
Method 2: Manually Uploading a Theme From Your Computer
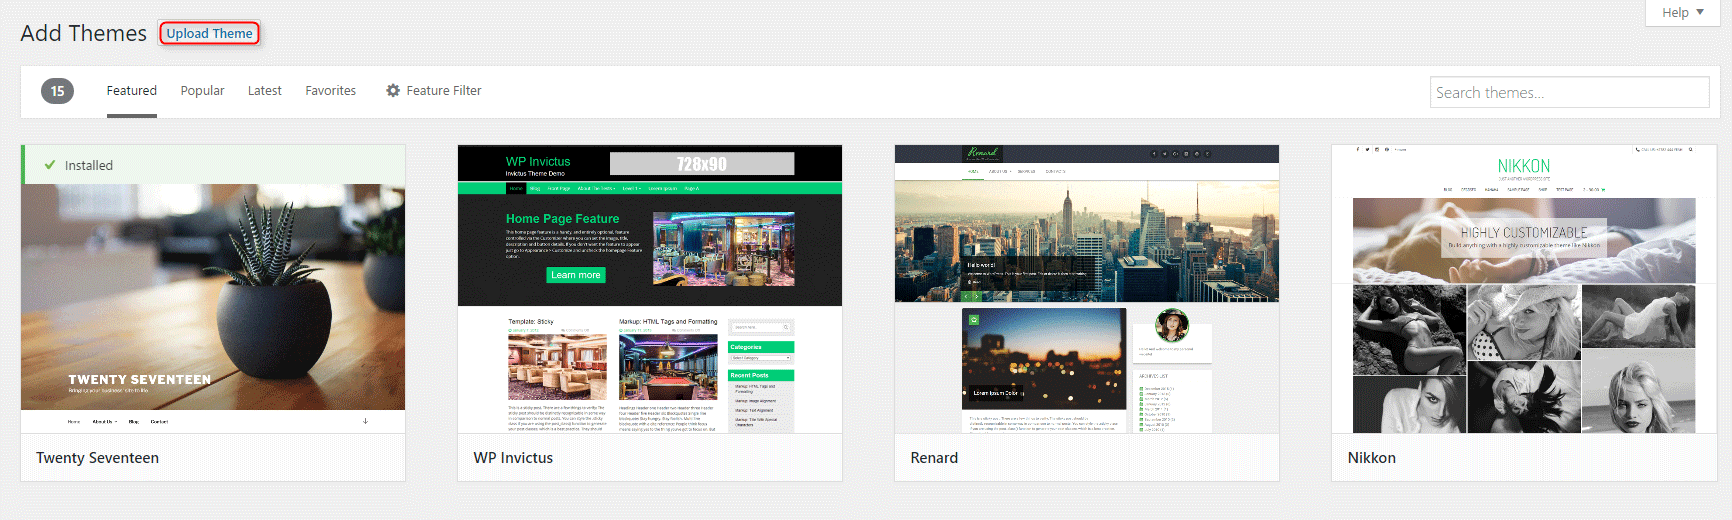
Step 1: Enter the Theme Options
Let’s say you’ve bought a theme, or downloaded one from a third-party theme provider. To upload it to your site, you have to go to Themes. Then click Add New. This is the same as the first step from the previous method. Even without moving the mouse, you can click on Upload Theme.
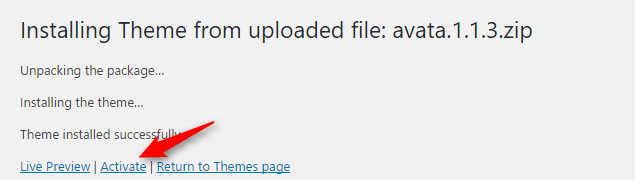
Step 2: Upload the Chosen Theme
A menu will show. Click the Choose File button, select the archive of your theme from your computer and press the Install Now button. WordPress will finish the operation automatically for you. Just click Activate afterward.

When you are creating a website with WordPress, and you’ve installed the desired theme, you might also want to create a child theme. Doing so will prevent you from losing any changes that you make when the theme is updated.
How to Install a WordPress Plugin
Plugins are what make WordPress so versatile. By using these small, and often simple add-ons, you can make a really functional website, without knowing how to code. And even if you don’t understand how the machine works, you’ll be able to use it.
The installation of plugins facilitates simple tasks such as adding Google Analytics, Facebook Pixel, or Google Adsense codes to your website. But what is more, is that the plugins are so many that there is a phrase “there is a plugin for that”. This means, (almost) any functionality you might need for your website, someone has already created a plugin for it.
What is left for you is to just install and use it.
We’ve already covered how to install a WordPress plugin. And you can read that tutorial, or just continue reading the present one.
Method 1: Installing a Plugin Using the WordPress Search Engine
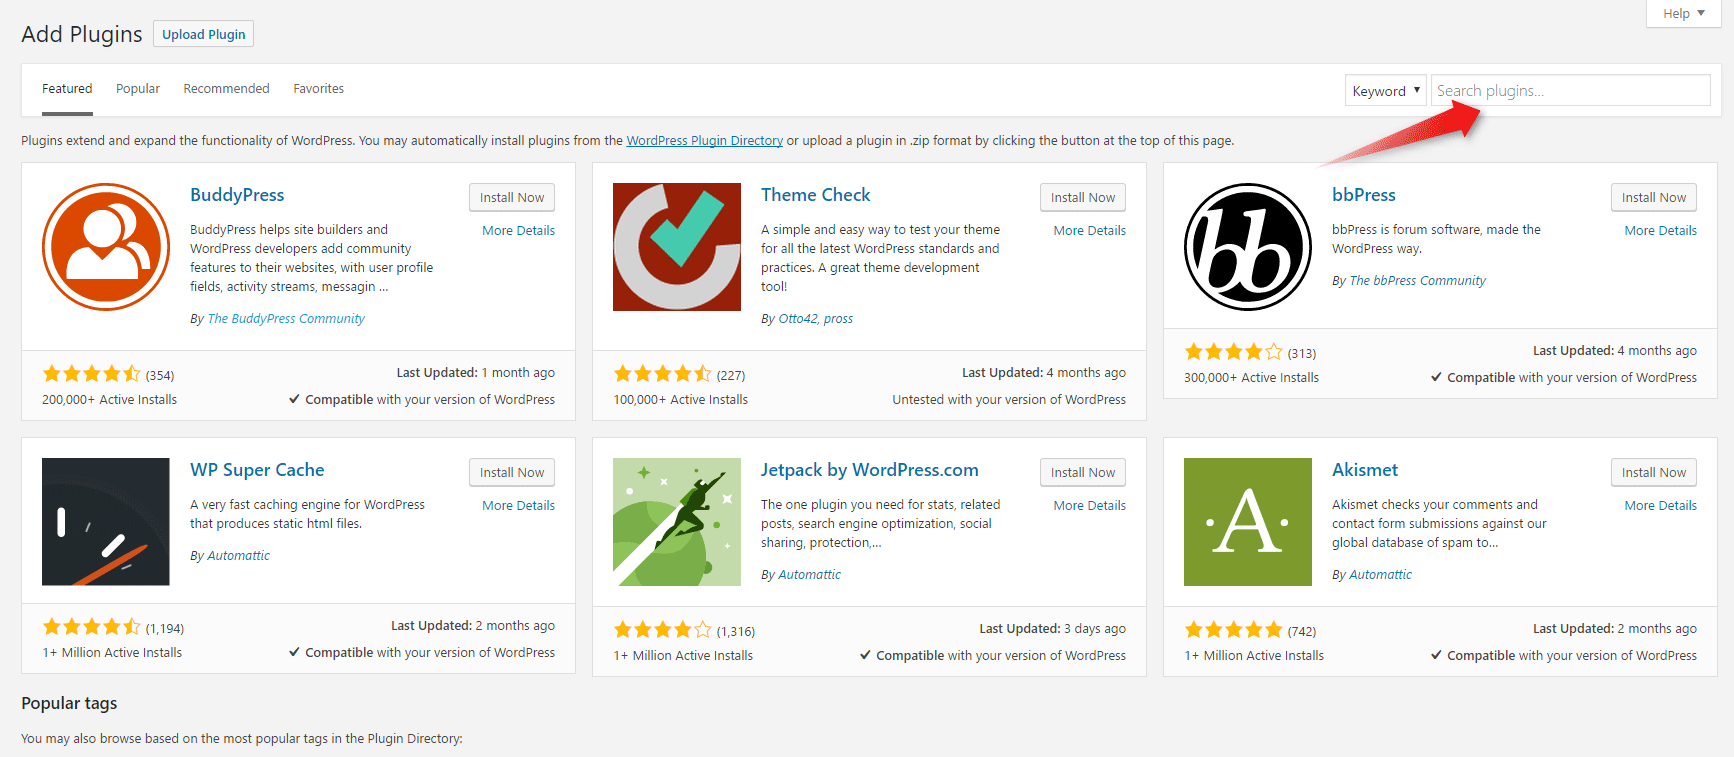
Step 1: Go to Plugins -> Add new
Step 2: Search for the Plugin You Need
Step 3: Add the Chosen Plugin in WordPress
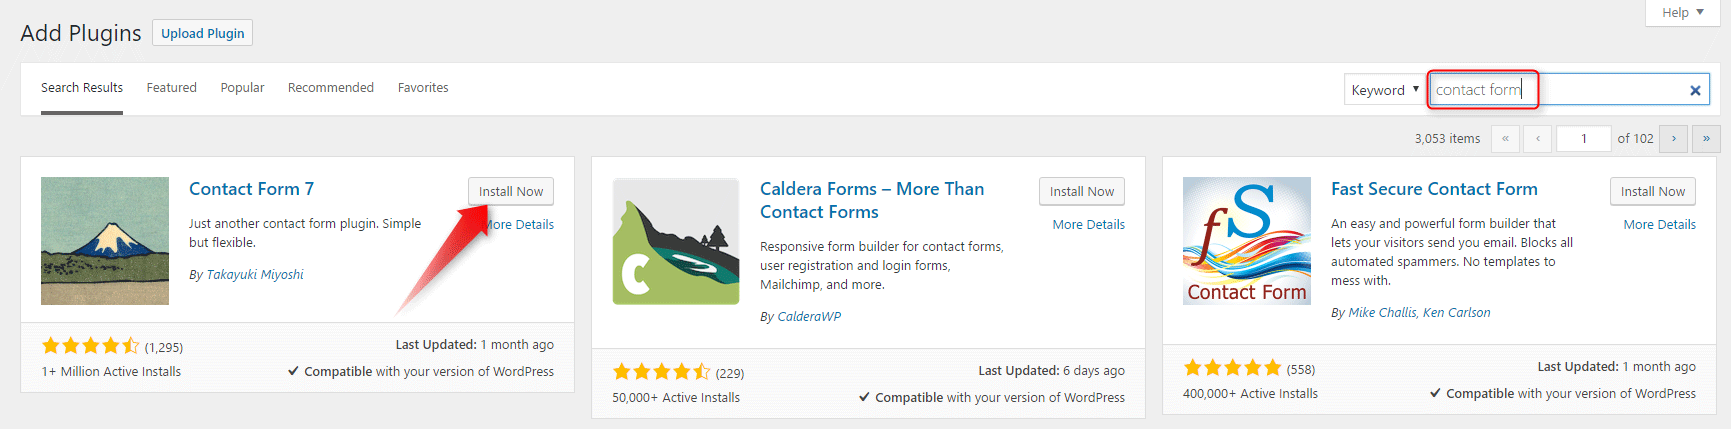
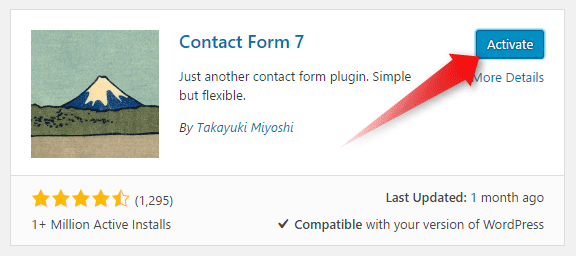
Once you like a plugin all you need to do is to click the Install Now button.
Once the plugin is installed, you’ll have two options. Either you can click Activate, which will redirect you to the plugin activation page, or you can keep searching for other plugins.
Method 2: Manually Uploading a Plugin in WordPress
Step 1: Go to Plugins->Add new
As you can imagine, this step is the same as the first step from the previous method.
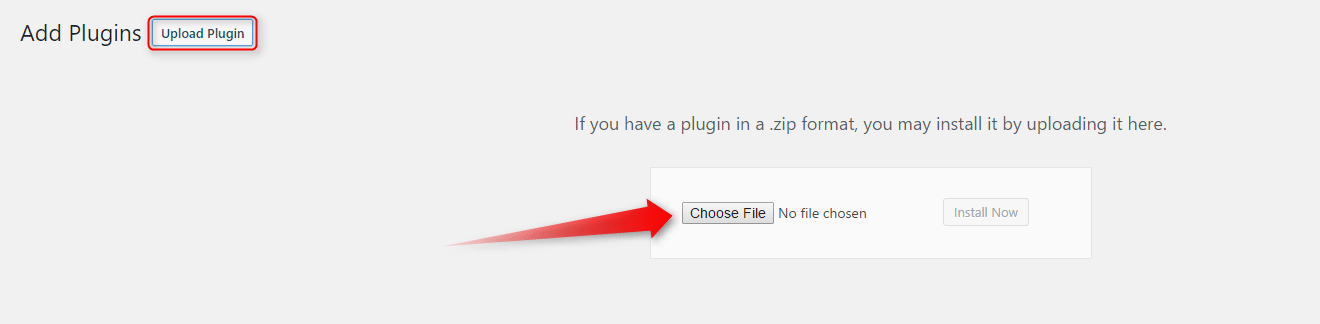
Step 2: Upload the Plugin to WordPress from Your Computer
After you’ve entered the Add new page, at the top left corner, you’ll see an Upload Plugin button. Click it. A menu will show up.
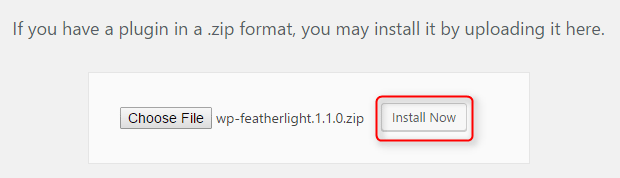
Click the Choose file button and locate the plugin on your computer. Upload it.
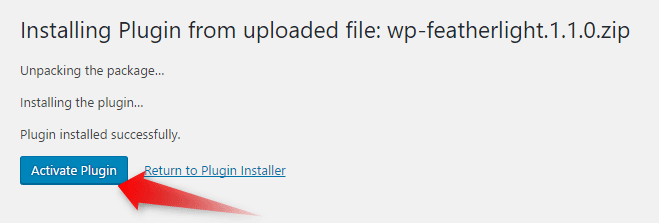
Step 3: Install the Uploaded Plugin to Your WordPress Website
Once installed, a new page will show up. You can either Activate the plugin or get back to the Plugin Installer.
Here is how to actually add a contact form to WordPress.
Before You Start Posting and Create New Pages
Adding a page to WordPress takes the same amount of effort and almost the same steps, which we’ll cover soon. But before you start creating posts and pages, you need to take care of something known as permalinks, and slugs.
They are extremely important for the SEO of your WordPress website.
Permalinks and Slug in WordPress
Permalink is an URL, leading to a given post or page on your website. The purpose of the permalink, as its name suggests, is for it to be permanent. So, after you’ve decided what type of permalink (URL) structure you want for your website, bear in mind you’ll be better if you continue with it, no matter what.
In our tutorials, you can find out more about Permalinks in WordPress.
Every permalink could have two or more building blocks(parts). In WordPress, they could be as follows – domain URL-> category slug->post slug. Of course, pages, tags, or any other entity on your website has its slug.
The idea behind the custom post, category or page slug is for it to be user-friendlier. What does it mean for the permalink to be user-friendly, you may ask.
Say, one is searching in any Search Engine “what is a permalink”. As you can imagine, a WordPress post slug (and thus permalink) /whats-a-permalink/ is far more felicitous than the default “?p=123” one.
To change the permalink structure, and the slugs of your website, go to the Dashboard and then Settings->Permalinks.
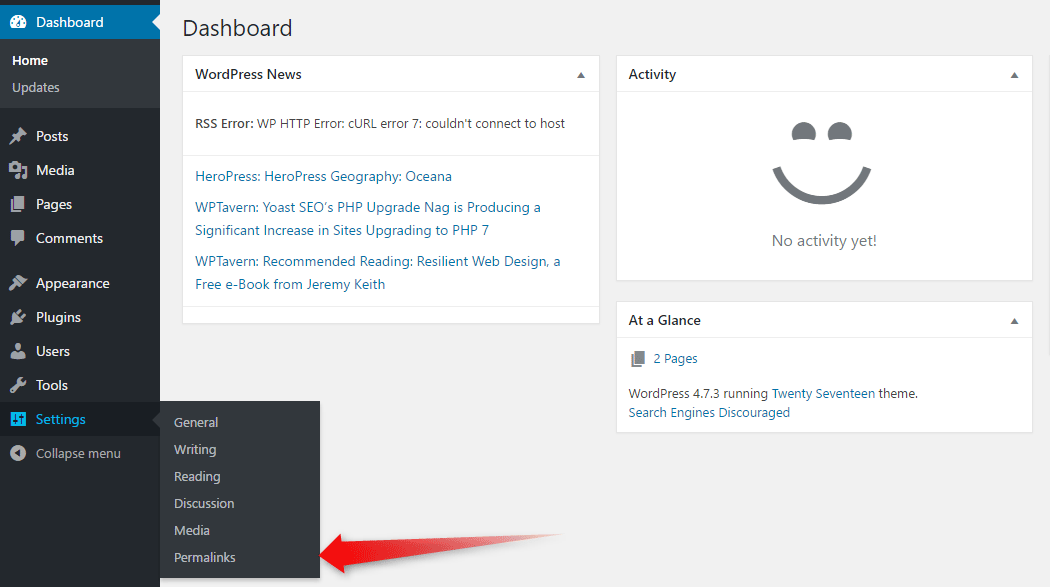
There you’ll find all the types of permalinks you can use.
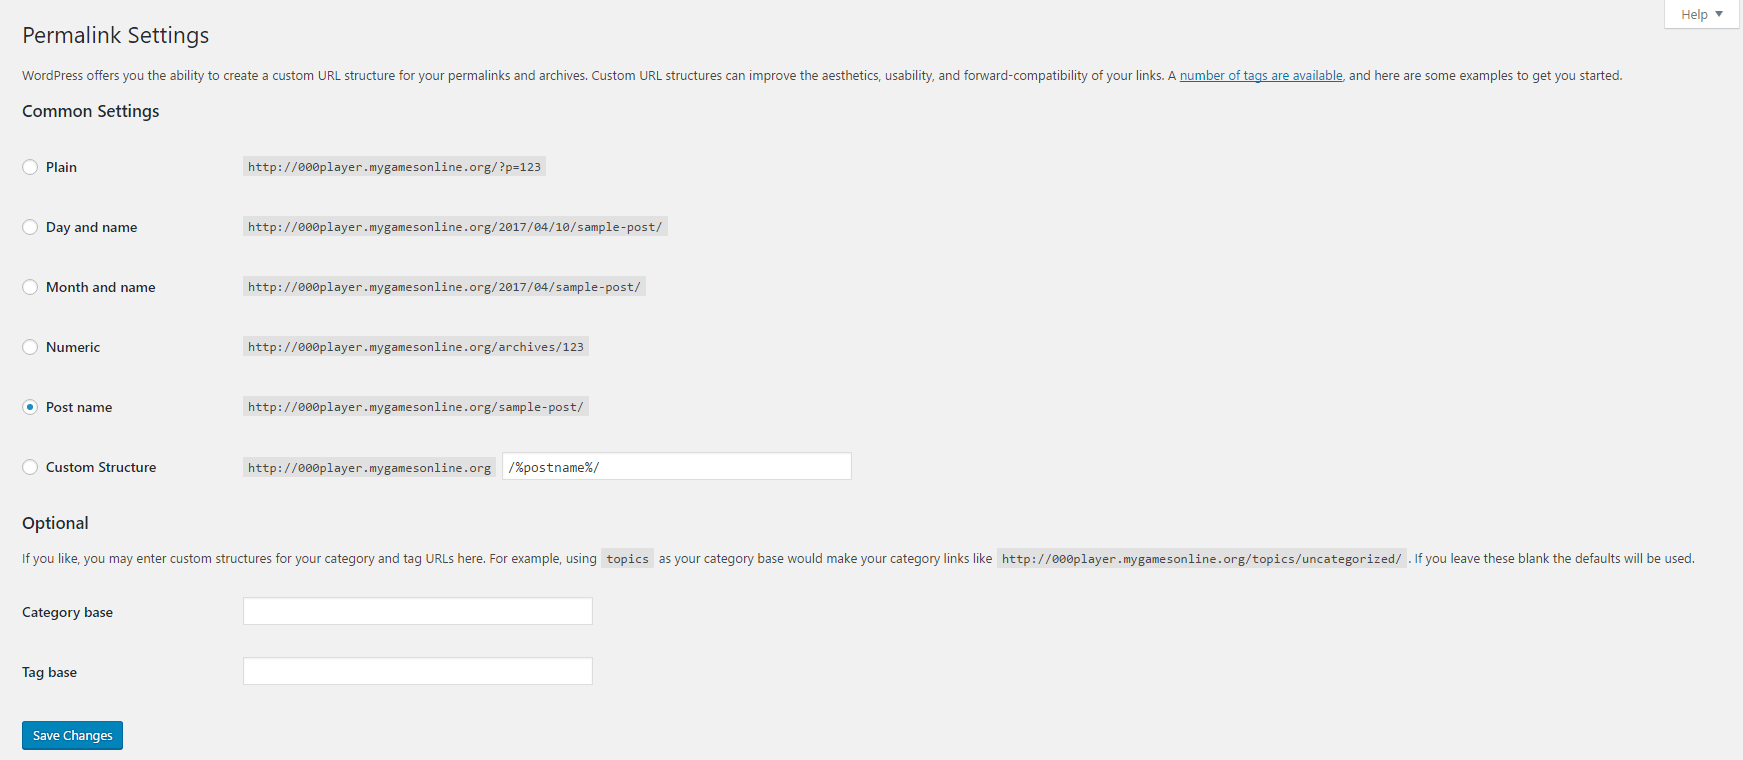
In order to be able to have a user-friendly post, the best option you could choose is the Post name. After that, while creating a post, you can change the post slug with something that you find the most relevant to the content.
How to Post on WordPress
We’ve already created an exhaustive article on how to post on WordPress, and you can see it here.
Also, if you are curious, you can find out how to schedule a post in WordPress and more about the WordPress post types.
Speaking of building a WordPress based site, Posts are the main ingredient.
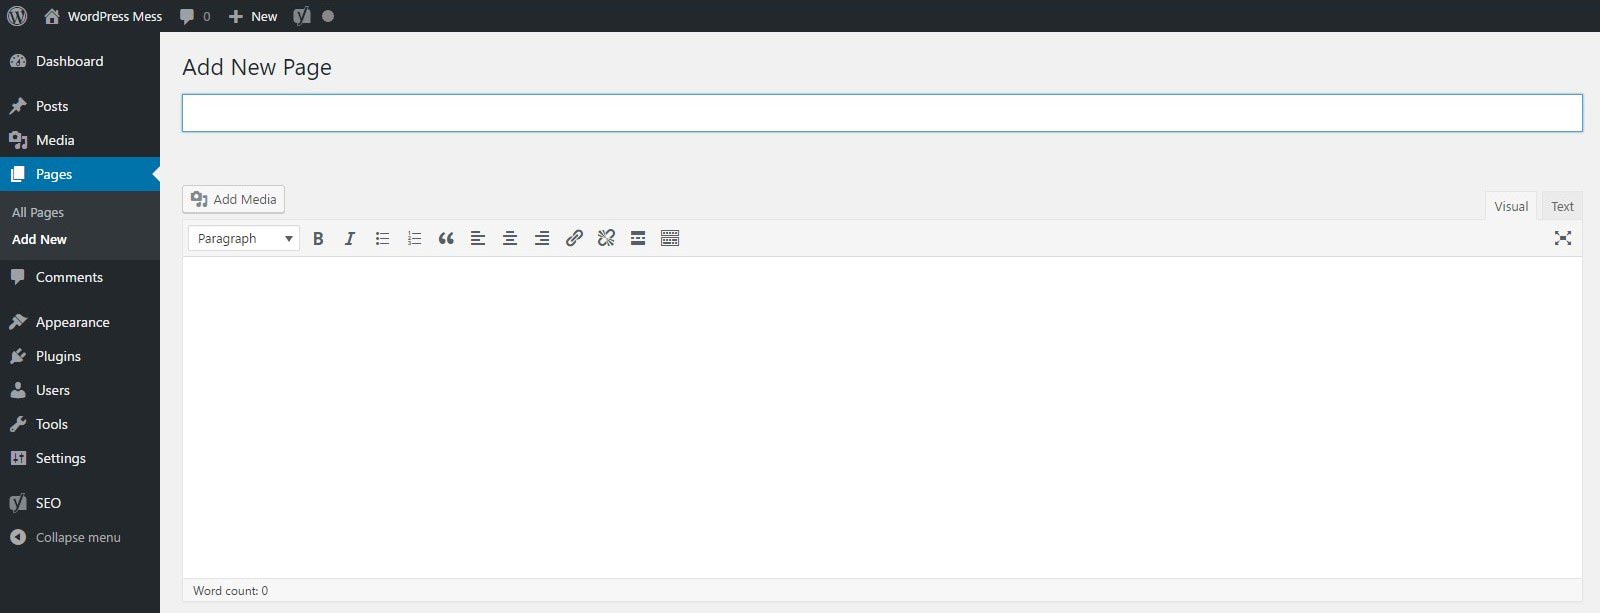
To start posting on WordPress, go to your Dashboard, hover the mouse pointer over Posts. Then click Add New.

Afterward, the post editor (a.k.a. WYSIWYG) will show up. If you are just to create a new post without adding anything additional, except for words in it, pay attention to:
- Post Title
- Post
– Visual (use the editor to format your text visually)
– Text (use the Text editor to format your post, by adding, or changing the code).
When you are ready with the content of the Post, you can either Save it as a Draft, Preview how it would look on the site, or just Publish it. In this same menu, you’ll also be able to delete the post by clicking Move to Trash.
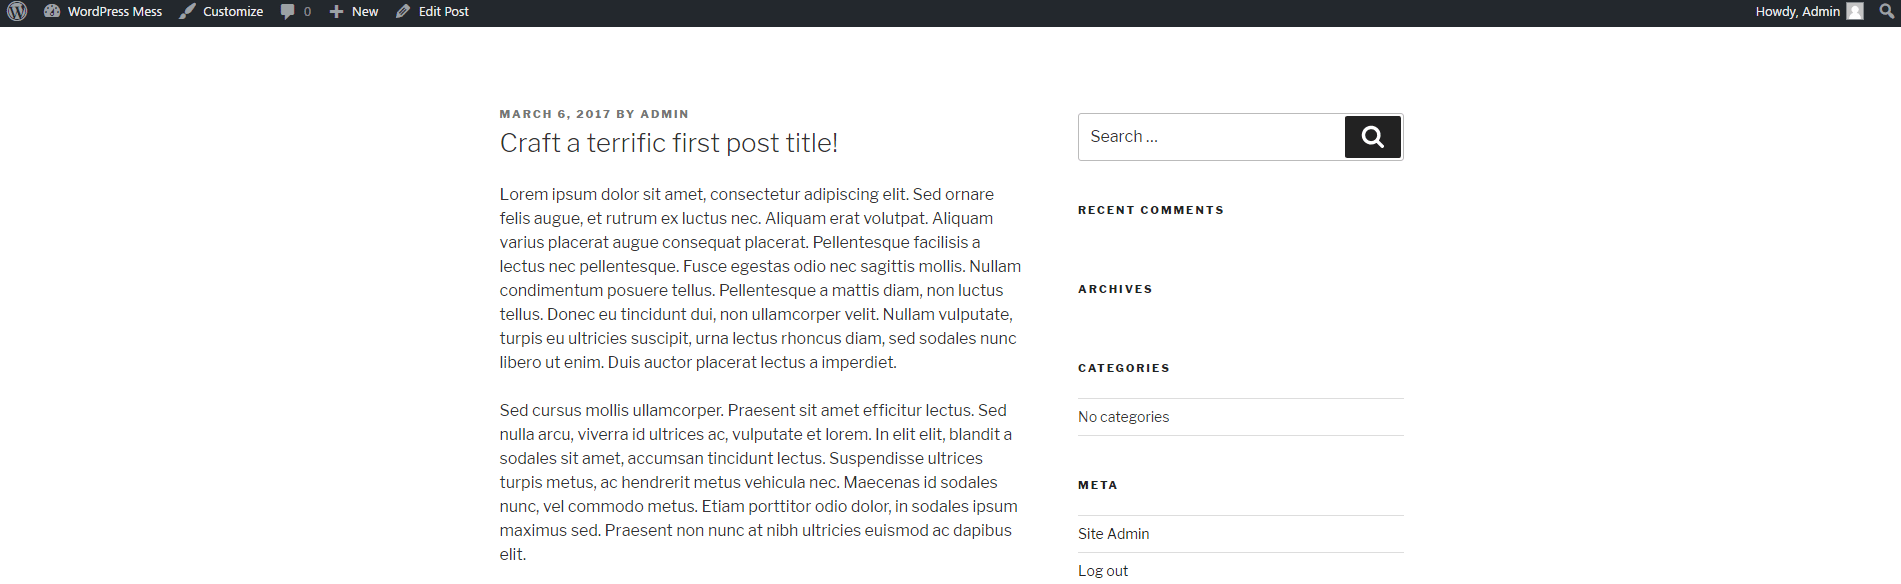
After you are ready with the Post Title, and the Post itself click on Publish.
Now you can go to the front end of the site to see your first post.
Interested in adding images to a post?
WordPress User Roles
By giving a different role to users, you also give them different capabilities. AwardSpace has an in-depth tutorial on WordPress User Roles, that you might want to take a look at if you are interested to find out more about user roles in the CMS.
The role of a user in WordPress is to represent the user’s hierarchy level. By default, a user could be Subscriber, Contributor, Author, Editor, and, of course, Administrator. Every one of the roles has its predefined capabilities.
Read: How to Change Author in WordPress
- The subscriber is at the lowest level of the user role hierarchy. By default, the subscriber will be able to only change their profile information. This is the only right that they have regarding the backend of the website. On the front end, they’ll be able to comment on your content.
- Having contributors is a great choice if your site is new, but there are people that are eager to help. Contributors are almost as limited as the Subscribers. But they can create posts. They could only create, edit and delete their own content.
- Author’s role is for those users that will write, edit, publish and delete their own content. Also, they’ll be able to upload files. Authors also have the right to edit their profiles and change their passwords.
- Excluding the Administrator, the Editor is the one with the most rights. Editors are capable of writing, editing, publishing, and deleting posts. The Editor is able to do all of this to any post on the site. It doesn’t matter if he is the one that created the content in the first place. You may or may not need an Editor.
- The administrator is usually just one. This user is automatically created in the WordPress installation process. Of course, you can give someone else the same rights, by creating another Administrator profile. But that will allow them to have full access to everything on your website. The users that are assigned the role of Administrator are able to install, delete and edit themes and plugins. The same goes for posts, pages, categories, tags, even other users.
How Does the WordPress Menu Work
WordPress comes with a well-structured and efficient menu building system. By using it, you can create not only a navigation menu (the one on the top of the page), but also sidebar menus, and footer menus.
There are WordPress themes that will provide you with more than one menu type. And some even do have in-theme menu building logic. But for most of the themes out there, the default WordPress menu building page will be more than enough.
Here is a truly in-depth tutorial on WordPress Menus if you need it. If you don’t need an in-depth tutorial but just want to know how the WordPress menu works, we’ll cover that in this full guide on how to create a WordPress website.
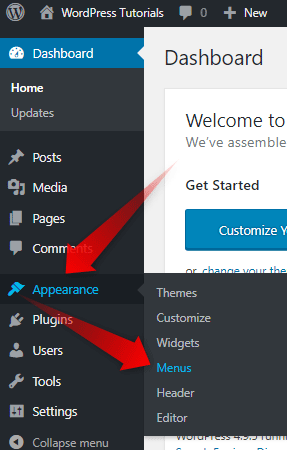
Enter your WordPress Admin Panel.
You need to look for the Appearance option in the sidebar menu. And then go for the Menus option.
Here is what you should be looking for:
After you click on the Menus button, you’ll land on the menu creation page. It looks like this:
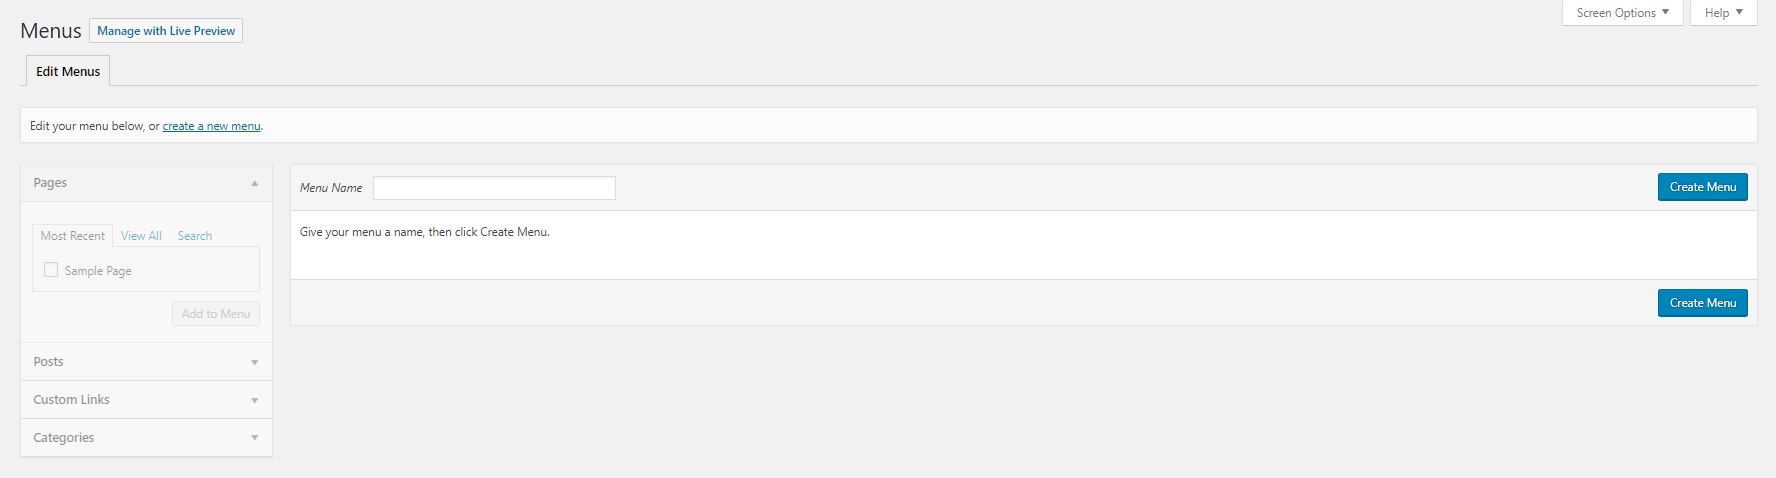
As you can see, you are not presented with many options. To change this, you need to create a menu.
Add the name of the menu you are about to create, and just click one of the Create Menu buttons, located on the right part of the page.
Now that you’ve created your first menu, you need to choose the pages that you want to be presented in it.
To add pages, posts, or categories to the menu, they should be published. And what you are adding in the menu from top to bottom will be presented from left to right on the front end.
To add elements to the menu you need to first choose them, by clicking on the empty squares on the left of the elements.
Mark the elements you want to add to this menu and click the Add to Menu button.

And while you can be cautious of the sequence in which you are adding the units to the menu, there is an easy way to rearrange them, once they are added.
You can just click on the element and move it around. Changing its position in the menu, or making it a part of a drop-down menu.
To create a sub-menu, that will emerge when a user hovers a specific element of your menu, drag and drop the elements you want in the sub-menu just a bit on the right.
Like so:
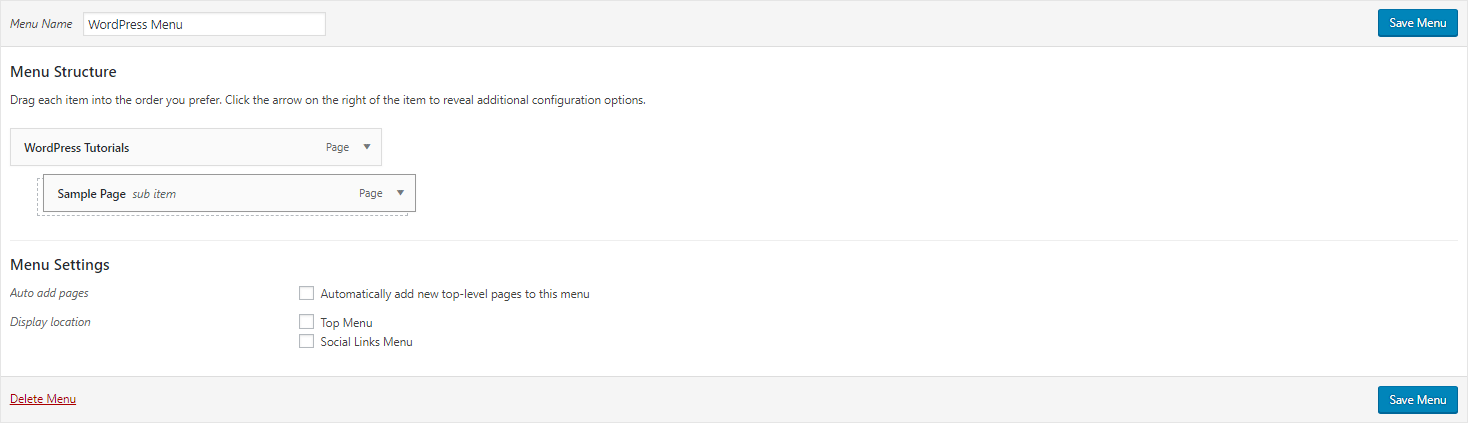 Once you’ve arranged the elements of your menu, don’t forget to click the blue Save Menu button, which you’ll find above and below the menu on the right part of the Menu Structure window.
In this article, we learned how to start a website with WordPress for free. The following are some frequently asked questions the answer to which can be really helpful to anyone who is new to WordPress.
Frequently Asked Questions About WordPress
There is a set of WordPress questions that are often asked, and way too often left unanswered. Here are the questions and their answers.
Is WordPress the only way to create a website?
As mentioned in this tutorial, there are many ways to create a website. Not only you can use another CMS or a website builder. You can also learn to code and create your website in HTML, CSS, JavaScript, and PHP.
Yet, we believe that WordPress is the best and easiest way to create a website.
How do I make money from my website?
After you’ve created a website with WordPress, you might ask yourself whether you can make any money with it. Of course, in the cases where you’ve created a website to sell products, that question, or a business card website, this question won’t appear.
For all the other types of websites – blogs, social media, forums, news media, etc., etc., you can use your website’s estate, to sell ad space. You can start referring to a product, which would be affiliate marketing.
You can also, create a shop to sell your own merchandise.
How do I start a website where I can sell products?
WordPress is easily transformed from a blog to an eCommerce Shop. Check out our step-by-step guide on how to create an eCommerce Website with WordPress.
Do I have to know how to code to create and customize my website?
To create and customize your website with WordPress it won’t be necessary to know any programming language. Yet, the truth is, it will help you a lot to know at least a basic level of HTML and CSS.
Can I get a free domain for my website?
Yes, AwardSpace is offering a free domain (TLD) with a number of our hosting plans. Here you can check out how you can get a free .com domain.