
In this WooCommerce tutorial, we will explain how you can create an eCommerce store using WordPress and WooCommerce. We will cover the setup process as well as the basic configuration options of WooCommerce to try and help you out in your first steps as an online store owner.
WooCommerce is becoming one of the most popular eCommerce website platforms at present. More than 40% of all online stores are currently using WooCommerce according to statistics from 2018.
List of contents
- What is WooCommerce
- WooCommerce Hosting Requirements
- WooCommerce Download and Installation
- How to Setup a WooCommerce Store
- Improve the Customer Experience of your WooCommerce Online Store
- Adding and Managing Products
- Managing your WooCommerce Online Store
- WooCommerce Settings
- System Status
- WooCommerce Extensions
- Conclusion
What is WooCommerce
WooCommerce is a website platform that enables you to sell products and services online. It is gaining popularity as an easy-to-use eCommerce website solution for small and medium-sized businesses. What makes this platform a suitable choice for most online store owners is its intuitive interface, fast performance, and quick installation process.

The first thing in the present WooCommerce tutorial, that we would like to point out is that WooCommerce is not a stand-alone platform. In other words, WooCommerce cannot function on its own, since it is a plugin for WordPress. To create an eCommerce store with WooCommerce, you first need to install WordPress, and then proceed with the addition of the free WooCommerce plugin itself. By doing so, you will extend the functionality of your WordPress website, thus turning your website into an eCommerce store and enabling you to sell products to customers online.
WooCommerce Hosting Requirements
To ensure the smooth operation of your online store, it is recommended to check the hosting environment for compatibility.
You can read our tutorial on WooCommerce Hosting Requirements to learn more.
Our WordPress Hosting Plan will provide you with the necessary server resources to install and run a WooCommerce online store. In the present WooCommerce tutorial, you will find a detailed explanation of how to configure your еCommerce store.
WooCommerce Download and Installation
Before proceeding with the installation of the WordPress platform and WooCommerce plugin, you would need a domain name and a hosting plan.
In case you do not already own a domain name and hosting, then it’s time to purchase these now. With AwardSpace, you can order both services all at once! Simply head to the AwardSpace website by following the link: Sign Up.
Installation Process
If you are about to start creating your website from scratch, the first task you would need to accomplish is to install WordPress. In case you already have WordPress installed for your website, you can skip this step.
You can easily install WordPress by using our automated One-Click installer – Zacky Installer. We recommend our WordPress Hosting plan, which is fully compatible with both WordPress and the WooCommerce plugin.
For your convenience, the WooCommerce plugin for WordPress is included in the automated installer in our WordPress Hosting plan. Thus, you will be able to install both WordPress and the WooCommerce plugin at once. Using our Zacky automated installer will enable you to set up your online store effortlessly by following the step-by-step wizard.
If you already have WordPress installed, you would only need to install the WooCommerce plugin. There are several methods of how you can do this, which will be described in a separate guide.
Step 1. Access the Zacky Automatic Installer
Go to your hosting control panel, and then navigate to Website Manager -> Zacky Installer Section.
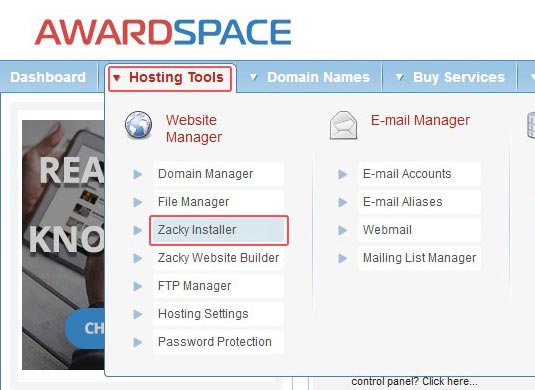
You will be redirected to the Zacky Installer Wizard.
Step 2. Select WordPress
You will see a list of available platforms you can choose to install. Select WordPress from the available platforms.
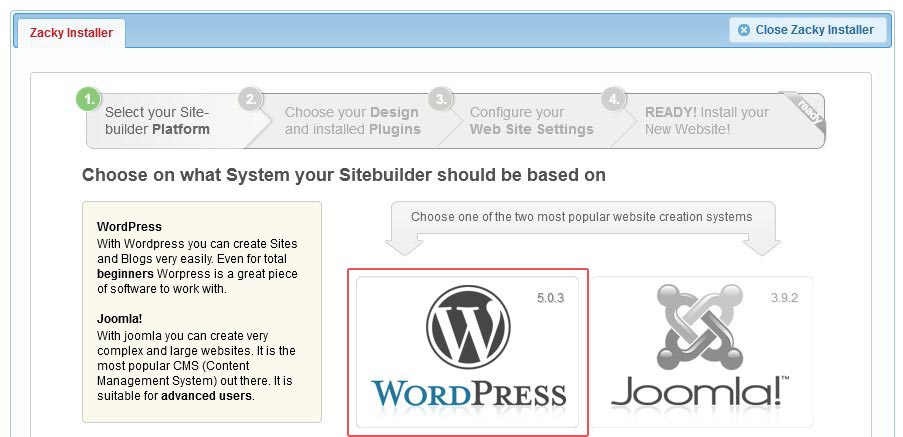
Click the Next button to continue.
Step 3. Choose the WooCommerce plugin
In this step, you can select any additional plugins for WordPress that will be installed for your website. Select the WooCommerce plugin by clicking the checkbox. You can also add any other plugins as necessary.
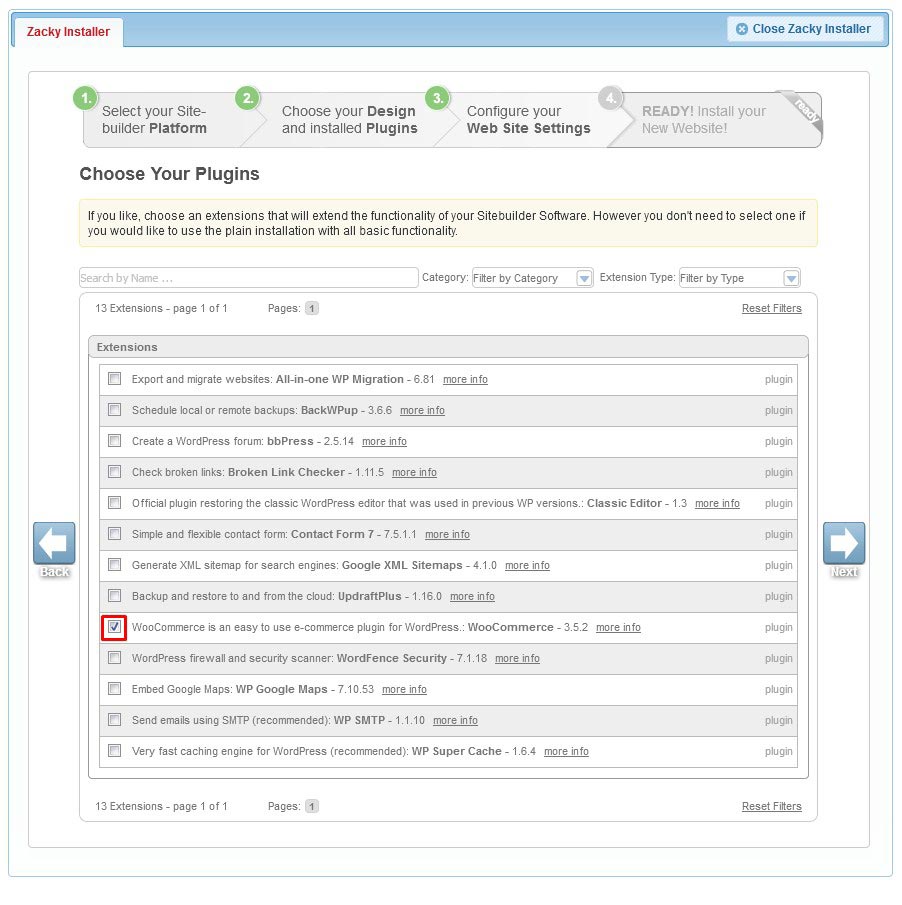
On the same page, you can also pick a custom theme for your WordPress installation.
Once you make the required selections click the Next button to continue.
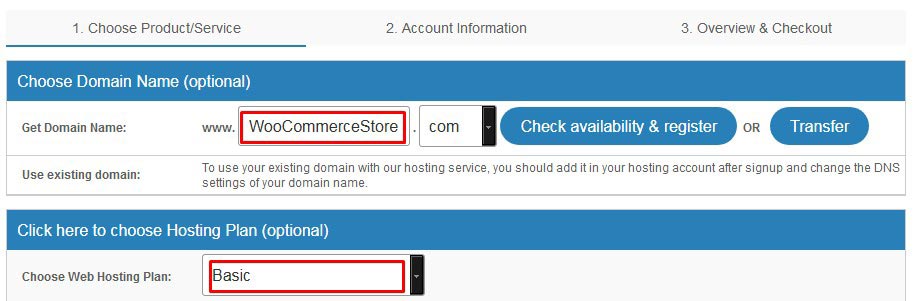
Step 4. Select a Domain Name for your eCommerce Store
In this step, you will need to select a domain name for your website.
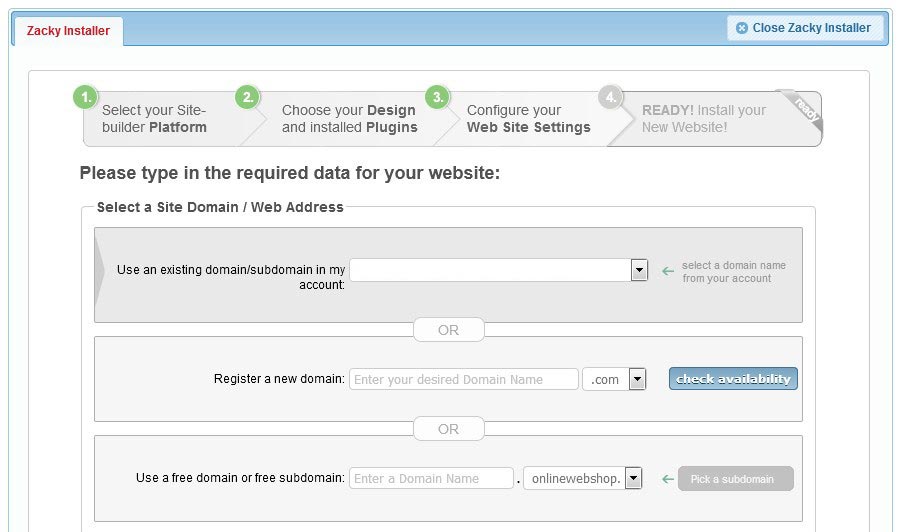
You can choose between one of the following options:
- Use an existing domain/subdomain in my account
If you already own a domain name you can use it for your new website installation. To use it you need to click on the drop-down menu and select it from the list of available domain names. - Register a new domain
If you do not already own a domain name, you can choose to register a new domain name to use for your website. Registering a domain name is a paid service, and it will require you to make a purchase. - Use a free domain or free subdomain
You can also choose to use a free domain or free subdomain name for your eCommerce store. This option is suitable if you wish to create a store for development purposes. It is possible to switch the domain name of your store at a later moment to use a fully qualified domain name.
For the purpose of this WooCommerce tutorial, we will select the third option: Use a free domain name.
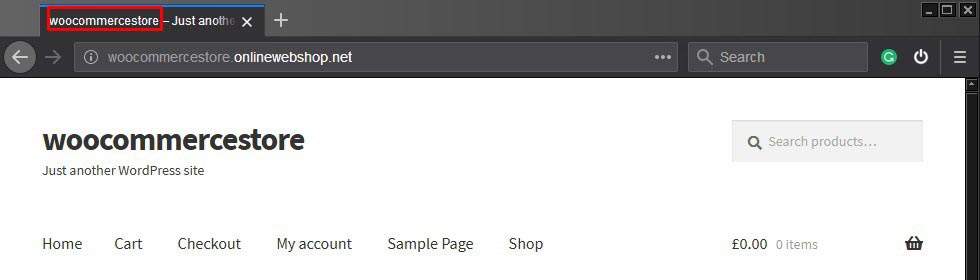
We will use a free subdomain as an example: WooCommerceStore.OnlineWebShop.Net
Selecting Installation Path
Depending on your selected domain name, your WordPress installation will be created into a corresponding directory in your hosting disk space. For our example, the location will be the following:
Your Installation path: http://WooCommerceStore.onlinewebshop.net/
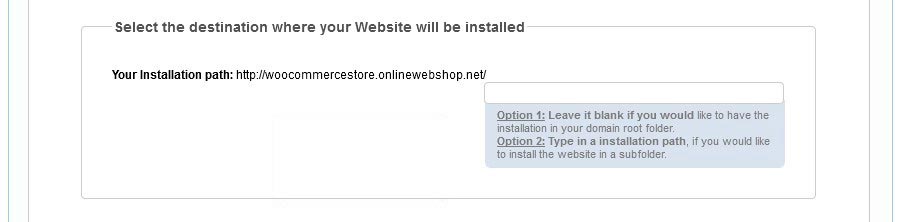
Note: To complete the installation successfully using the automatic installer, the directory where you wish to install WordPress must be empty!
Specify your eCommerce Store Title and Admin Credentials
Before you can proceed with the installation, you need to specify your eCommerce Store Title and Administrator Credentials.

The title is the name of your WooCommerce store. The title you provide will be visible in the browser window.
Finally, you need to specify your administrator credentials. Those include your login email address, username, and password.
Once you fill in all the fields, click the Next button to continue.
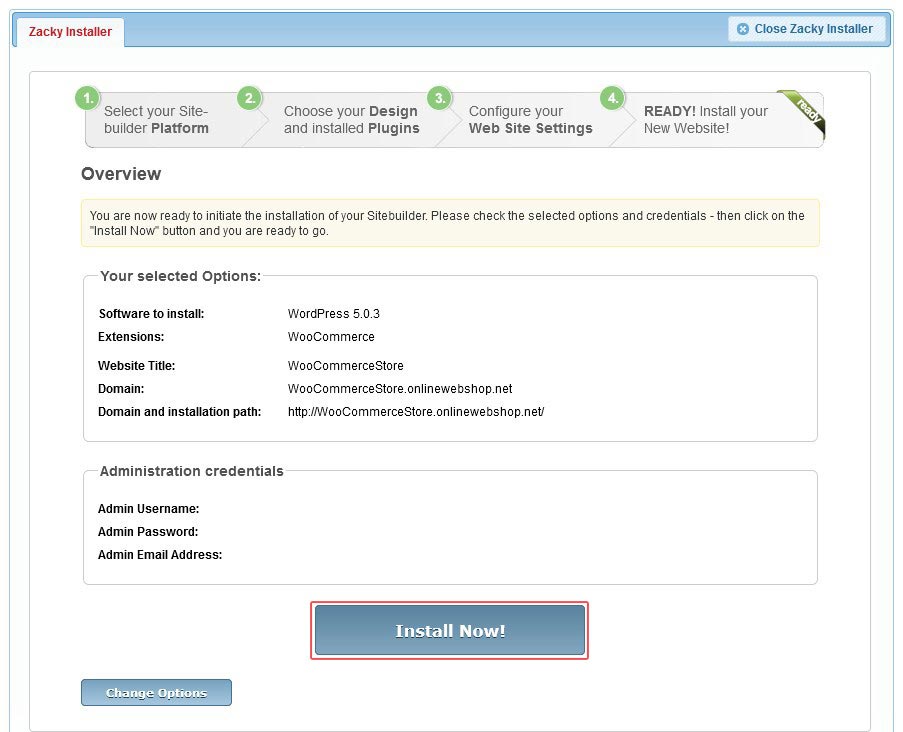
Overview Page
You will be redirected to the Overview window. Here you can review your selected options.
If all the selected details of your WordPress installation are configured correctly press the Install Now button to proceed.
Installation Process is Now Complete
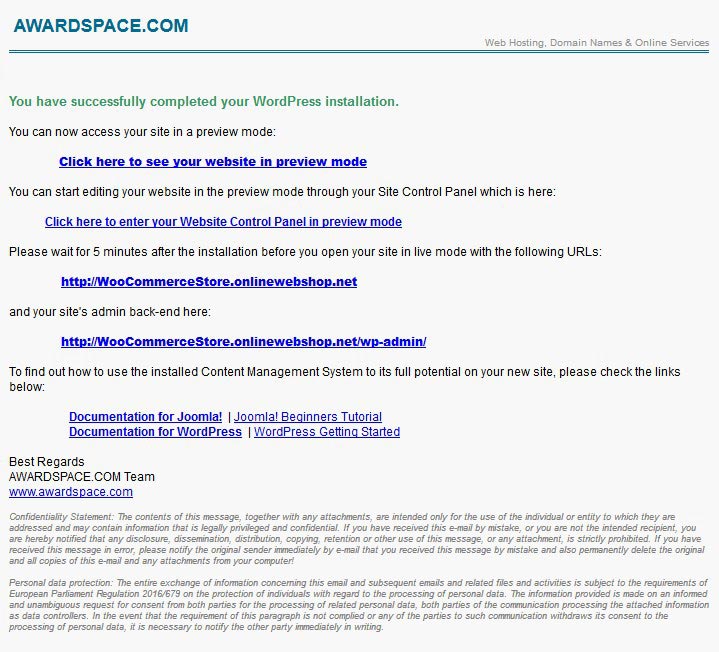
The installation of your WordPress website is now complete. Use your selected admin login credentials to access the WordPress Dashboard.
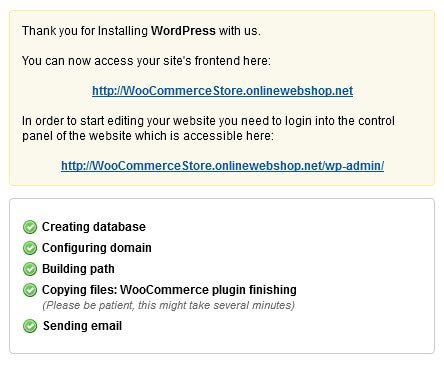
As soon as you complete the installation process of your website, your login credentials will be sent to the email account you provided during the installation setup. Check your email account for the message.
The installation process of WordPress and the WooCommerce plugin is now complete. You are now ready to start configuring your eCommerce Website using the WooCommerce plugin for WordPress. The next section of this WooCommerce tutorial will guide you through this process.
How to Setup your WooCommerce Store
After completing the installation process, it is time to configure your eCommerce store. The present WooCommerce tutorial will now continue with an explanation of the required steps you will need to go through to perform this task.
To begin, log into your WordPress dashboard. As soon as you do that, a welcome notice will be displayed from the WooCommerce plugin, suggesting that you go through the Setup Wizard. Using this wizard is recommended as it will assist you to go through the setup of your WooCommerce store, as it will guide you through the essential settings of WooCommerce.
It is important to note that during the Store Setup Process several pages will be created on your WordPress website, including a shop, cart, checkout, and my account pages. If you are unsure about any of these settings, you can always leave them for now and decide later.
1. Run the Store Setup Wizard
To begin, you will need to do to click on the purple-colored button. You will find the button at the top of the home screen of your WordPress Dashboard.
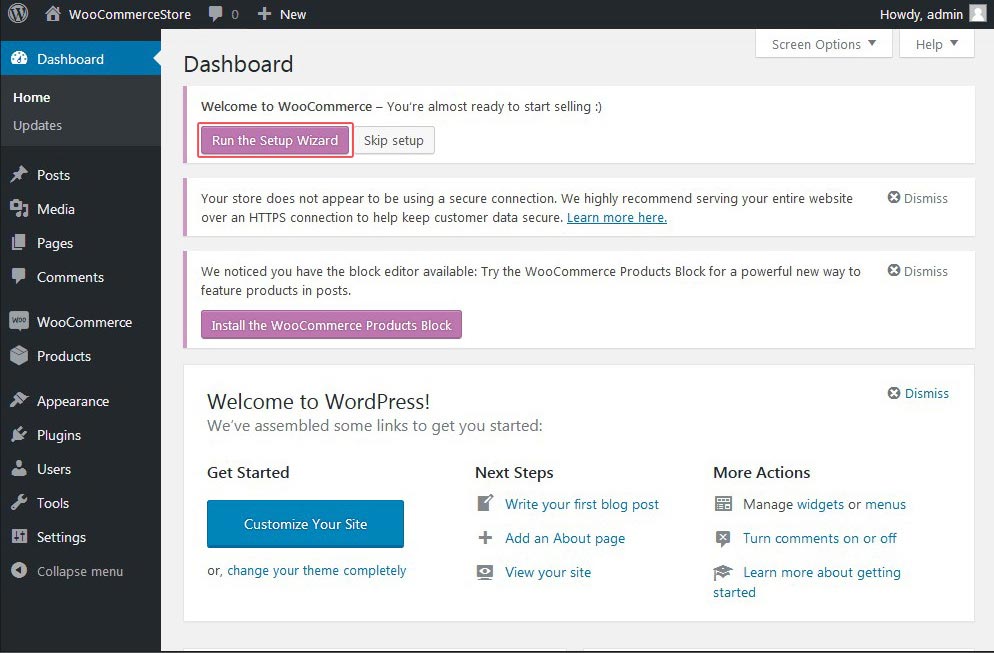
In case you accidentally clicked the button Skip Setup, you will be able to start the Wizard by going to WooCommerce – > Help – > Setup Wizard area.
Click on the link and Run the Setup Wizard to continue.
2. Store Setup Page
This page of the Store Setup Wizard enables you to configure the location of your eCommerce store as well as other options such as the currency and type of products.
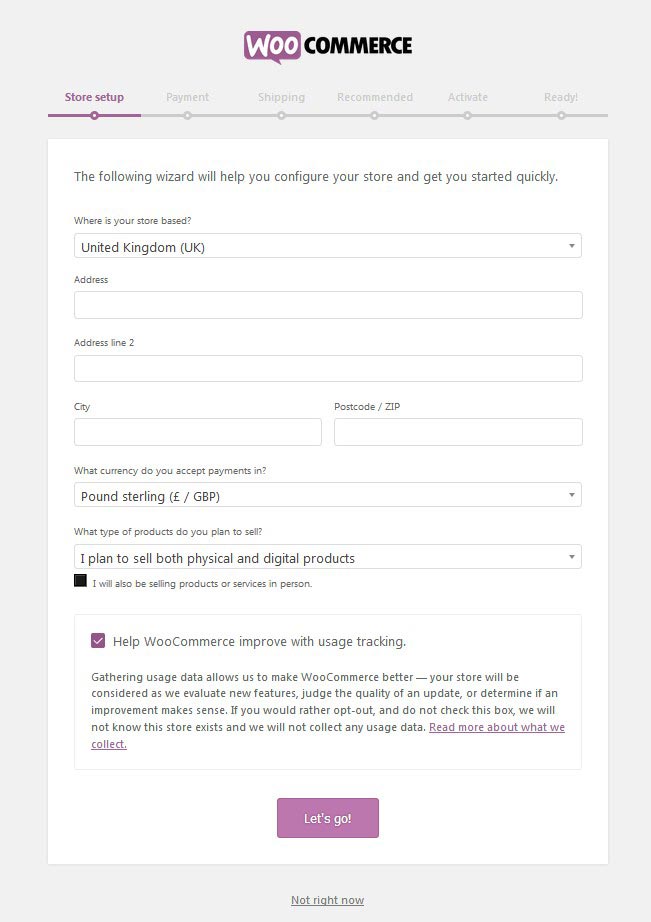
Your WooCommerce store can be used to sell both physical and digital products. For physical products, it is required to set up shipping methods, while for digital products this is not necessary. Based on your selection of the type of products you may or may not need to configure the shipping options later on.
After you fill in the required fields, click on the Let’s Go! button.
3. Payment Page
In the Payment, Screen selects your desired payment gateway. Based on your selection of payment methods, some WooCommerce extensions may be automatically installed.
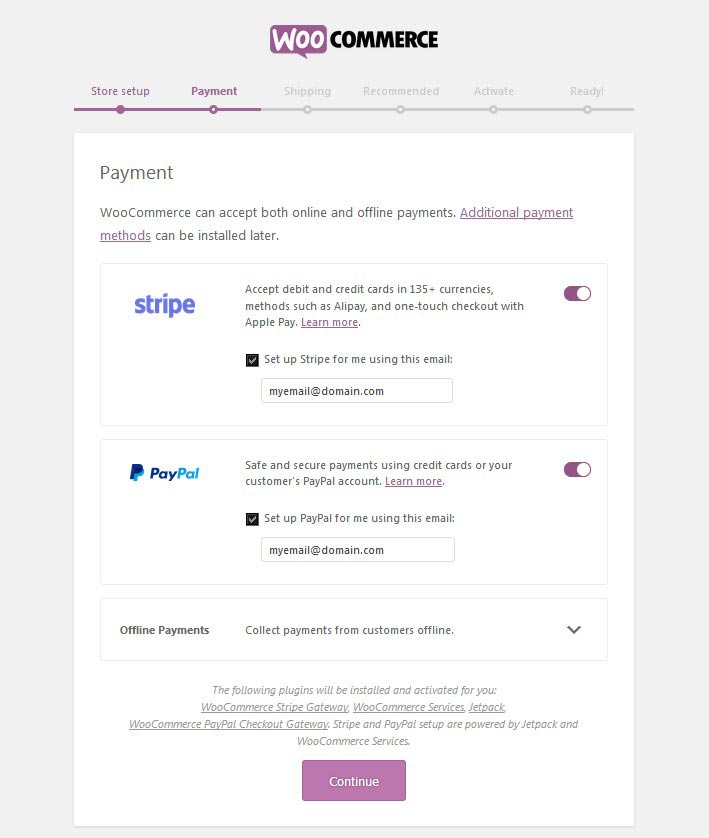
After you are done, click on the button Continue.
You will be able to install additional Payment Gateways after completing the WooCommerce setup process.
4. Shipping Page
If you have chosen to sell physical products, on this page, you can configure the shipping options for your eCommerce store. By default, two shipping zones will be created – orders from your country, and international orders. It is possible to create additional shipping zones if necessary.
For each shipping zone, you can configure the cost your customers need to pay for their delivery. It can be set as free for the customer, or a predefined value – a flat rate.
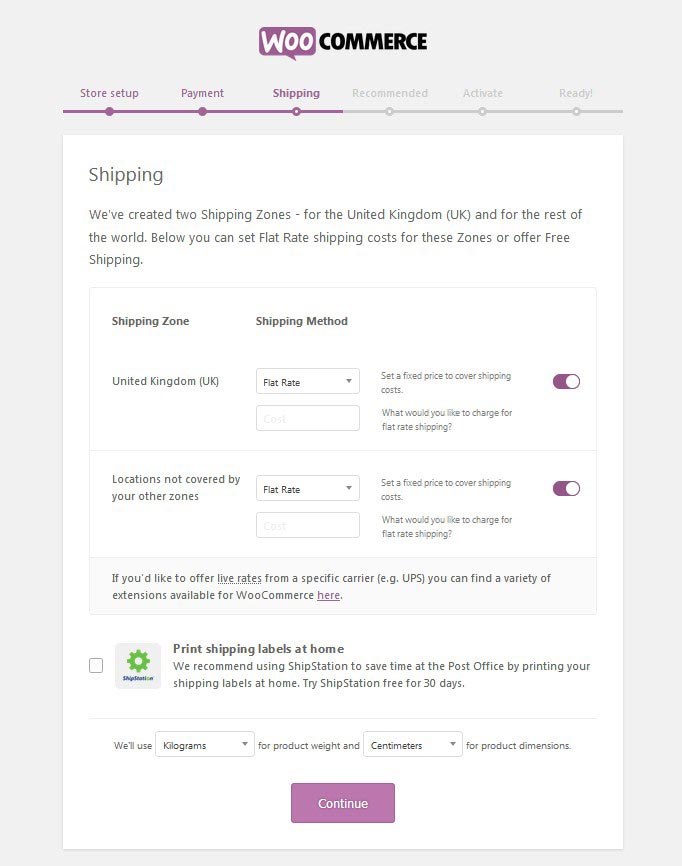
On this page, you can also select the preferred units for your products. For example, these can be the measurements of the weight and size of the products you are selling.
When you are done with the configuration of the Shipping Zones, click on the Continue button to go to the next page.
5. Recommended Page
On this page, you will be given the option to install several recommended WooCommerce extensions.
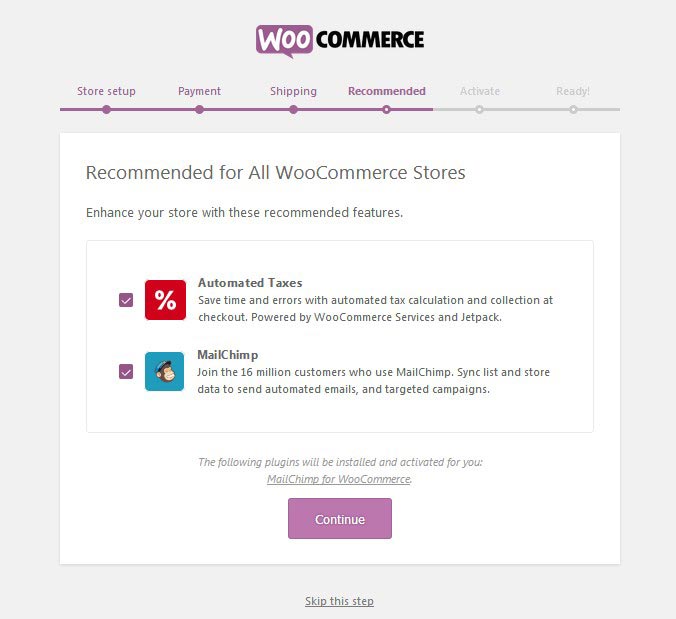
You can enable these extensions now, or you can skip this step. When you are done with your selection, click the Continue button to advance.
6. Activate Page
In addition to the recommended extensions from the previous page, you will also be offered to install the Jetpack plugin for WordPress. This plugin will bring useful additional information and functionality to website and eCommerce store owners, such as security improvements, useful statistics, and monitoring tools and methods of sharing your products on social networks.

We would generally advise you to install this extension unless you have a specific reason not to.
Click on the button to continue with Jetpack, or if you do not wish to do so use the link and skip this step.
7. Ready Page
The initial configuration of your WooCommerce store is now complete! This concludes the initial Setup Process of your WooCommerce store.
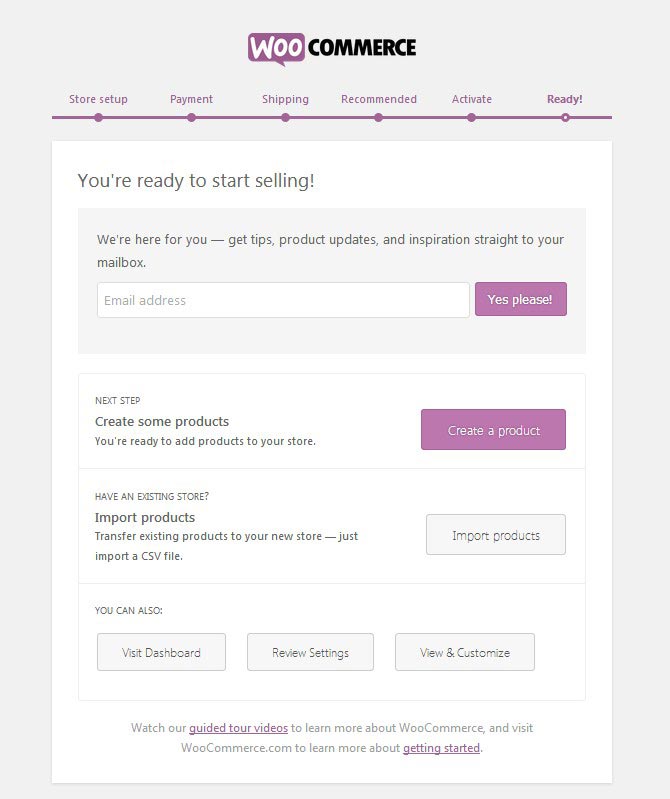
There are some things you can do to further improve your WooCommerce online store. We will discuss the further configuration options in the following sections of this tutorial.
Tip: To return to your WordPress Dashboard click on the button Visit Dashboard.
Improve the Customer Experience of your WooCommerce Online Store
In this section, we will talk about what improvements you can make to your eCommerce store to enhance its design and appearance, and make it more user-friendly. All of these things may be just small details, but together they will differentiate your online store from the competition and give it a more professional appearance. For the reasons outlined above, we believe it is advisable to think about them right from the start and not leave them for now or even skip them entirely.
We’ll start with your website appearance. Usually, leaving your WooCommerce store in its default appearance isn’t the most beneficial solution for your business. Taking advantage of the vast selection of customization possibilities provided to you by WordPress, you should attempt at customizing your site appearance according to your needs.
Change the Theme of your eCommerce Website
You can enhance the appearance of your WooCommerce store by installing a new theme just like any other WordPress website. There are plenty of options available – you can decide to stick to a classy and minimalist look or want to go loud.
If you would like to see our recommendation for choosing a theme for your WooCommerce website, read our article on this topic: 6 Best Free WooCommerce Themes.
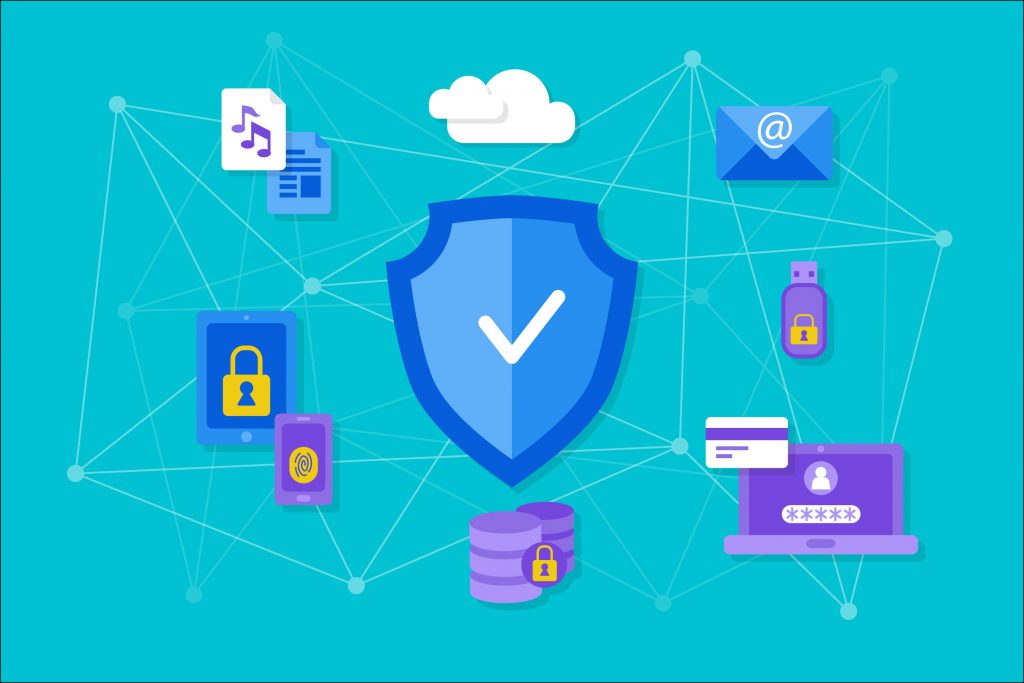
WooCommerce SSL
It is important to enabling secure connections for your WooCommerce website. Many payment gateways require it, and for this reason, it is highly recommended to activate secure connections.
How will Secure Connections Improve your WooCommerce Store?
Customers, who are looking at your WooCommerce store will recognize it as an indication of reliability and hope to see the padlock symbol in the address bar of your browser when browsing, ordering, and entering their client account and payment information.
Even if your eCommerce website doesn’t accept payment with credit cards directly, for example, payment is transferred through PayPal, providing secure connections shows that you as a store owner take the security of your customers seriously.
How to enable SSL Connections in WooCommerce?
To enable secure connections for your WooCommerce store, you must install an SSL Certificate for your domain name. Please note that the installation of the certificate is done from your AwardSpace hosting control panel, and not your WordPress Dashboard.
Change WooCommerce Login Methods
Another improvement you can do to your WooCommerce store is to change the configuration of the Login Methods for your customers. For example, to make it more convenient for the customers, you can choose to enable login using social profiles. This will spare your customers the necessity to create a dedicated registration profile for your eCommerce store, and instead enable them to use their existing social media profiles.
Adding New Products and Managing Existing Items in WooCommerce
The purpose of running an online store is without a doubt to sell products. Therefore, your first task is to add items to your store.
1. What Defines WooCommerce Products
Before we proceed, it is a good idea to learn the essentials and discover what are WooCommerce categories, types, and attributes of products:
- Product category – The categories enable you to divide your items into groups. Using the categories will help you to organize the products in your online store into logical groups. For instance, if you are selling clothes, your product categories can be ‘shirts,’ ‘trousers’ and ‘jackets.’ They allow the customer to rapidly find items from a similar classification. You can edit the existing product categories and add new ones at any time, and you can have as many of them as you need to.
- Attributes – Attributes enable you to separate the products. For example, the size, color, and material of a product are attributes, and these provide the client the opportunity to select wanted items effectively. You can give a common characteristic for the whole selection of products, or set out to give out a different attribute to each product.
- Product Types – For your convenience WooCommerce comes with predefined item types. Here is a list of them as well as a short description:
- Simple – These are delivered with no product options. For instance, a printed book.
- Grouped – The grouped type is a collection of related products — for instance, a set of tea cups.
- Virtual – Virtual items are those that do not need to be delivered, for example, services.
- Downloadable: Those include items that each customer can download. Music files, photos, digital books, and so on are such items.
- External: You publicize the item on your site. However, it is available for sale somewhere else.
- Variable: Those are items with variable characteristics such as size, color, and so on. For example clothing.
With such a large number of item types, it may appear to be complicated to add items to your WooCommerce store. The good news is that this process is simple, and it is equivalent to publishing a post on your blog.
2. Adding your First Product to WooCommerce
After installing the WooCommerce plugin for WordPress, the first change you’ll see is the addition of two new items to your dashboard’s side menu, named WooCommerce (your general settings territory) and Products (your items settings region).
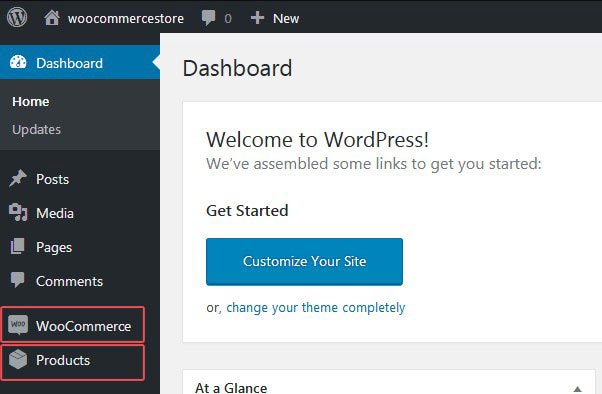
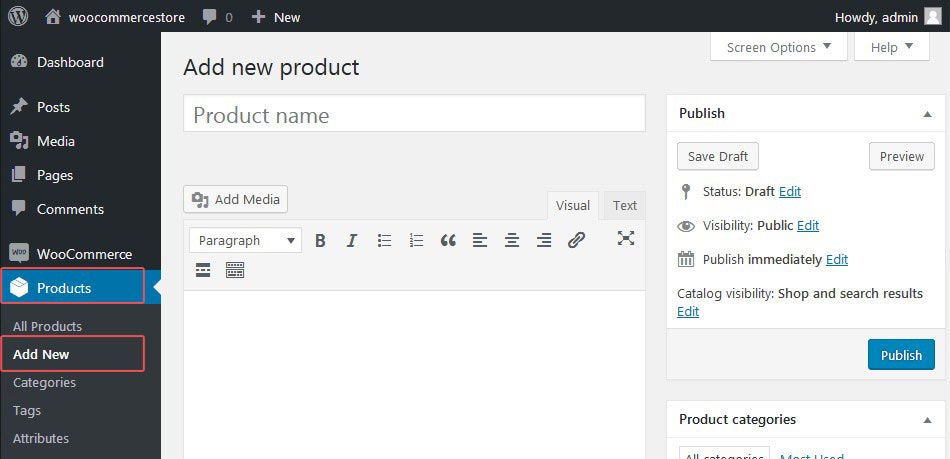
To add your first product to your WooCommerce, go to WordPress Dashboard -> Products -> Add New.
We will now cover all the WooCommerce product fields and provide you with a general explanation of what each one represents:
2.1. WooCommerce Product Name and Description
Fill in the Product Name field with a unique title. Specifying a product name will make it possible to distinguish this product from all remaining items. In addition to that, you need to fill in the Product Description field with the most essential and informative data about your item.
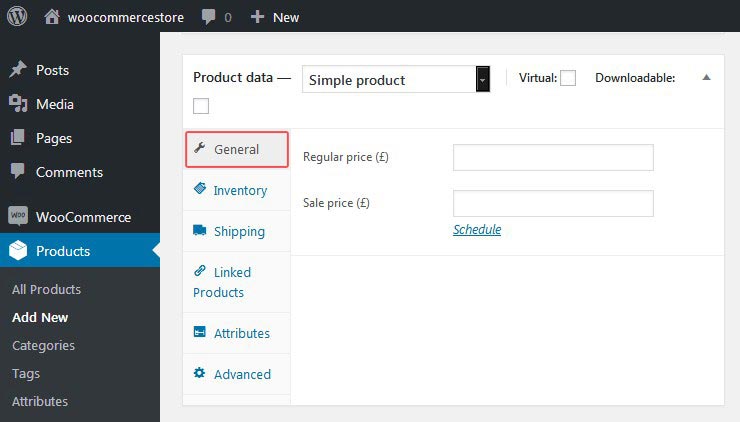
2.2. The Section WooCommerce Product Data
The majority of the options for WooCommerce products can be found in the section Product Data. In this segment, you can modify your item. You can modify its type by utilizing the collapsible menu. The Products Data Section will enable you to specify whether the product is virtual, which removes the shipping tab if it is downloadable.
To get acquainted with this panel we would advise you to start with a Simple item.
Next, in our WooCommerce tutorial, we will provide you with a description of each of the available Products Data Tabs:
2.3. WooCommerce Product General Tab
To set the price of the item that you intend to sell go to the General tab. As well as that, you can specify a promotional price or even a scheduled sale price.
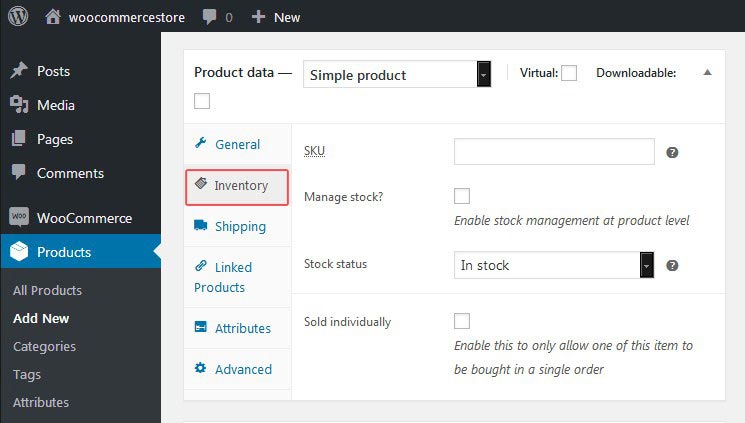
2.4. WooCommerce Product Inventory Tab
The Inventory tab enables you to manage stock keeping. Here you can assign your product an SKU ( SKU stands for Stock Keep Unit), and examine whether this item is out of stock or in stock. Use the check-box Sold individually should you need to sell the product only one piece per order.
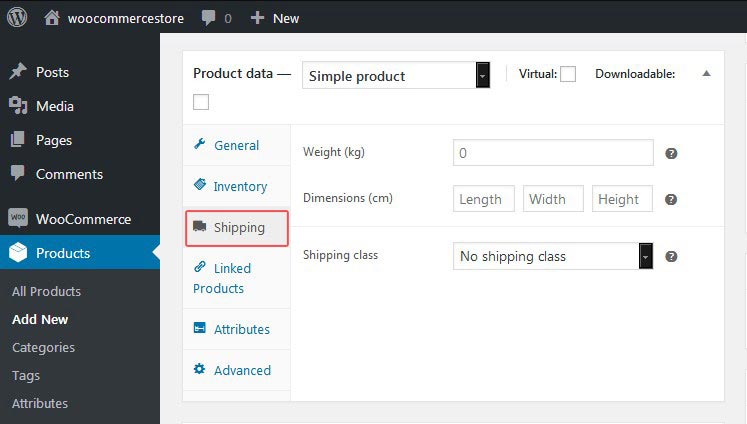
2.5. WooCommerce Product Shipping Tab
The Shipping tab manages deliveries. This is where you can specify your product’s shipping class, dimensions, and weight.
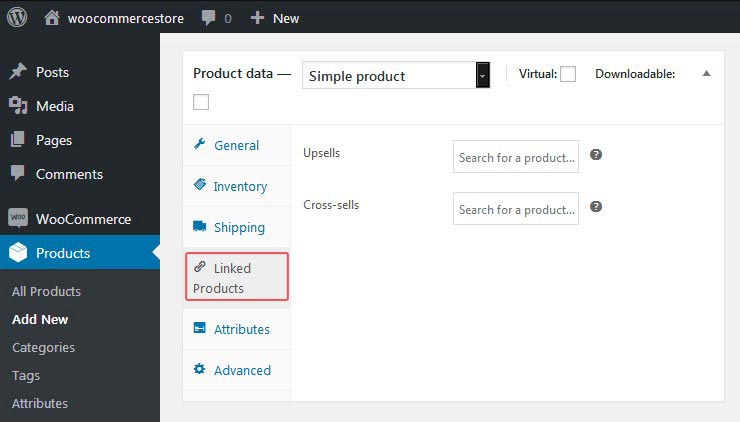
2.6. WooCommerce Linked Products Tab
The tab Linked Products tab enables you to tie together connected items and offer them to your clients. It is located in the Product Data section. Expand the collapsible list and select a specific item to create a group of linked products.
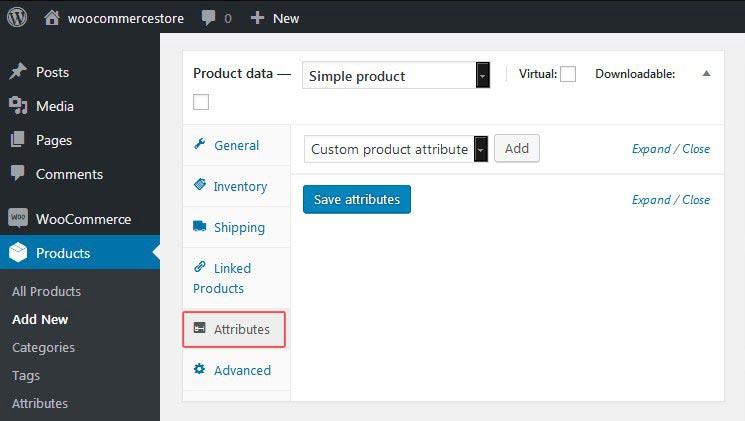
2.7. WooCommerce Attributes Tab
To assign characteristics to your item use the Attributes tab. For instance, if you offer a variety of different colored clothes, you can indicate their colors here. In addition to that, you to define custom traits for your items using the option Custom Product Attributes.
When you are finished including properties, press the button Save attributes.
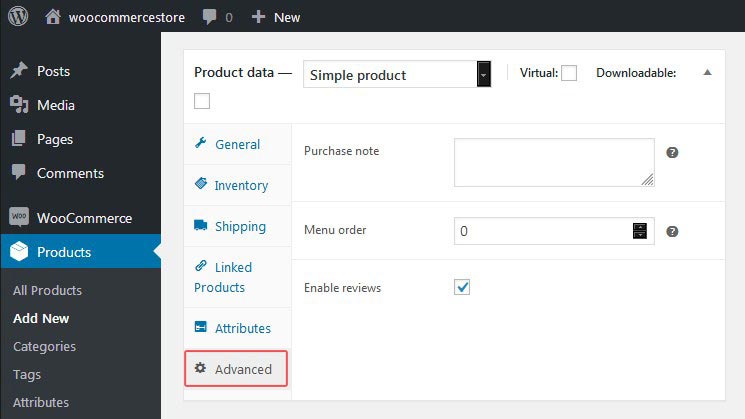
2.8. WooCommerce Advanced Tab
The Advanced tab will enable you to turn on or off product reviews and to add buy notes for clients. You can likewise determine menu positioning here and pick a custom order for your item.
By now you should be familiar with the process of adding a WooCommerce Simple Product.
2.9. Additional WooCommerce Product Types
In addition to Simple Products, WooCommerce also enables you to add products that are downloadable, virtual, as well as external. We will now give you a detailed explanation of each of those types of products.
Grouped Product
In the Product Type field choose the option Grouped. Doing so will exclude several options in the section, such as cost and some others.
Next, you have to include a child item in the Grouped Product. To include a child item, make another Simple Product. Select the parent item from the drop-down grouping menu in the area Linked Product.

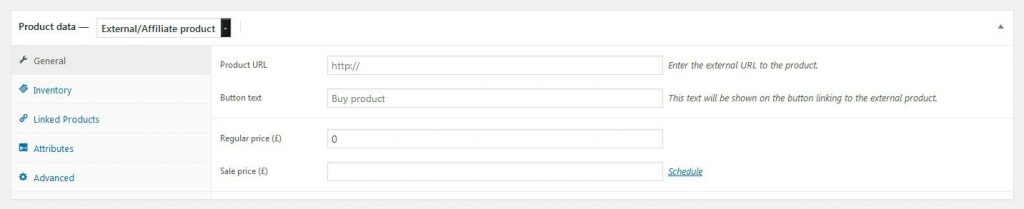
External Product
Pick the External/Affiliate option in the Product Type drop-down to include an External Product or an Affiliate one, pick the option External/Affiliate in the drop-down menu Product Type Afterward, you will need to supply the address of the target site.
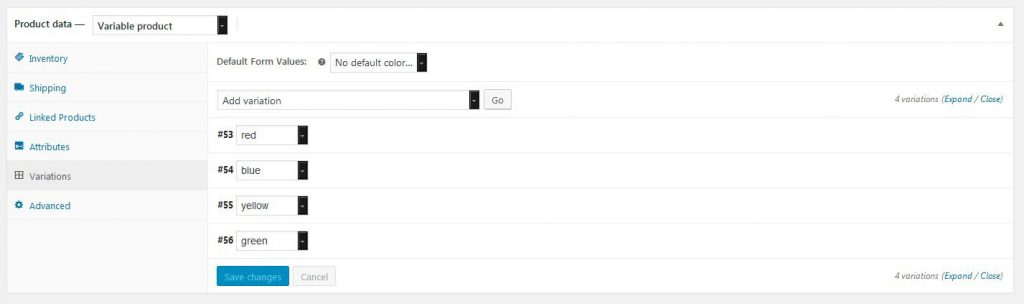
Variable Product
Creating Variable Products is just like including a Simple one. Assign the type of your product as a Variable. Doing so will add an extra tab Variation in the Product information section.
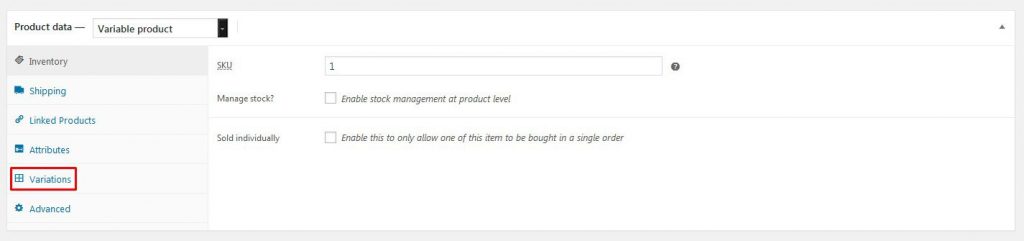
Product Variations
To include a description of the product variations, as well as their disparities, go to the tab Variations.
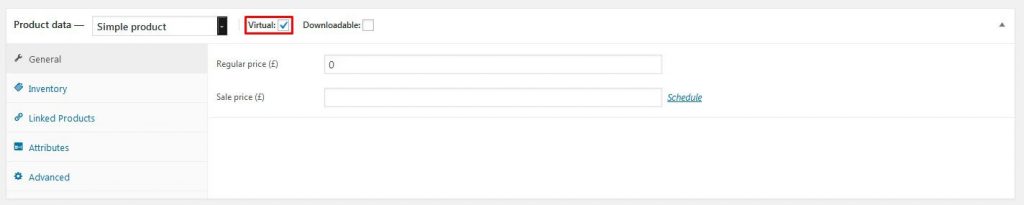
Virtual Product
Go to the area Product Type and select the checkbox Virtual to add a Virtual Product.
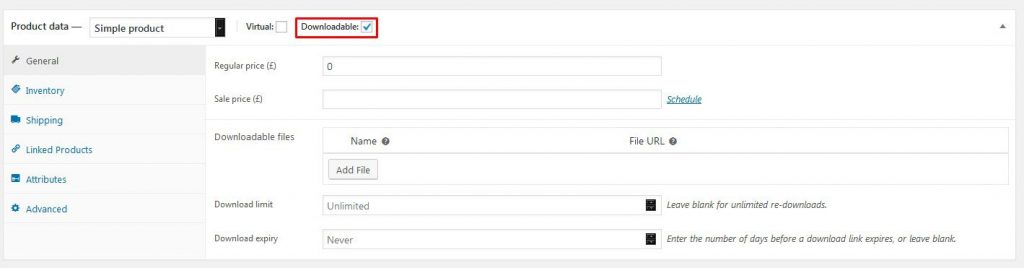
Downloadable Product
Select the checkbox Downloadable to set a product as downloadable. Likewise, you will need to supply the location of the file, that your customers will download. Also, set the highest amount of times permitted for an individual is allowed to download the document. Leave empty the download restriction for no limit on downloads.
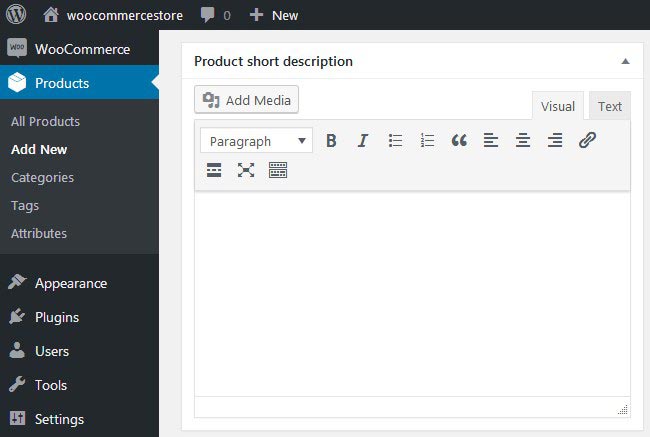
2.10. WooCommerce Product Short Description
As soon as you finish the task of setting the type of the product, as well as entering the item information, you should proceed with providing a short item description. In the bottom end of the window, just underneath the Product Data window, you will find The Product Short Description field. The description should contain the most critical and significant information about your product.
2.11. Additional WooCommerce Product Properties
In the right column of the window, you will find the options to include item classes, and labels, select a featured photo and add a gallery of product pictures. These options are identical to the settings you can see while making a regular post in WordPress. The main difference is the Catalog visibility setting. It has the options listed below:
- Catalog and search – The Item will be published throughout the eCommerce store: search results, as well as the shop and category pages.
- Catalog – The item will only be displayed on the shop and categories pages; it won’t appear on the search results page.
- Search – The item will be shown just in search results; it won’t appear on the categories and the shop pages.
- Hidden – The item will be displayed on the single item page only; it won’t appear on some other pages.
When you are finished with the configuration, press the Publish button.
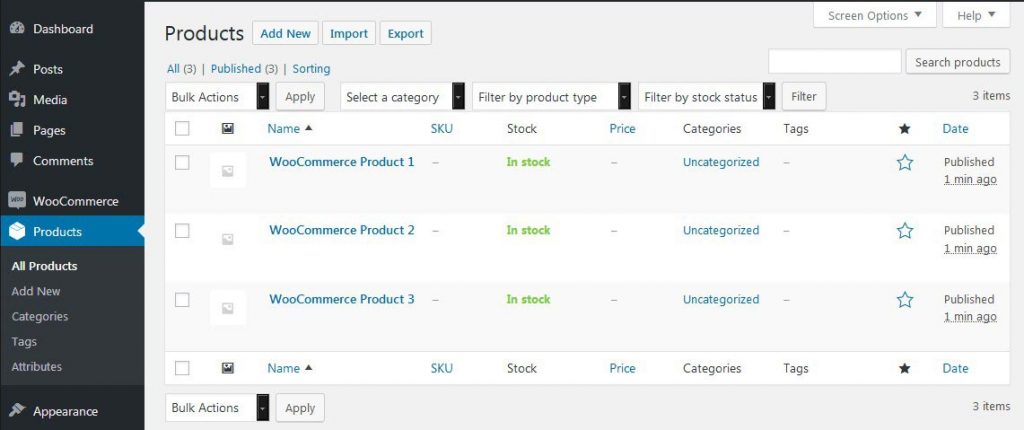
3. Managing Products in your WooCommerce Store
In the Products section, a list of all your items will be displayed. This is where you can manage the items by performing actions such as edit, delete, duplicate, and feature an item. It is possible to apply bulk modifications by choosing multiple items.
3.1. Duplicating WooCommerce Products
To make a copy of an existing item, look for it in the product section and press the button Duplicate. It is located under the Product Name. A new item will be created in WooCommerce on your behalf. Duplicating products is a convenient way to generate a new item that is similar to an existing one in some specifications.
3.2. Deleting WooCommerce Products
To delete a WooCommerce product use the Trash button. It can be found under the Product Name, and it will be shown when you hover over it. Once you click on the button, your Product will be moved to the trash bin, and it will no longer be visible in the products list.
3.3. Setting WooCommerce Products as Featured
Finally, you can mark an item as Featured. To do so press the button with the Star symbol on it in the item alternative. Highlighted items can be shown on your landing page. In addition to that, they can be incorporated inside posts by utilizing shortcodes.
Managing your WooCommerce Online Store
This section of the WooCommerce tutorial will explain how to operate your eCommerce site as a store manager. We will describe the menus accessible under the WooCommerce tab in the WordPress Dashboard. Every single menu item will be covered one by one, so you know precisely what it does.

To begin, go to the WordPress Dashboard -> WooCommerce tab. You will see the WooCommerce Orders page. This is where you can manage various things about your eCommerce store: view orders, coupons, and reports.
1. Viewing a List of Orders
Each time a client finishes the checkout procedure a new order is generated. A list of all orders can be seen by Admin and Shop Managers only. Each order is given a one of a kind Order ID.
You can see the list of orders by going to the WordPress dashboard and clicking on the Orders link in the menu located on the left side of the screen.
On this page, each line shows valuable information, such as client name and order ID, date of purchase, Order Status, Value, etc.
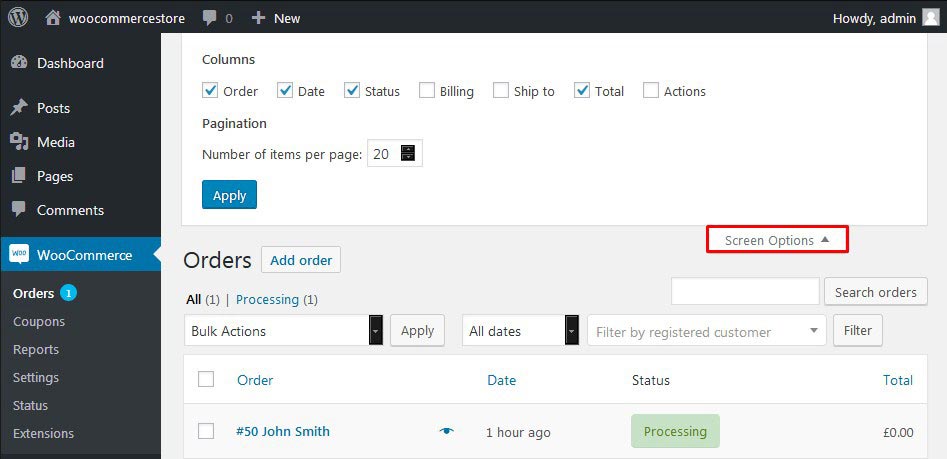
1.1. Customizing the Appearance of the Orders Page
Should you require to see more or less information on the Orders page, you can open the Screen Options at the upper right corner. A panel will open providing screen customization options. Select which Columns and what number of Orders you would like to be shown per page, and then click the button Apply.
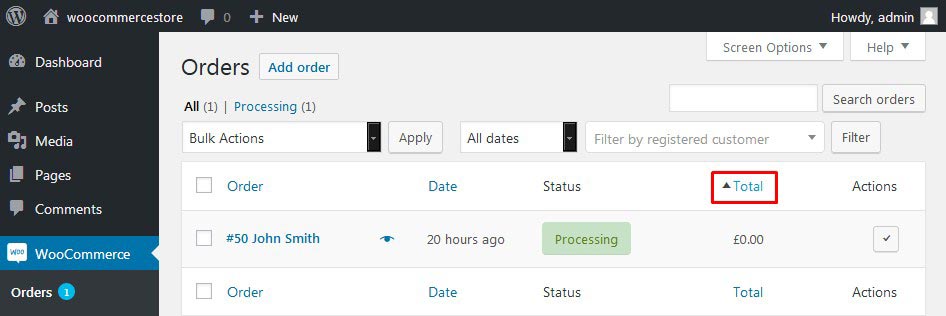
1.2. Using the Sort and Filter Options on the Orders Page
By default, the orders are arranged chronologically, with the most recent order at the top of the list. However, you can sort the list in ascending or descending order based in their Order number, Date or Total (Amount).
To change the Order sorting type hover over any of the column headings. A directional arrow will be displayed – up or down. Each time you click on any one of these labels, the list will be switched between Ascending (up arrow) and Descending (down arrow).
In addition to sorting orders, you can also apply filters by date (month/year) or Search for an existing (registered) customer. To achieve that you need to use the drop-down list and filter field above the orders list.
1.3. Opening Order Preview
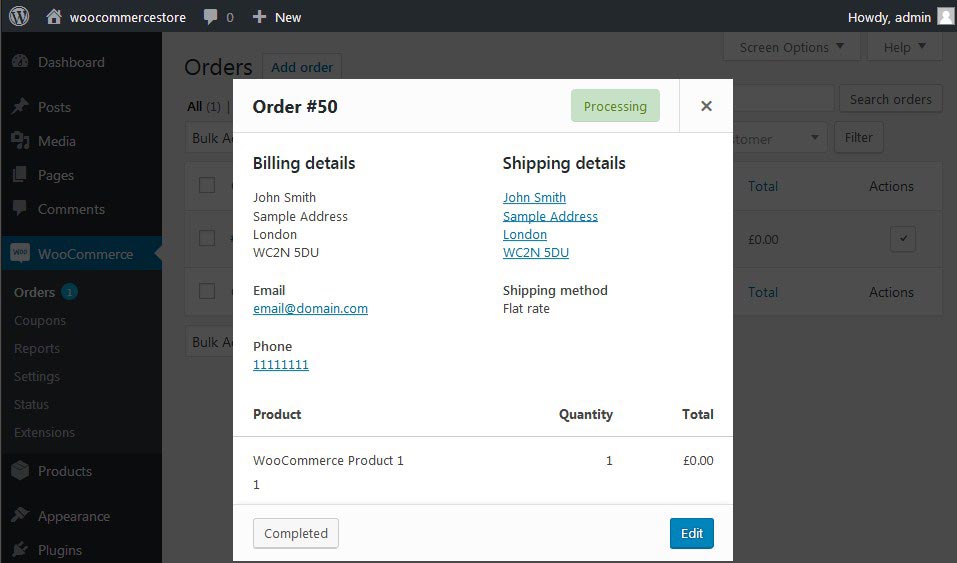
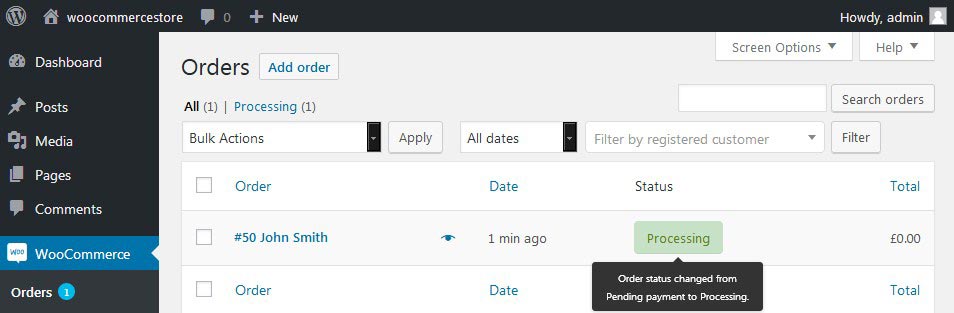
In the list of orders, you can find an eye symbol in the rows next to the Order ID and Customer Name. Clicking on this button will open a window which contains the following information: order number, status, billing/shipping details, the ordered products, selected payment method, as well as the option to change/edit order status.

The Order Preview is useful for the occasions when you need to quickly check the order details, before returning to the Order List.
To close the Order Preview window click on the X button in the top right corner.
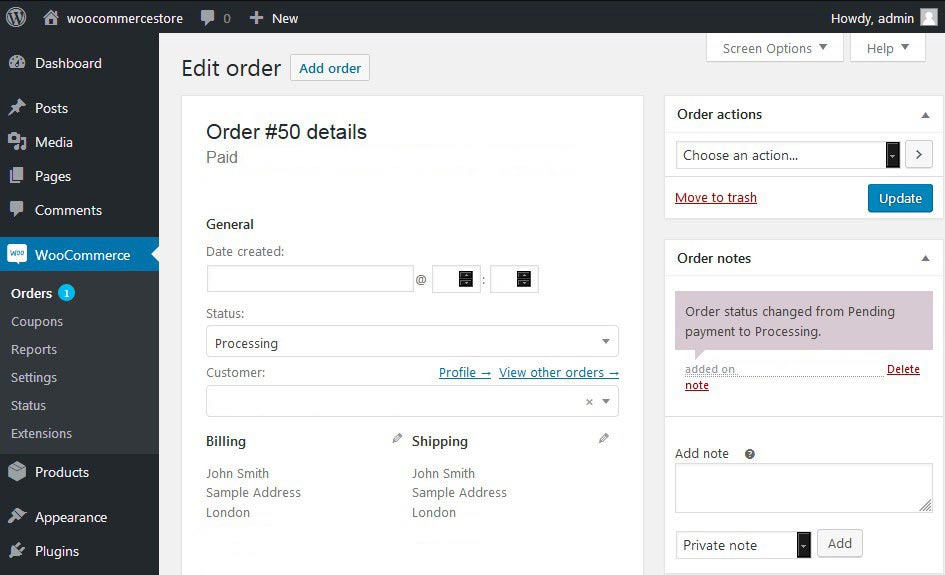
1.4. Viewing Single Order Page
To go to the Single Order page click the order number and customer name. Here you can edit Order Details, change Status, and Add Notes.

1.5. Order Status
Each order has a Status. Order statuses let you what is the current state of an order. Each new order begins with a Processing status and ends with a Completed status. We will now describe the list of order statuses that are used in WooCommerce:
- Pending payment – An order is placed by the customer, but the payment process is not yet complete. Waiting for the payment to be received.
- Failed – The payment process failed or was declined by the customer. Note that this status may not be displayed immediately, but the order might be shown as Pending until verified (e.g., PayPal).
- Processing – Payment has been transferred, and the product stock quantity has been updated; the Order is now waiting to be handled by the store manager. All product orders need to be handled by the store manager, with the exception of those that just contain items that are both Virtual and Downloadable.
- Completed – Order is handled by the store manager and is complete – it requires no further activity.
- On-Hold – Awaiting payment – product stock is updated, but the store manager needs to confirm if payment is received.
- Canceled – Cancelled by a store manager or the client – product stock quantity is restored, no further activity required.
- Refunded – Refunded by a store manager – no further activity required.
Order Statuses are color-coded to make them easy to distinguish from each other:
- Pending Payment – Grey
- Failed – Red
- Processing – Green
- Completed – Blue
- On-Hold – Orange
- Canceled – Grey
- Refunded – Grey
Hovering over an order Status displays its status progression:
1.6. Explanation and Progression of Order Statuses
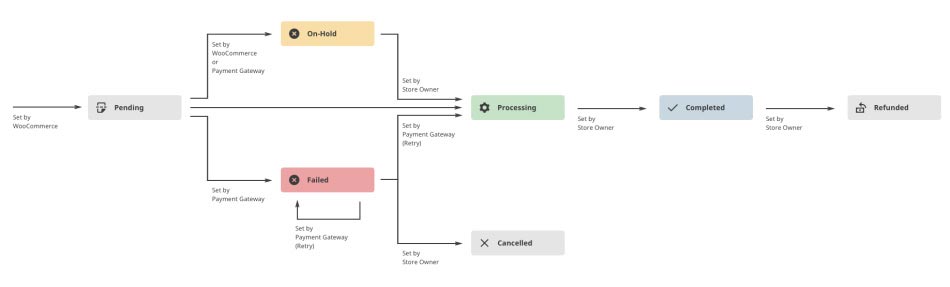
This graphic illustrates the different statuses an order goes through from Pending to Completed, Canceled, or Refunded.
Once submitted the order is assigned Pending status. Then based on your WooCommerce store payment gateway configuration, the order goes through an automatic payment verification process.
In case the payment process is unsuccessful, the order might go through one of the following statuses: On-Hold or Cancelled. In the situation when the automatic payment verification has failed, the store manager must review the orders himself and manually set the order statuses to Cancelled.
After the payment verification process complete successfully, the order is automatically set with status Processing. At this point, the store manager must process the order and ship the ordered product(s) to the customer.
After the order is processed and the products are shipped to the customer, the store owner must change the status of the order to Completed.
The last remaining status, Refunded is used when the customer has requested a refund for his payment.
The Order Status can be changed easily by the store manager using the Single Order Page view. Alternatively, you can use the shortcut buttons, which can be activated using the Orders Page Appearance Customization option.
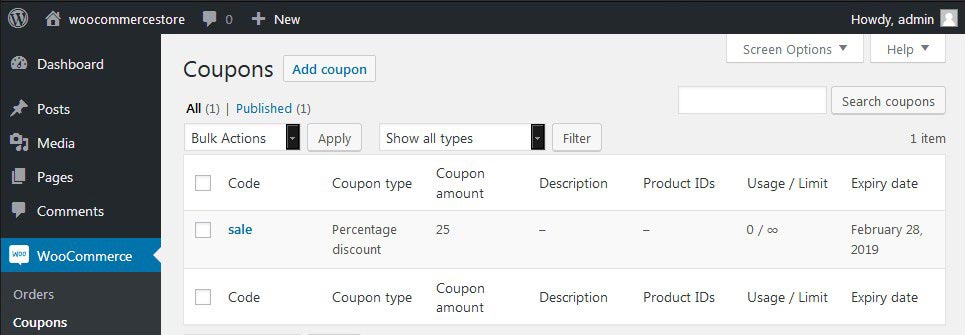
2. Using Coupons
Using coupons is useful for marketing and selling your items. You can add coupons and see previously used ones with WooCommerce in the Coupons segment. To make changes to a coupon, hover over its name and click in order to perform the required changes.
3. How to Manage Reports
On the Reports segment, you can inspect how effectively your WooCommerce store is operating. In the reports, you will be able to see various information about the purchases from your store, net deals, normal day-by-day deals, and different details.
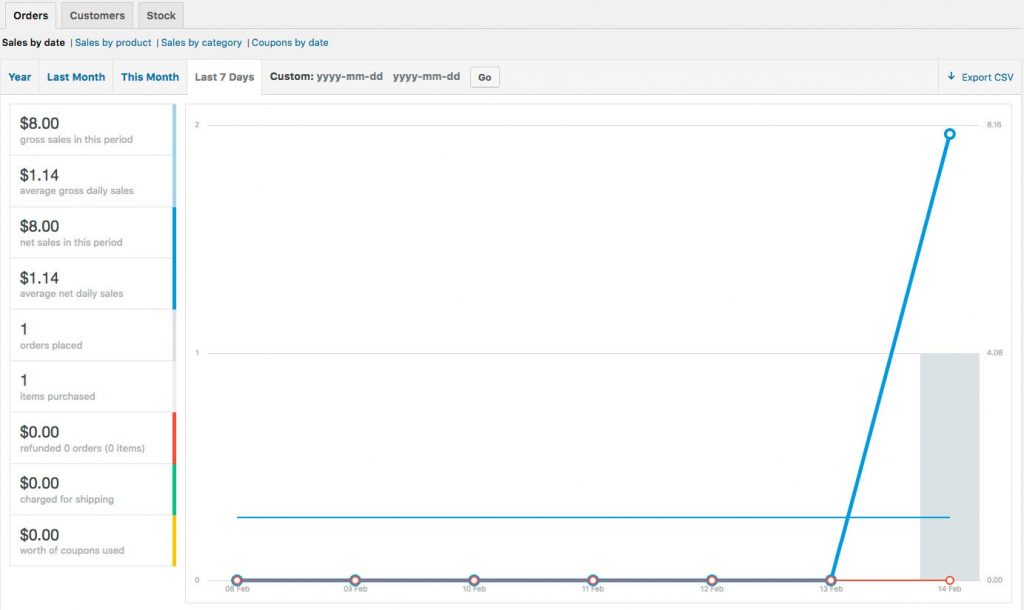
You can create insights for independent items, their classifications, or coupons. Choose the desired period – previous month, current month, the last week or any other custom duration. After selecting the wanted period click on the Go button to generate and view the report.
This concludes the description of the basic operations required to maintain a WooCommerce store.
WooCommerce Settings
In this section of our WooCommerce tutorial, you will find a detailed overview of the various settings of your WooCommerce store. In the occasion that at some point you need to alter the whereabouts, currency or other settings of your eCommerce store, this is the page you need to go to. Before performing any substantial changes, take a look at the WooCommerce Help segment, where you will find step-by-step guidelines and clarification of each configuration option. We will now go through each of the tabs in the Settings page quickly outline you can alter there.
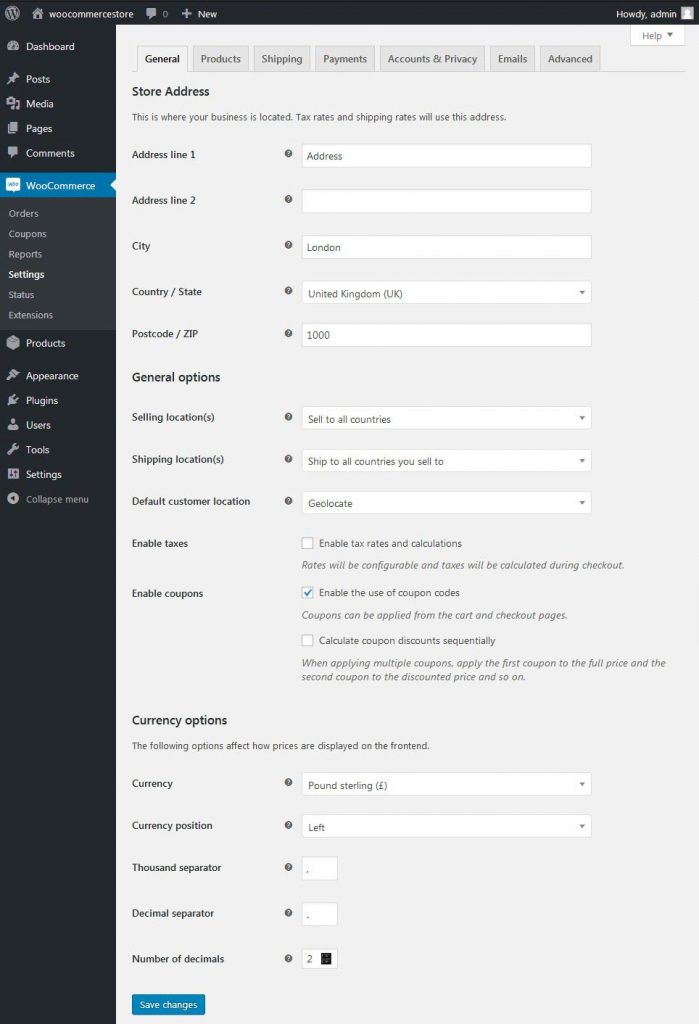
1. General Tab
Here you can configure the primary settings of your eCommerce store, for example, location, currency, whether to include taxes and others.
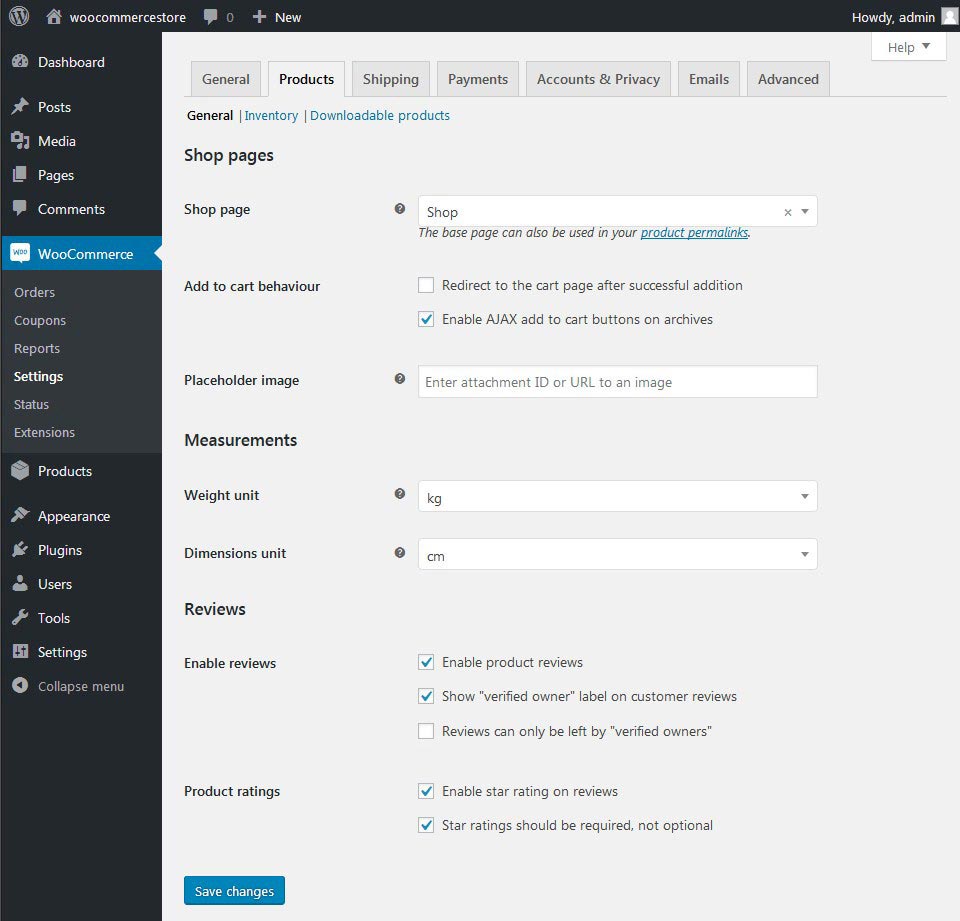
2. Products Tab
The Products tab consists of several individual pages. You will see several links at the top of the Products settings tab, which will redirect you to each of the sub-pages. We will now describe each one:
2.1. General Page
Go to WooCommerce -> Settings -> Products -> General. Here you can alter different products settings like measurements units and turning product reviews on or off.
2.2. Inventory Page
Go to WooCommerce -> Settings -> Products -> Inventory. This page will enable you to change the default stock preferences, as well as turn stock management on or off. You can likewise enable the notification to get email messages when an item becomes unavaiable.

2.3. Downloadable Products Page
Go to WooCommerce -> Settings -> Products -> Downloadable Products. Here you can set up methods of file downloads and access limitations if you offer downloadable products in your eCommerce store.

After making the required changes, make sure to click on the Save changes button to finalize the change to your WooCommerce store settings.
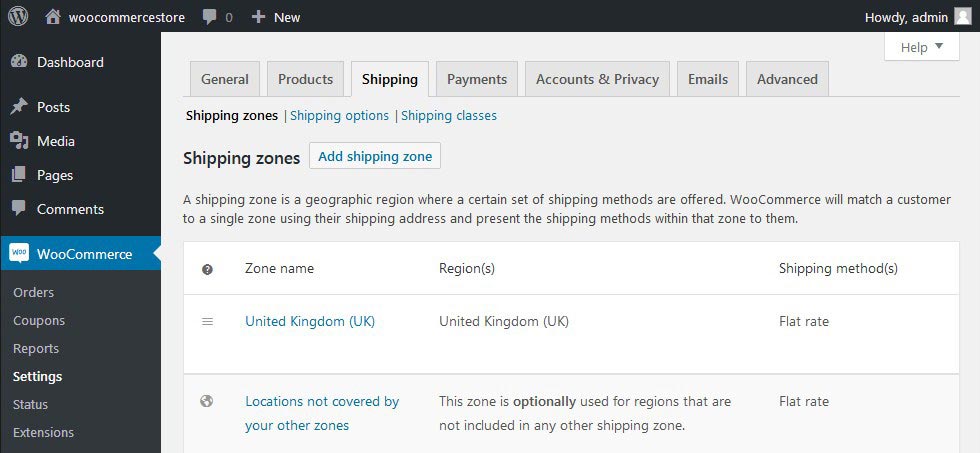
3. Shipping Tab
This section will be highly beneficial for you if your products are for sale worldwide. Using the settings on this page, you can configure the shipping zones, strategies, and rates. It is possible to set various shipping rates based on the customer’s location.
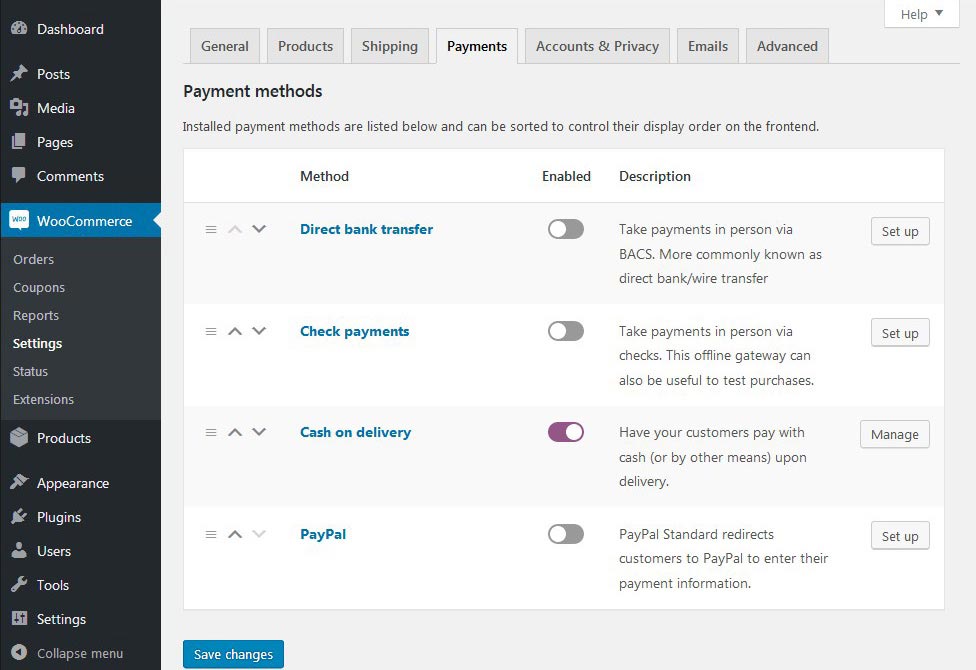
4. Payments Tab
Here you will be able to alter the checkout configuration and include new methods for payment. By default, WooCommerce comes with a selection of five payment methods from which you can choose. You can add more payment gateways by installing WooCommerce extensions. In the following section of this WooCommerce tutorial, we will provide you with an explanation on how to install extensions to WooCommerce.
Finally, on the Payments Tab of the WooCommerce Settings, you will also find the option to force the usage of secure connections for your eCommerce store (https://) and change different options on the Payments tab.
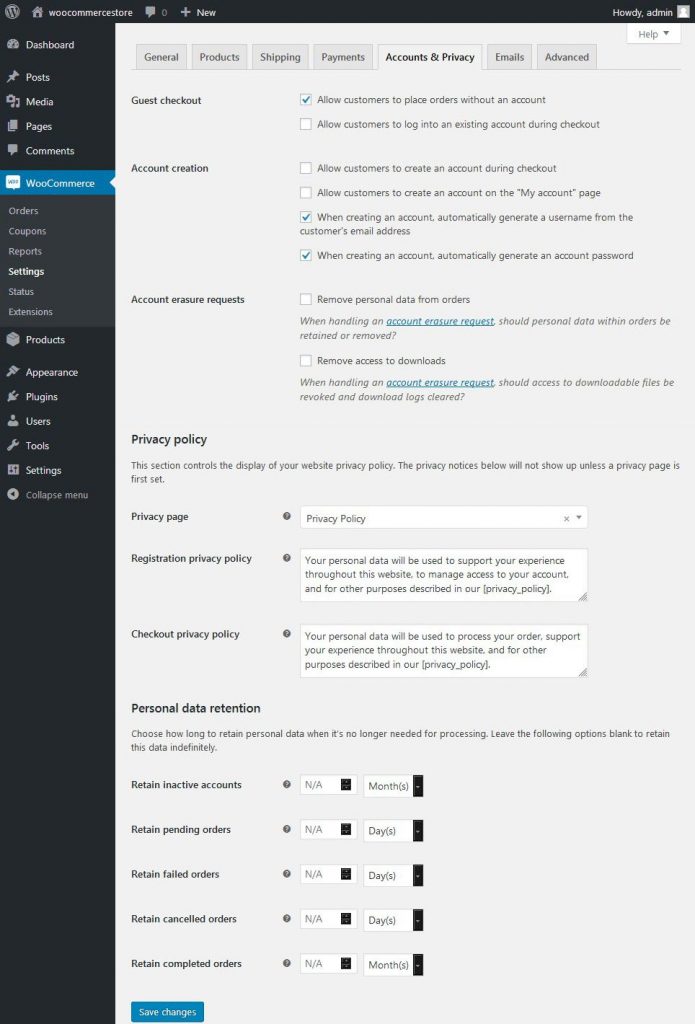
5. Accounts & Privacy Tab
On this page, you can configure the account page area, turn on or off customer registration options, and set up the general account sign-up process.
As well as that you can configure the privacy policy of your eCommerce store.
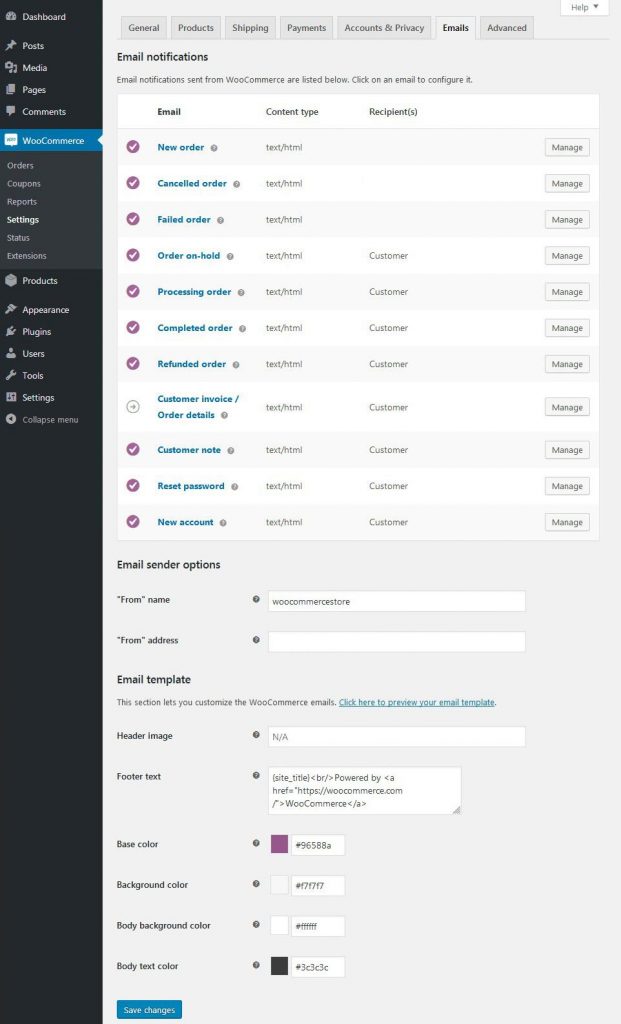
6. Emails Tab
This tab enables you to customize the email notification which is sent to your customers. On the Emails tab, you can alter the email layouts and email sender attributes. You have complete control of the appearance and the content of the email messages of your eCommerce store, and you can customize each of their details.
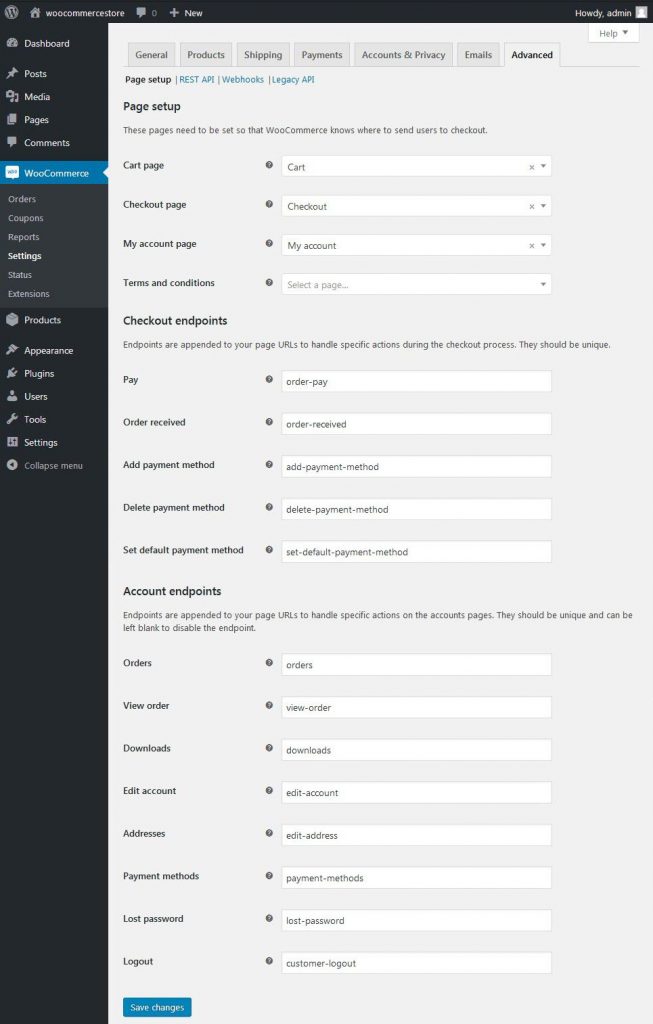
7. Advanced Tab
The last tab from the list called Advanced enables you to customize the Product Pages of your WooCommerce store, and also to turn on or off the WooCommerce API, which allows web developers to create interactions with sites remotely.
This tab includes four pages, which are the following:
- Page Setup – On this page, you can select the system endpoint pages for your WooCommerce store.
- REST API – This page enables you to turn the WooCommerce API, which will give access to outside applications.
- Webhooks – These can be customized in this segment as well.
- Legacy API – This page is used to configure the old version of the WooCommerce API system.
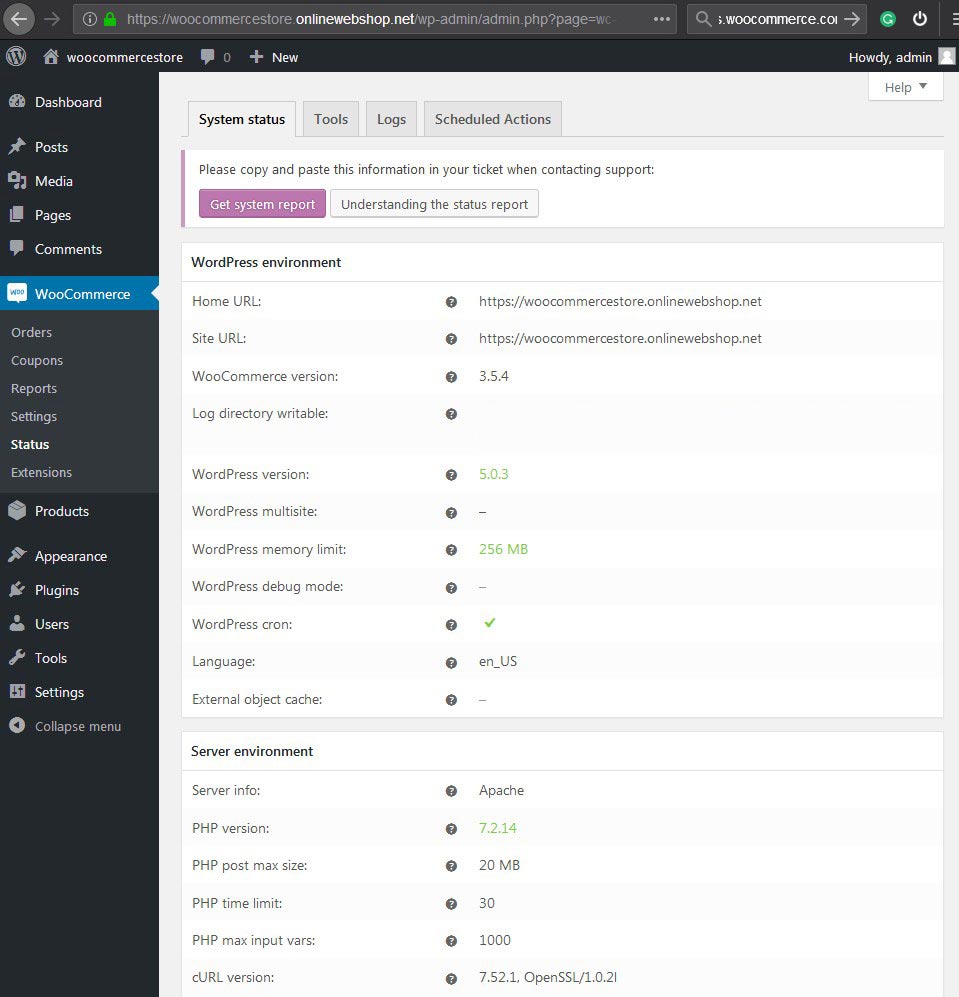
WooCommerce System Status
This page consists of three tabs:
- System Status – This page is valuable for inspecting the general well-being of the WooCommerce store. Here you will see all the information you could need – for example, which WooCommerce version you are using, the PHP version of your host, and the PHP limits. To generate a detailed report, click on the button Get System Report. If you have to give such information to your hosting company or the support team of WooCommerce, this will be very useful.
- Tools – You can clear the cache of your WooCommerce store in this section, as well as turn on or off the debug mode, reset client capacities, etc.
- Logs – On this tab, you can find recovered log documents with valuable data for investigating or investigating blunders.
WooCommerce Extensions
Just like WooCommerce is a plugin for WordPress, there are plenty of solutions that can extend the functionality of the WooCommerce platform, such as Themes and Plugins. The reason behind the flexibility of WooCommerce and its ease of use are the many available Extensions.
Just like WordPress plugins, to install WooCommerce extensions you need to use the WooCommerce Plugins store. Although you need to purchase the vast majority of the expansions to be able to use them, they are useful and worth their price. By utilizing plugins, you can upgrade your online business store, include greater payment options, and shipping strategies, enable tracking solutions as well as sync external services to the WooCommerce store.
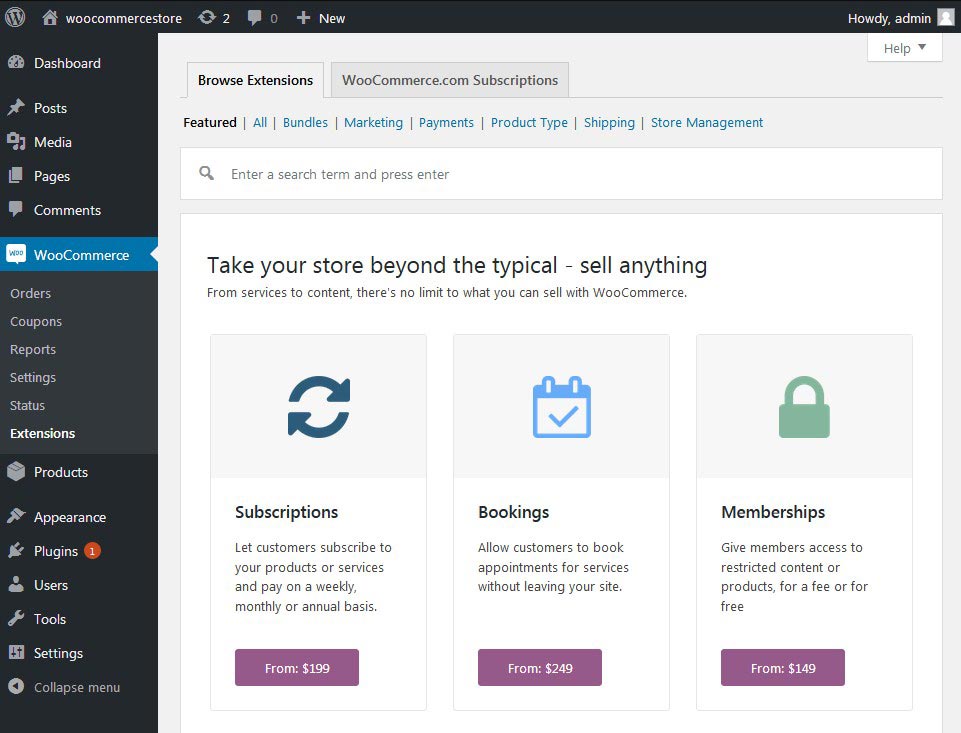
You can add many useful additional features to WooCommerce through extensions. These extensions range from introducing more language and currency options to your eCommerce store to providing useful analytics tools which can help you with your task as a store owner.
To install plugins on WordPress, you should simply head toward the WordPress Dashboard, and then go to the page Plugins – > Add New.
Conclusion
WooCommerce is without a doubt an extraordinary instrument to transform WordPress into a fully functional eCommerce store. The best feature of WooCommerce is that you are not required to have in-depth knowledge and to learn to program to sell your items with it. We trust that this WooCommerce Tutorial will encourage you to create and configure your store.