
WooCommerce Login is a broad term, and it summarizes the procedure of how your clients sign into your online store. There are a few different ways to configure the WooCommerce Login. Just as it is important to choose a suitable hosting plan for your eCommerce store, the decision of which one you should select is also essential, and it relies upon how you need your eCommerce store to function.
This tutorial will provide you with detailed information about the different login methods for WooCommerce. We’ll go through the various login possibilities and the benefits of each method. We will provide specific instructions on how to configure the Login Methods of a newly installed WooCommerce store, with optional or obligatory registrations, and log in using social media profiles.
If you are new to WooCommerce, we would highly recommend you first take a look at our guide on creating an eCommerce store with WooCommerce. By doing so, you will get an overall understanding of how WooCommerce operates, before getting into the more specific task of configuring the Login Methods of your store.
We’ll also mention some useful plugins to make a concealed, or secret store using WooCommerce, that just signed-in clients can reach. For an explanation of how to add plugins to WordPress, read our guide here.
The Various Login Methods
First of all, we will provide a short description of each of the various login methods for WooCommerce.
1. Open WooCommerce Store with Guest Checkout
This setup is the most widely used login method. Anybody can view all of your WooCommerce items; there are no concealed products. Clients can purchase items without the requirement to log in sign up. Alternatively, they can register in the course of the checkout process if they choose to do so.
2. Open WooCommerce Store with Obligatory Client Accounts
Anybody can browse the WooCommerce store and its items. However, clients must create an account or log in to be able to make a purchase.
3. Open WooCommerce Store with Social Login
To make it more convenient for your clients to sign in, you can enable social logins into your site utilizing online networking profiles, for example, Google, Facebook or Twitter.
4. Protected WooCommerce Store Categories
Rather than (or in addition to) managing individual client registrations, you can protect certain areas of your WooCommerce store with a password. Anybody can purchase from the open part of your eCommerce store, while just those clients with the required credentials can reach the protected areas. When a client signs into your concealed sections, they can browse and purchase the hidden items inside.
5. Completely Private WooCommerce Store
There are situations when its preferable to conceal your entire WooCommerce Store for guests. In this case, the clients must first log in or submit a password to get to the store.
6. WooCommerce Auto-Login Links
Enable your clients to log in easily into your WooCommere store by using an individual login URL. Therefore authenticating using a username and password will no longer be required.
We will now take a more detailed look at each of the different WooCommerce login methods. After reading our guide, you should become familiar with each one.
1. Open WooCommerce Store with Guest Checkout
The majority of eCommerce stores let customers view and purchase the available items, regardless of whether they’re signed in.
Enabling Checkout for Guests in WooCommerce
- Sign into the WordPress dashboard and go to WooCommerce -> Settings -> Accounts & Privacy.
- Look for the checkbox with the following label:
Allow customers to place orders without an account.

- Check this box to enable the clients to buy without signing in or making a client account.
- Click on the Save changes button below.
Disallowing Client Registrations in WooCommerce
To disallow your clients from creating registrations, log in to your WordPress Dashboard and go to WooCommerce > Settings > Accounts & Privacy. On this page untick the following two boxes:
- Allow customers to create an account during checkout;
- Allow customers to create an account on the “My Account” page.
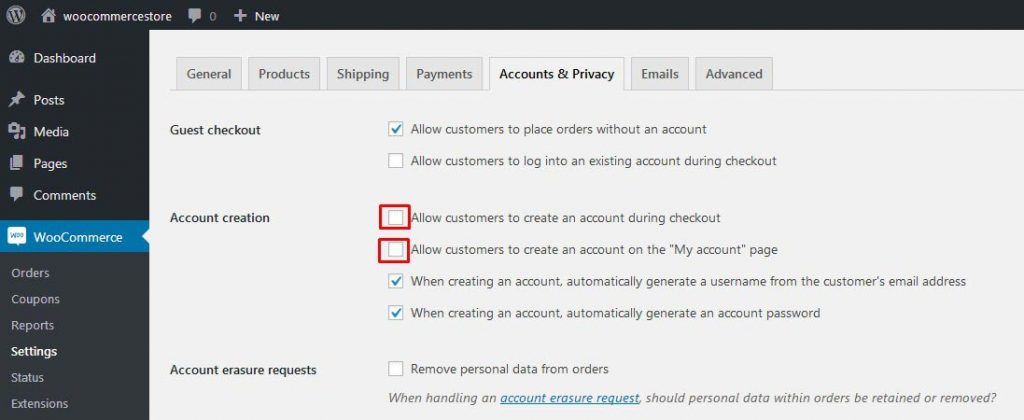
This will keep clients from creating an account on your site by any means, so it is not necessary to create a login page.
2. Open WooCommerce Store with Obligatory Client Accounts
How to Create a Register/Login Page in WooCommerce
As soon as you complete the WooCommerce installation and go through the Setup Wizard, you will be offered to have all the fundamental pages for your eCommerce store automatically generated for you.
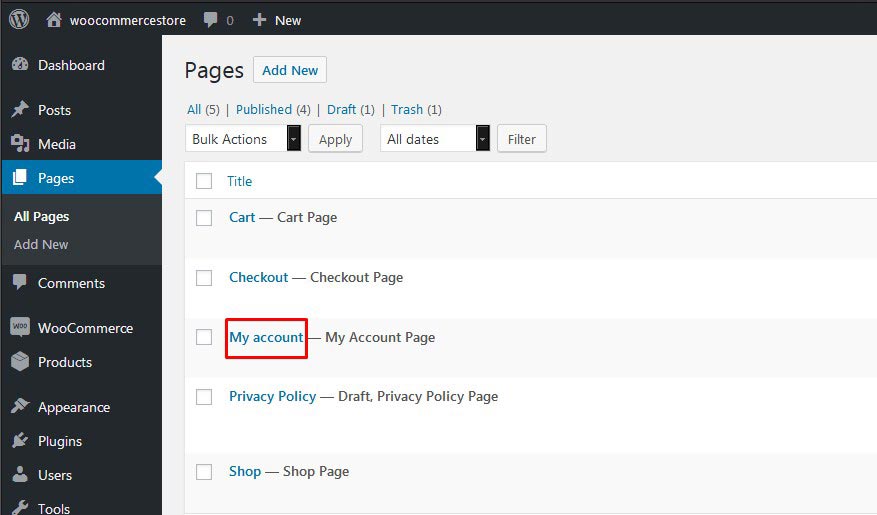
If you have done so, you’ll see a page My Account in the list of your pages (alongside other new pages for the shop, cart, and checkout). The [woocommerce_my_account] shortcode will show up in the content of the page. You can utilize this page as a sign-in or registration page, for instance by providing a link to it in your website header or the sidebar.
The WooCommerce sign-in / registration form works in the following way:
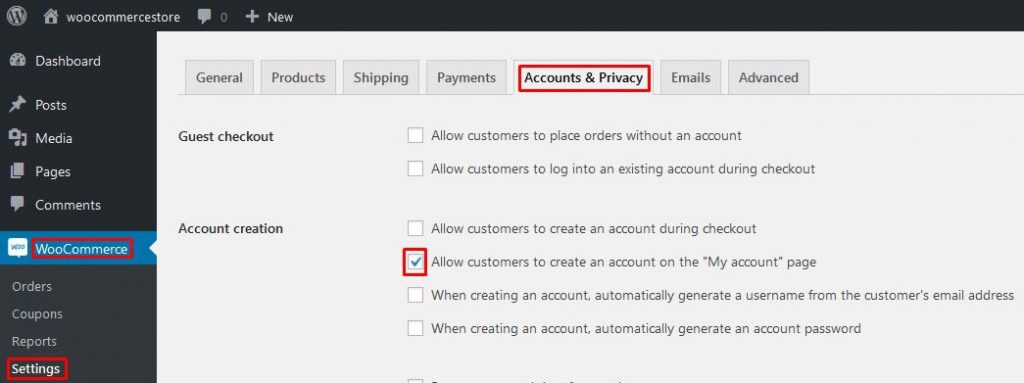
- Guest clients will be able to access the WooCommerce login form, most likely with a registration form. To incorporate the form on the login page of your store, go to WooCommerce -> Settings -> Accounts & Privacy and tick the box:
Allow customers to create an account on the “My Account” page.
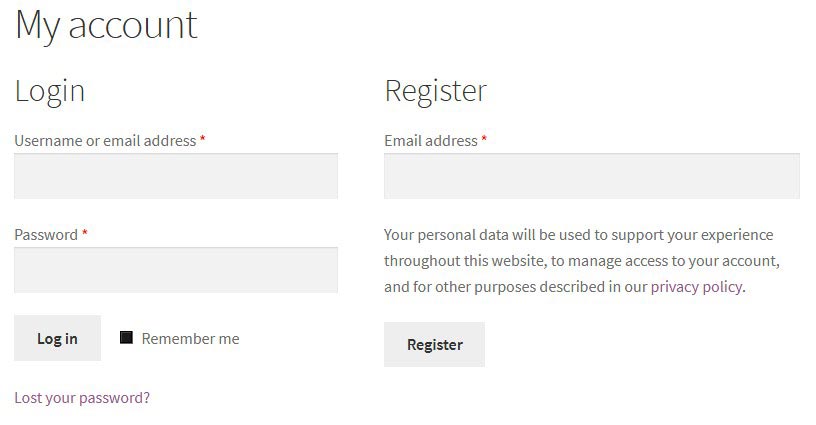
- Signed-in clients will be able to view their registration page, along with their information such as order history, profile, and other data.
You can include the [woocommerce_my_account] shortcode anyplace else on your site to make additional login forms. There are different plugins that you can use for this task, for example, Sidebar Login and Woocommerce Login/Signup Lite. These will enable you to create WooCommerce login forms with more complex functionality. If the WooCommerce login shortcode provided with WooCommerce isn’t sufficient for you, you would just need an additional plugin to replace it with another solution.
How to Obligate WooCommerce Clients to log in or Register Before they Purchase
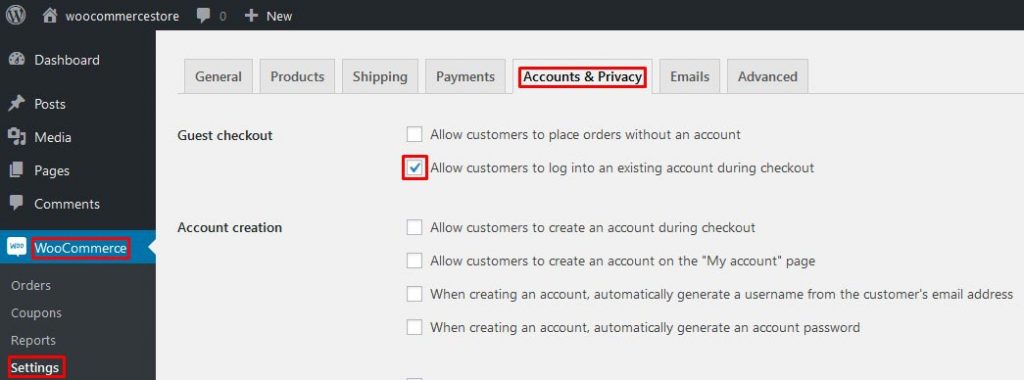
- From the WordPress dashboard, navigate to WooCommerce -> Settings -> Accounts & Privacy.
- Untick the box:
Allow customers to place orders without an account.

This setting will obligate clients to make a registration when they are about to submit a purchase in your WooCommerce store.
Additionally, you can arrange how client accounts are made. On the same page of the WooCommerce settings you choose whether to incorporate a registration form on the checkout page and whether to consequently create client login usernames and passwords.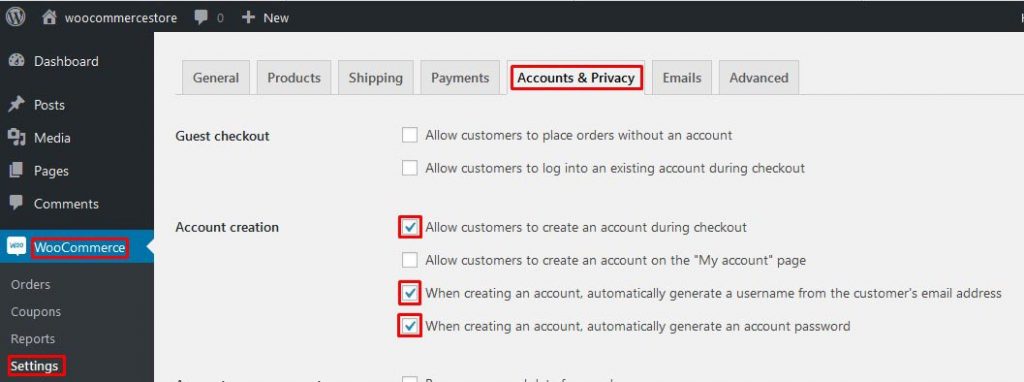
There’s likewise a checkbox to show a login reminder on the checkout with the goal that returning clients can log in. This is extremely valuable if guest checkout is prohibited, as you have to simplify the login process for the clients.
Note: If a client finishes checkout without signing in then registration will be made automatically by WooCommerce. They will get the login information by email with the goal that they can log in next time they buy from you.
3. Open Store with WooCommerce Social Login
Using social login, you make an open WooCommerce store as normal with the goal that anybody can view your items. As a feature of the checkout, they can sign in to your site utilizing their web-based social networking accounts.
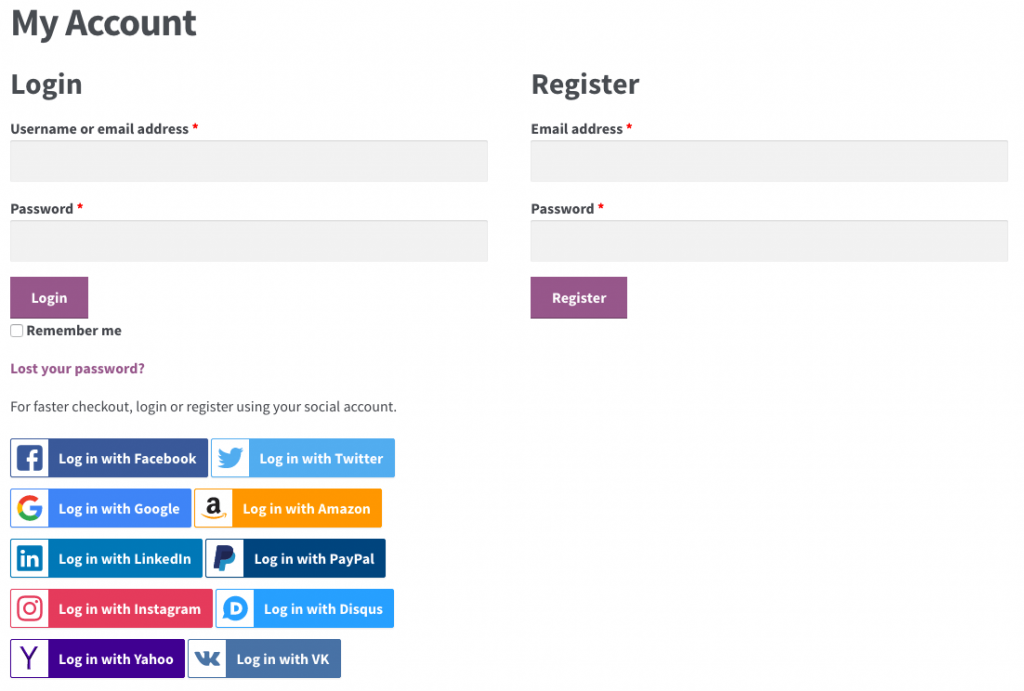
You may provide an additional social login alternative to the direct registration on your WooCommerce site.
Research indicates that over 3/4 of clients want to sign into WooCommerce or different sites utilizing internet-based life. This is not unexpected for the reason that it spares them the effort of making another registration for your site and recalling their login information.
Adding Social Login to WooCommerce
If you’re thinking about social login, we would suggest that you utilize the official WooCommerce plugin. This plugin provides the best opportunity regard to make an easy-to-use WooCommerce social login for your site.
You need to purchase the plug-in before you can add it to your WooCommerce Site. Next, follow the guidelines provided on the official website for the plugin to perform the installation. Finally, make sure to submit your license key.
We highly recommend extensive testing before implementing social login. Ensure the login methods of your WooCommerce store work consistently. Specifically, test the accompanying parts of the login procedure:
- First-time WooCommerce logins utilizing each social network.
- Repetitive logins utilizing the same social network.
- Repetitive logins utilizing an alternate social network. (for example what occurs if a client doesn’t remember what social network registration they signed in with already?)
- Register utilizing social login and afterward try signing in on the site utilizing the Lost Password link.
Essentially, attempt to find a problem and then report it to WooCommerce if you do. Social login is a useful addition to your eCommerce store though yet needs careful testing to make sure it works correctly, as clients may overlook how they recently signed into your WooCommerce store.
4. WooCommerce Protected Categories of Products
The login options 1 – 3, which we talked about so far, are tied in with letting clients log in to an open WooCommerce store. They may need to sign in to their account to place an order, yet anybody can view the store and browse the products.
In contrast, you can make a WooCommerce login configuration where clients need to sign in or submit a password to be able to view your products or other content of your store. The plugin WooCommerce Protected Categories restricts access to at least one of your item categories. Clients must log in with the right accreditations to be able to view the items inside.
The Benefits of Protected Product Categories
WooCommerce Protected Categories can be utilized in a few different ways:
- Show items from protected categories in the public area of your store.
When somebody wants to see a protected item, they should enter the password or login to see the single item page or make a purchase. This gives you a chance to show all items in the open store, while just pre-selected clients can purchase protected ones. - Conceal protected categories and items from the public store.
You can make protected WooCommerce categories and their items hidden from the public section of your store. Authorized clients can log in and then navigate to the corresponding protected category.
This method is most suitable for WooCommerce discount stores or client-specific items where you offer distinctive items for each different customer. - Make your whole WooCommerce store concealed.
Finally, you can move ALL your items inside at least one protected category. In this case, clients need to sign in before they can see your items or make a purchase.
(Tip: While you can hide your entire WooCommerce store with this plugin, instead you could use option 5, beneath. Both plugins enable you to make a WooCommerce hidden store)
How to Make Protected Categories in WooCommerce
For full instructions about this plugin’s setup process go to the plugin knowledge base. Below is a quick manual to help you start:
- First, get the plugin WooCommerce Protected Categories.
- Install the plugin and activate it.
- Make sure to fill in your license key by going to WooCommerce -> Settings -> Products – > Protected Categories.
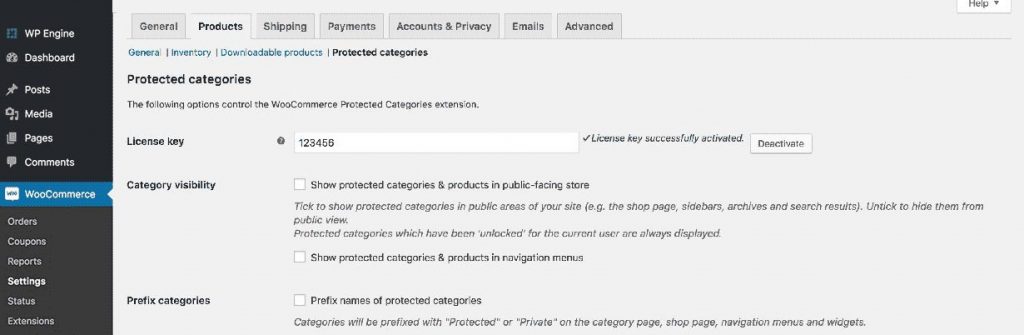
- Make the necessary changes to the settings, for example, tweaking the content on the password login page, and if the protected categories should be concealed from the public regions of your store.
- Then, navigate to the product category that you need to hide behind the login page. You’ll discover this option in Products -> Categories.
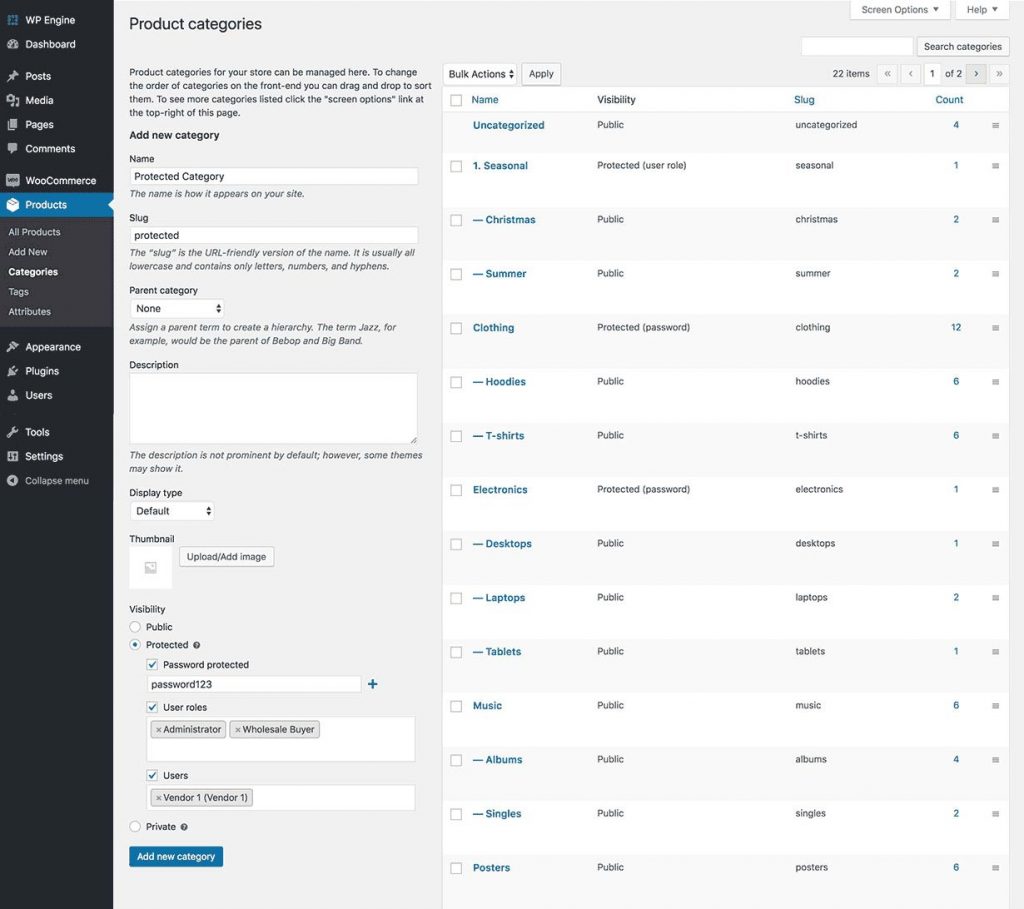 The plugin has included another area Visibility with choices to protect the category with a password or to make the category private. Pick Protected and either protect the category with a password or deny access to it only to explicit clients or roles.
 - Repeat step 5 for every one of the classes you need to protect.
At last, test the protected categories of your WooCommerce store from various client login situations. For instance, attempt it when you’re signed all through the site. Additionally, attempt it when you log in to a category.
5. Password-Protected Private WooCommerce Store
WooCommerce Private Store obligates your clients to first sign in to your WooCommerce store in order to be able to see your shop page, items, categories, or some other store content. It’s a straightforward yet compelling plugin to conceal WooCommerce from general visibility, without influencing the open sections of your site.
By signing into their client account or simply entering a password on the login page of your private WooCommerce store, clients can open the store and browse the items and other content inside. Your guest visitors won’t realize you have a WooCommerce store, except if you choose to link it to the login page. (In this case, they will probably be able to see the WooCommerce login page yet none of the concealed content.)
How to Conceal your Entire WooCommerce Store using a Password or Client Login Form
For this task, we would recommend you to use the plugin WooCommerce Private Store. For detailed instructions about the setup process please visit the plugin knowledge base. The installation takes just a couple of minutes:
- Purchase the Private WooCommerce Store plugin.
- Go to WooCommerce -> Settings -> Products -> Private Store.
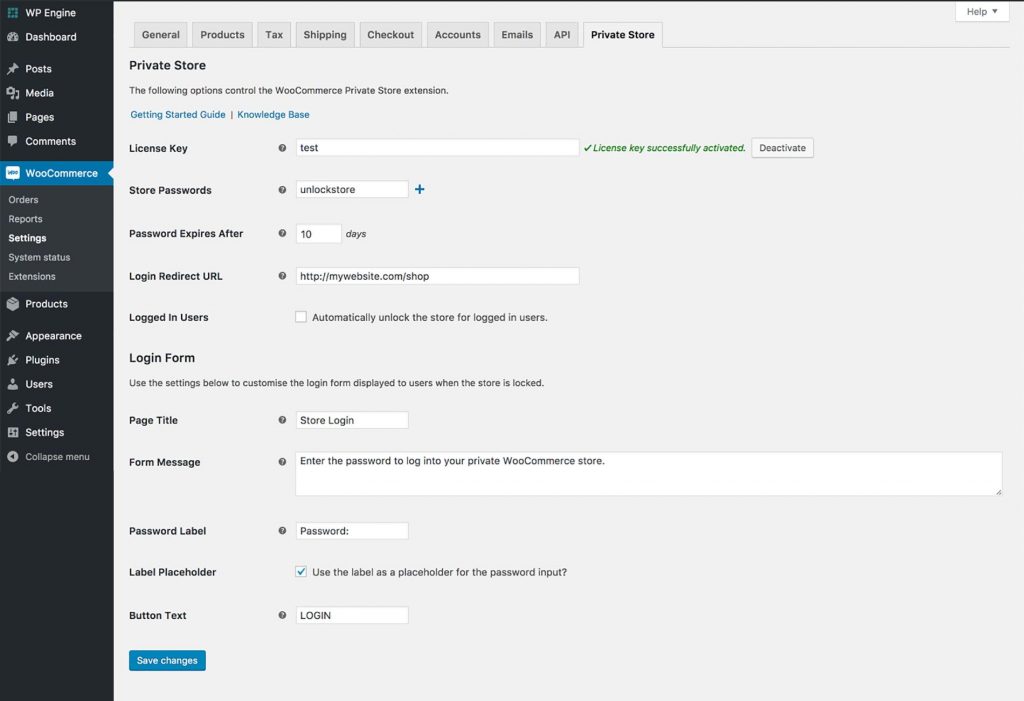
- Enter your license key and afterward make any changes necessary to the settings, for example, editing the WooCommerce sign-in form. Either pick a password to protect WooCommerce or tick the option Signed In Users to consequently open it for signed-in clients.
When you’ve saved the changes made on the settings page, your entire store will be concealed. Clients should sign in or enter the password before they can see ANY WooCommerce content, for example, the primary shop page, items, classifications, and so forth. Your WooCommerce contents will likewise be hidden from web crawlers, therefore this method is simple yet secure to conceal your WooCommerce store.
6. WooCommerce Auto-login by URL
At long last, you may provide your clients with a less demanding option to login into their accounts in your WooCommerce store.
WordPress and WooCommerce auto-login plugins give a dynamic connection that consequently logs clients into their records. This spares clients the need to recall the usernames and passwords of their registrations. All they are required to use is their auto-login URL.
Enabling Auto-Login links for WooCommerce
A plugin we would like to recommend for this task is Autologin Links. Once installed and activated it will enable you to create autologin links for your WooCommerce store by signing in guests under a specific client name.
As a site administrator, you can edit (create and delete) autologin links for clients; the clients can just view their autologin links.
Note that this module bypasses the standard log-in method for WordPress using username and password, and for this reason, it should be used with care.
- Install and activate the Plugin Autologin from your WordPress dashboard.
- To create an auto-login link for your customers, go to WordPress Dashboard -> Users.
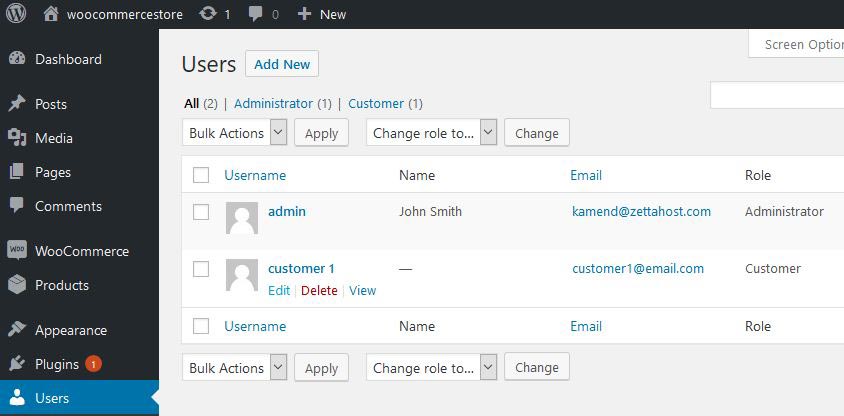
- Hover over the name of a customer, and click on the link edit. This will redirect you to the user profile page.
- On the user profile page look for the section Auto-Login. Press the button new to generate a login link for your customer.
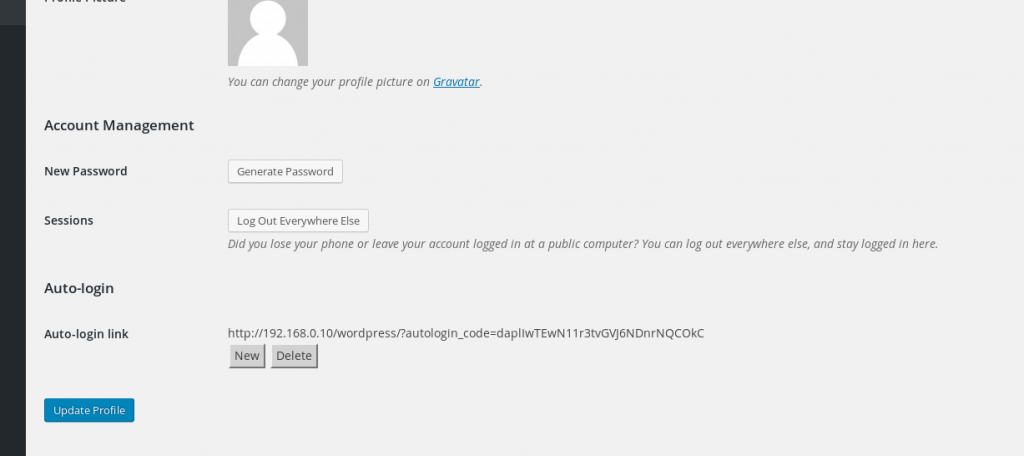
- Finally, press the button Update Profile to save the link.
You can utilize Auto-Login links with the login methods 1, 2, 4, and 5, which we previously discussed.
What Kind of WooCommerce Login should you use?
As should be obvious, there are numerous kinds of WooCommerce logins intended for various sorts of stores. This guide should help you to pick the most suitable login method for your WooCommerce store and to set it up correctly.