
It is a good idea for every eCommerce store manager to add Google Analytics to WooCommerce. By doing so, you will be able to track your WooCommerce shop to improve the knowledge of the user and increase your revenues. Learning which products sell the most in your online store is a popular exercise.
In this tutorial, we’re going to show you how to add Google Analytics to WooCommerce.
What is eCommerce Tracking?
If you run a WordPress website, it is common practice to add Google Analytics to WooCommerce, as well as tracking and analyzing your website’s visitors.
You are likely monitoring your website’s traffic with Google Analytics already. It enables you to optimize your page for customers so that more information can be obtained. You may also monitor your WooCommerce store’s activity on Google Analytics as a particular blog.
Likewise, the option improved eCommerce tracking is also available in the Google Analytics dashboard. It provides you full insight into your store’s acquisitions. This choice will assist you to know your prospective customers so that you can enhance the most frequented consumer websites for your customers and create them even easier.
How to activate eCommerce tracking in Google Analytics?
To monitor your customers’ purchasing behavior, you will need to enable Google Analytics eCommerce monitoring for WooCommerce. Enhanced eCommerce monitoring will assist you to obtain some significant Google Analytics statistics such as purchasing behavior, checkout behavior, product lists performance, sales efficiency, marketing statistics, and more.
These reports bring enormous advantages to your WooCommerce store.
To begin, you first need to activate the enhanced Google Analytics eCommerce. Google Analytics
-
- If you aren’t already using Google Analytics on your website, sign up for an account.
- Enable Ecommerce for a view within Google Analytics for transaction data to be recorded.
- Sign in to Google Analytics.
- Click Admin, and navigate to the view you want.
- In the VIEW column, Ecommerce Settings.

- Set Enable Ecommerce to ON.
- Set Enable Enhanced eCommerce Reporting to On.
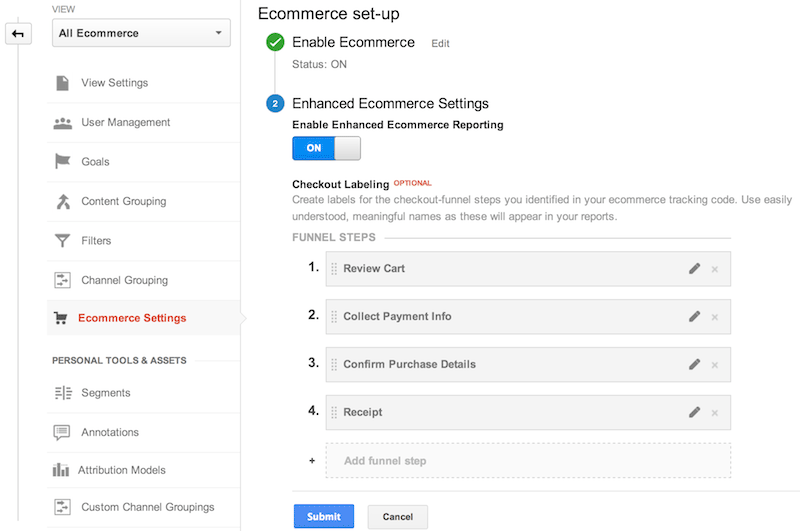
- Save, then click on View Settings
- Set the setting Currency displayed as to match your WooCommerce currency.
- Save your Analytics View settings.
- Optional: Set Enable Related Products to ON.
- Save your Analytics View settings.
- Click Next Step.
- Click Submit.
How to add Google Analytics to WooCommerce?
After enabling the enhanced Google Analytics eCommerce Tracking, you are now ready to install and set up the necessary functionality on your WooCommerce online store.
- Log into your WordPress Dashboard and navigate to Plugins > Add New
- Search for the plugin WooCommerce Google Analytics Integration by WooCommerce.
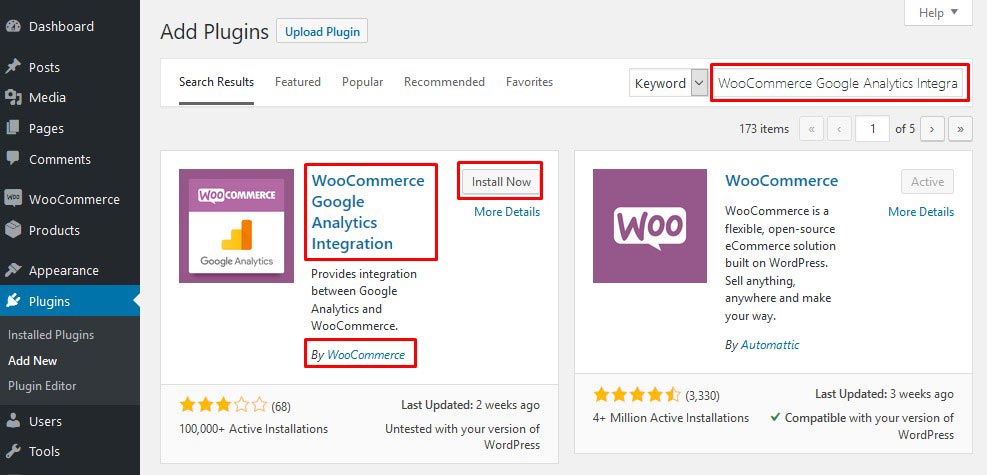
- Click the Install Now button, and then click Activate.
- To configure the plugin, navigate to WooCommerce > Settings and then select Integration.
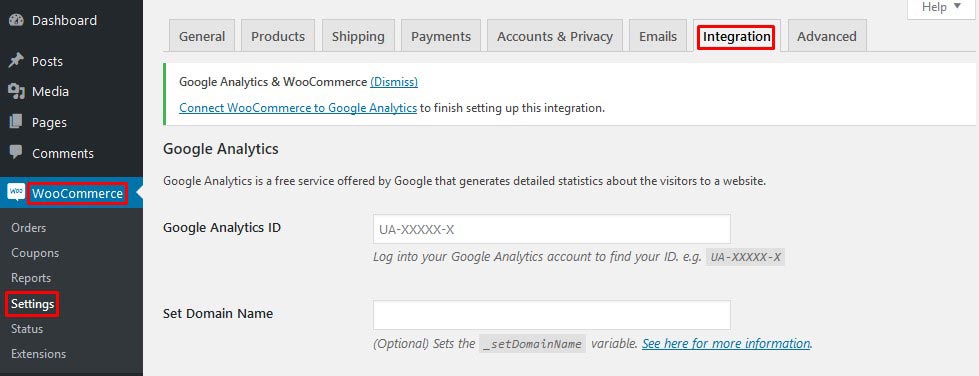
- On this page, you need to fill in the following fields:
- Google Analytics ID: Add the Tracking ID from your Google Analytics account.
- Set Domain Name: Add the domain for your site, such as yourcompany.com. If you’re tracking multiple domains or tracking subdomains, we recommend reviewing the documentation provided by Google Analytics.
Google Analytics Tracking Options
Next, you need to configure the tracking options for the WooCommerce Google Analytics Integration plugin.
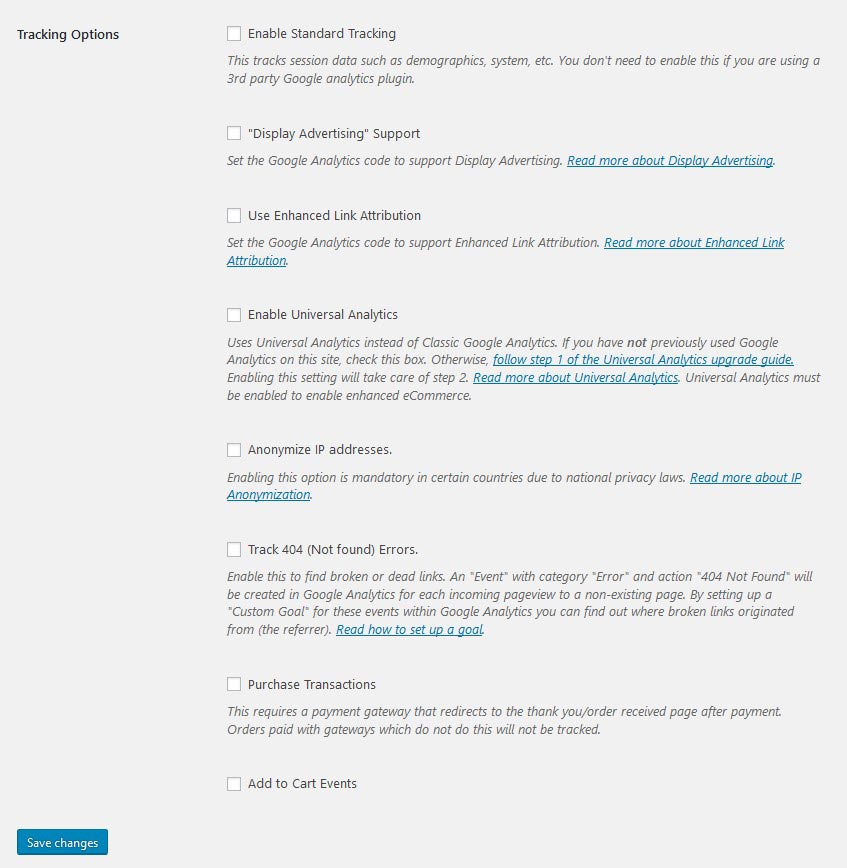
- Enable Standard Tracking: This adds basic website tracking. It is needed if WooCommerce Google Analytics Integration is the only Google Analytics plugin on your site. If you are using another Google Analytics plugin for your site, leave this box unchecked.
- “Display Advertising” Support: Check this box if you intend to run ads on the Google Display Network and would like these tracked in your analytics account.
- Use Enhanced Link Attribution: It improves the accuracy of your In-Page Analytics report by differentiating between several links to one URL on a single page. Select it if you have multiple links to the same URL and want to understand which are clicked more often.
- Enable Universal Analytics: This is the new standard for Google Analytics. Check this box if you have not used Google Analytics on this site before. If you have used it before, upgrade to Universal Analytics.
- Anonymize IP addresses: This keeps user data more private and is mandatory in some countries. Read more about IP Anonymization.
- Track 404 (Not found) Errors: This allows you to find broken or dead links. To see how many times this occurs, go to your Google Analytics account > Behavior > Events > Overview > Error.
- Purchase Transactions: Track purchases on your site, including data like revenue, tax, refunds, shipping, and more. This requires a payment gateway that redirects to the thank you/order received page after payment. Some popular options that do this are Stripe, PayPal powered by Braintree, PayPal Express Checkout, and Square.
- Add to Cart Events: Track when customers add a product to their cart. This allows you to see more specific details about your customers’ experience and better understand where they might be dropping off.
What are the recommended Tracking Options?
If you are not sure about the tracking options, you can use our recommended settings below:
- Turn off the option Enable standard tracking.
- Tick Enable Universal Analytics
- Tick Purchase Transactions
- Tick Add to Cart Events
- Tick Enable Enhanced eCommerce
- Click Save changes to update the plugin settings.
It is highly recommended to log out of your website and place a test order, including payment. After doing so, you’ll need to wait 12-24 hours for Google Analytics to record and analyze the data.
What to do next after you add Google Analytics to WooCommerce?
Once you have installed and activated Google Analytics for your WooCommerce store, it is a good idea to visit Google Support for more information and best practices on goals and funnels for your WooCommerce site.
Once a few sales have rolled in, log in to Google Analytics, click on your website, then click on Conversions, eCommerce, Overview, and take a look around.
The Acquisition, Overview report can also be beneficial, as it will show you the conversion rates and revenue statistics for each traffic source.
You may wish to read Google’s support article, which explains what information is available once eCommerce tracking has been enabled.