
To give your audience the opportunity to comment on your content is crucial to the relationship that you might create with the people that are following you. And you can do that with a perfect utility by using the integrated comments of WordPress. Probably you are already doing it. Never thought neither why, nor how to add Facebook comments to your WordPress website.
You might think that disabling the default WordPress comments, and adding Facebook comments is an unnecessary effort. But that is not quite true.
And here is why.
WordPress comments are not a big security issue. Still, they are a target for more hackers than you can imagine.
Why?
Free links and traffic.
If you have a big and well-known website as AwardSpace, and you are keeping the default WordPress comments turned on, you are probably experiencing serious trouble with spam comments. They are most often than not made by robots that are crawling all over the internet and are making automatic comments to every comment section available.
And even if you’ve fought a winning battle over the spam comments of your WordPress website, you’ll probably still want to add Facebook comments to your site.
As of today (March 2019), according to Statista.com, Facebook has more than 2.271 billion active users. That is billion. With a “B”.
And for your WordPress website that means that if you choose to add Facebook comments to your website, most often than not, people won’t have to log in or register, so the chances are they’ll leave more comments.
And one more thing.
When commenting via their Facebook profiles, you’ll be able to get to know your audience better. And to make a better connection. And the latest is the essence of good marketing.
How to Add Facebook Comments to WordPress
Adding Facebook Comments to a WordPress website could be done in two manners. By adding a plugin to your WordPress, which is usually the easier way, but is always the path, we won’t recommend you to go, as the plugins, generally speaking, are slowing your website down.
Therefore, here is how to add Facebook comments to WordPress without using a plugin.
Step 1: Setup Facebook Comments
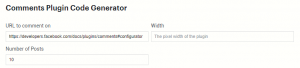
Go to the official Facebook Comment developer page. Once there, configure the settings of your comment section. That is to configure the width, and the number of posts you would like to be shown before the user looks for more.
NB! If you add set the width of the Facebook comment section in % it will be responsive, but if you set it in px it will be a specific width.
It is possible for an error to occur. Once you’ve copied the code to your website, and the website looks like it works normally, and the Facebook Comments are present, it may happen so, that all the comments section are the same. That is to say, if you(or one of your website’s visitors) comment on a specific post, your (their) comment may show up on every page where the comments are presented.
To prevent this from happening, you simply leave the URL text field empty.
Click the Get Code button.
Here is what you should expect to see:
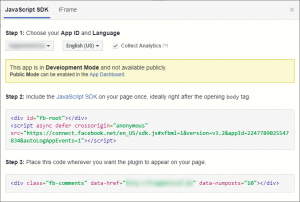
For this step, you’ll need the first code, named step 2 in Facebook’s code window.
Once, you copied the code, you need to go to your WordPress Dashboard. From there look for Appearance> Editor and enter the file header.php. When you open the file paste the code from Facebook right below the < body > tag.
For the Facebook comments, and frankly all of your customizations, not to vanish when your theme is upgraded, we highly recommend you to create a child theme.
Step 2: Installing the Facebook Comments
We are almost done. Now you should copy and paste the second code, that Facebook gave you. In their code window, the code you are looking for now is located in Step 3.
Copy the code, and paste it where you want the comment section to appear. Usually, this is at the end of the posts.
You should look for the single.php file to edit inside your theme/child theme folder.
How to Add Facebook Comments to WordPress (With Plugin)
Now that we’ve covered the why let’s talk about the how of adding a Facebook comment section to your website. To set up Facebook Comments on your website with a plugin, you, of course, will have to install one.
Related: How to Add Plugin to WordPress
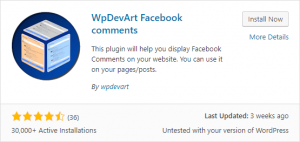
To reach the desired goal, we’ll use the WpDevArt plugin, which has a free as well as a pro version. And the free version is more than enough to get us where we need it.
Step 1: Installing WpDevArt
The first step will be to install the WpDevArt Facebook comments plugin. To do so, go to the WordPress Dashboard.
Once you are in the backend of your WordPress website, go to Plugins > Add New.
Search for the WpDevArt Facebook comments plugin. Click on Install Now. Wait for the plugin to install, and click the Activate button.
Once the plugin is installed and activated, you need to go through its configuration process. To be able to finish that process, you’ll need the so-called Facebook APP ID.
Step 2: Create an App ID on Facebook
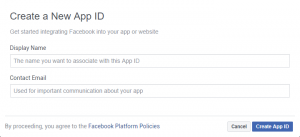
Click here to create your App on Facebook. Once the App is created, you’ll be able to get its ID and copy and paste it to the WpDevArt plugin’s configuration page.
NB! To be able to create your Facebook App, be sure that you are logged in to your Facebook account.
Step 3: Add the APP ID to your WpDevArt
Once created, get the App ID. Just click on the App ID, and it will be copied automatically. To make the App live, you’ll need to follow the criteria requested by Facebook. And, as they are always public, and could be changed, you’ll have to look it on their site, while creating the app.
Step 4: Configure the WpDevArt
In the Dashboard of your WordPress website, go to FB comments. Paste the App ID that we’ve copied in the previous step at the text field.
It is important to go through all of the following features of the plugin, in order to customize the Facebook Comment section of your website, so it looks natural to your site’s color and overall feel.
One more thing, in this step – configuring the WpDevArt plugin before adding the Facebook Comments to your website – you’ll have the opportunity to turn on and off the comments on a specific type of pages. Namely, by using this plugin, you can add or remove the comments on the home page, posts or pages as a whole (excl. the Home).
By leaving the checkboxes, as they are by default – all checked – you’ll have comments on every page of your website. You can remove the Facebook comments from your home page, or on all pages simultaneously, but leave the home with an option for your visitors to comment.
Depending on your website, you might want to let people comment on your pages, but as a whole, we would recommend you to turn them on, only below the posts.
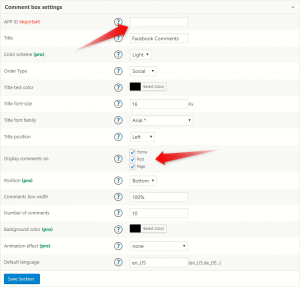
Once, you’ve configured the setting by your preference, you can click the Save Section button at the bottom of the screen. Now you are done with setting up Facebook Comments on your WordPress website.
