
Every computer, and thus, web hosting servers as well, have a defined amount of resources. That means the machine is only capable to do so much work before it gets stuck in a way too many operations that need its attention. That is when our computers ‘freeze’ and we have to restart them. And even if the machine didn’t ‘freeze’ it definitely slows down the undergoing processes. While we are using our personal computers, the delay of the operations could be annoying, but when the delay affects our website, and people impatient to wait for the website to load, are leaving, we are losing users, and thus potential profits.
You can easily leave your website’s loading speed to the chance. But giving it a little more thought, you might find out that it would be much better to take care of that. Not only you’ll preserve people from leaving your website, but it might affect your Search Engine Results
Related: WordPress SEO
What is Website Cache
We’ve got used to getting everything in an instant. Thus, no one is considered of the actual number of the calculations that the machine is obligated to make, in order to serve the demanded information.
And why should be?
If one website is not served as fast as we might want, we could easily find something as good if not better, have we chosen to return to the search engine and continue looking around.
All that complex calculation stays invisible. But what if the server has made one calculation so much that it was just able to remember the result. Something like our core knowledge of the fact that 2+2 equals 4. We are not calculating that result each time someone asks. We just know it. Because we remember it. Thus, we preserve valuable energy for other activities.
The cache is much like patterns that we, as humans, are following. None of us needs to discover that a door is a door every time we happen to see one. We just know it. And that long ago obtained knowledge stays with us for as long as it is needed.
Caching works in a similar way. The information on the website’s content and design and elements, and structure are stored on the server. Thus, when a user asks the server to see a specific page of a website, he could be seeing what the server ‘remembers’ about the page.
That is a cached version of the page.
Cache in WordPress
As with every CMS, WordPress needs more resources, than a website built on HTML. That is one of the main reasons that the WordPress Hosting Service exists. A web server optimized for the usage of a CMS is indeed needed. But whether you are using a WordPress hosting service or not, you definitely need to consider activating cache on your WordPress website.
Once your content is ‘remembered’ and stored on the servers, your website visitors won’t have to wait for the content to be calculated and processed again, and again, and again.
It was already processed. Now the server will show the remembered version. That way, server power will be preserved and your WordPress website will load faster for the users.
Related: 9 Tips to Improve WordPress Speed and Performance
Best WordPress Cache Plugin
To enable cache in WordPress, you’ll need to add a plugin to your website.
As mentioned in our WordPress Speed Optimization article, we put our trust in WP Super Cache. It is a really straightforward plugin. That even its ‘Advanced Settings’ gives an understandable explanation to not expert users. Not only that, but the plugin does, what it promises – caches and speeds up your website’s performance.
Of course, W3 Total Cache is a good option as well. You can check both of the plugins, and decide which one to use.
But in this tutorial, we’ll cover how to set up the first one – WP Super Cache.
How to Enable Caching in WordPress
First of all, we need to mention something very important. You should never use more than one caching plugin. Period. You can use one of the already mentioned plugins, or any other that you like but don’t mix them.
If you follow this WordPress Tutorial diligently and configure the chosen WordPress caching plugin correctly, your website will run faster for your users. Which, after all, is the final goal.
To start the process, we’ll have to install a plugin, which is a pretty basic WordPress operation.
To install and setup WordPress WP Super Cache plugin:
-
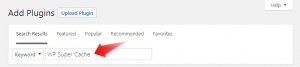
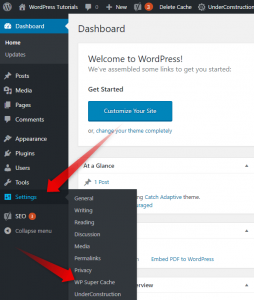
- Log into your WordPress dashboard.
- Visit the Plugins page and press Add New.
- In the Keyword search box enter WP Super Cache.
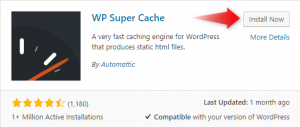
Your desired plugin will appear first in the list. To install it, click Install Now.
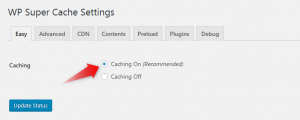
Once activated, go to the WP Super Cache settings page and select the Caching On option.
Once you’ve done that, your website will be cached, and you can call it a day. But we highly encourage you to go through the advanced options of the WP Super Cache.
Click on Advanced in the top menu of the WP Super Cache Setting. From here you’ll be able to go to the “Expert” mode and tune up how your WordPress Cache preferences.
How to Tune Up WP Super Cache
By clicking on the Advanced options button, and enabling the Expert Cache Delivery Method, you’ll be able to tune up your WP Super Cache, so your content will be delivered faster, and the possibility of pages being shown with their own version will be minimized.
Here are two images of the settings recommended by AwardSpace.
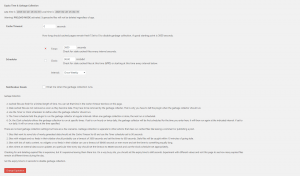
The options on both images (the so-called Expert options) are straightforward. This means, that what you see is what you get. Thus, once you check or uncheck a specific option you’ll get (or deprive yourself) of exactly what you read.
When you are setting up your WordPress Cache, it is a very important part of the Expert options of that plugin to remember the fact that although all the options are listed on one page, you need to save each of these sections one by one.
Therefore, when you make changes in one section, don’t continue tunning up the following sections. Save the one you’ve edited, the page will refresh, and then you can continue tunning up the caching options of your WordPress website.
How to Clear Cache in WordPress
From time to time, you’ll feel the need to clear the cache of your WordPress site. These situations are rare but possible. Thus, you’ll want to be prepared for such events.
To clear the cache of your WordPress website, you need to enter the WordPress dashboard.
Once there, look at the sidebar menu, located on the left part of the admin panel, and look for the Setting button. Hover it, with your mouse, and find WP Super Cache.
Now that you’ve entered the settings of your WP Super Cache, you can clear the website cache of your WordPress.
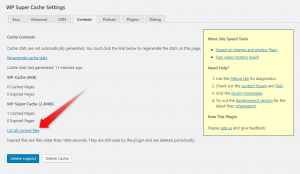
When you’ve entered the WP Super Cache page, you need to go to Contents, and then figure out whether you want to delete:
- All generated cache to date
- Only the expired cache
- Or the Cached version of specific pages
The first two options you can do, are by clicking the buttons at the bottom of the Contents page. The buttons are pointed with the second arrow on the image below.
To delete the expired cache or all the cache gathered to date, you can use the buttons at the bottom of the “contents” page of the WP Super Cache settings page.
You may want to delete the cache of pages that are changed or are changing regularly so that the newly added content will be shown to the users, and the servers won’t show the old version of your website to your visitors.
To delete the cache of a specific page, so you’ll save the cached version of all the content that was not edited, you have to go, once again, to the WP Super Cache Settings, and afterward to the Contents page. From here you can go to a page that will show you a list of all cached files.
When you click on the link shown above, a new page will load. There you’ll find a list of all the cached files and pages. To find the one you are looking for, you can either look around, or you can click Ctrl+F (working on every browser), and write the URL of the page that you are looking for.
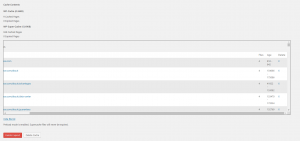
When you enter the ‘list all cached files’ page, a window will be presented to you. In the left half of that window, there will be a list of the URLs where the cached files (or pages) are located. Once you slide right, you’ll see the “Delete” option. To delete a specific page, click on the ‘X’ at the right end of the window.