
Migrating a WordPress Website can be an unpleasant experience. Although moving is always a tough task, it won’t be so frustrating if you know what exactly you are doing. Whether you are changing your neighborhood, job, or hosting provider. Of course, the tough tasks are those that give the best outcome. After all, there is a reason that made you consider moving.
So, you’ve decided to transfer your WordPress website to a new host and now the question is not “should I”, but “how to”. Let’s find out!
Are you migrating your website or just transferring the domain?
First things first, if this is going to be an all-in-one manual about how to migrate a WordPress website, we might as well cover the difference between transferring and migrating and when you should use either of the terms. If you already know what you are about to do, but don’t know how to do it, you can skip this part. On the other hand, to be able to ask for the correct service, you really need to know what to ask.
Essentially there are three types of migration. You can either:
- Change only the domain registrar and continue hosting your website with your current hosting provider
- Move only the website but continue using the same domain registrar
- Migrating your website and domain to one (or two) new provider(s).
There are no official terms referring to those actions, but we call them as follows: Domain Transfer; Website Migration; Complete Website Migration; and Complete Website Migration (to separate providers).
As you can imagine, to execute any of these tasks, you’ll have to go through a bit different process each time. Let’s examine every one of your possibilities step by step.
To transfer the domain of your website to a new registrar means to change whom you are paying for the domain, but to keep your present hosting provider (the place where your website is located).
1.1 Make sure that the domain doesn’t expire very soon. The transfer takes up to 10 business days. Also, bear in mind that it is not possible to transfer a domain that is less than 60 days old.
1.2 Order a domain transfer service. To order a domain transfer service, you need to go to the Control Panel -> Domain Manager -> Transfer a domain.
A text field will appear. There is a falling menu next to it, where you can choose the TLD of your domain. Once you’ve put the correct domain name and TLD, click the Transfer Domain button.
![]()
You’ll be presented with the option to buy another TLD of the same domain. If you don’t need it at the moment scroll down to the Domain Transfer option. There you’ll have two options – either click the Add Domain(s) and search again button if you want to transfer more than one domain or just click Continue. Tune all the following options in the way that suits you best and enter the correct Contact Details.
![]()
1.3 Unlock domain at current registrar if necessary. Domains are sometimes locked by the Hosting Provider in order to prevent unauthorized transfers. The steps you should follow in order to unlock your domain (if locked at all) differ from one domain provider to another. So, if you are unable to find how to unlock your domain, contact the support, they are obliged to help you out.
1.4 Check if the registrant information is accurate and up to date. This is quite an important step. To be able to perform it, you’ll have to turn off all the cloaking/WHOIS/Privacy Protection services if there are any enabled. You have to be sure about the truthfulness of the entered data because once you’ve requested an EPP key (which we’ll cover in the next step), it will be sent to the e-mail that you’ve entered in the registrant details of your domain. You can use this tool to check the so-called WHOIS information or any other that you prefer. Once you are sure that the information is correct you can move forward.
1.5 Request the EPP key from the current registrar. An EPP key (a.k.a. Authorization Code) is a string of characters, but it functions as a master password for your domain. By using this password you allow the transfer process of your domain between domain providers or registrars. Some of the registrars (Domain Providers) will allow you to obtain the key without contacting them. However, with others, you’ll need to contact the support in order to get it. So, there is no universal way to finish this step.
1.6 Send the EPP key to our support team, once you obtain it. To do this use the trouble ticket system in the Control Panel. You can open a Trouble Ticket by going to the Control Panel -> Support-> Trouble Ticket
1.7 We’ll initiate the transfer process after we receive the EPP key. You’ll receive a confirmation e-mail message to the registrant e-mail address of the domain from info@transfer-approval.com. Before you start the operation it is very important for you to make sure that the registrant’s e-mail address is correct and that you have access to it (we’ve covered that in Step 1.4). In the message, you will find a link, where you have to approve the domain transfer process from your current registrar to AwardSpace.
1.8 After the transfer is approved the process of transferring may take from 7 to 10 business days. When the operation is completed and your domain is transferred to AwardSpace, we will send you a notification e-mail regarding the success of the process.
The second possible situation we’ll examine is when you are about to change the hosting provider, but want to continue to use the same registrar for the domain. Migrating a WordPress website is a task that may take a while, but if you know what you are doing shouldn’t scare you.
Here are the steps you need to follow in order to move а WordPress based website from one hosting provider to another:
2.1 Export the WordPress database and site files. The fundamental elements of a WordPress-based website are its database and website files. So, the first thing you need to do is to make a copy of your database and website files from your current hosting provider to your local computer. This step is mandatory for the migration of your website, but at the same time, it allows you to create a backup of your website on your local computer, which is never a bad idea.
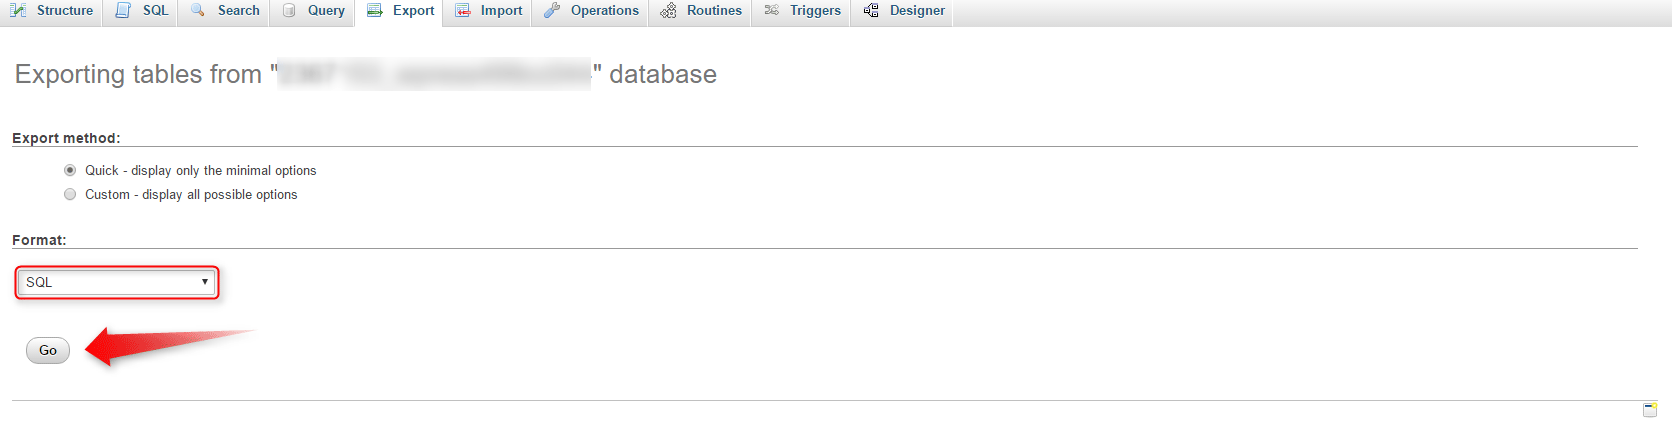
Export the WordPress database: No matter what type of control panel your current hosting provider uses, in order to export the WordPress database, you need to go to the so-called phpMyAdmin, and choose the database you want to download. Click the Export button.
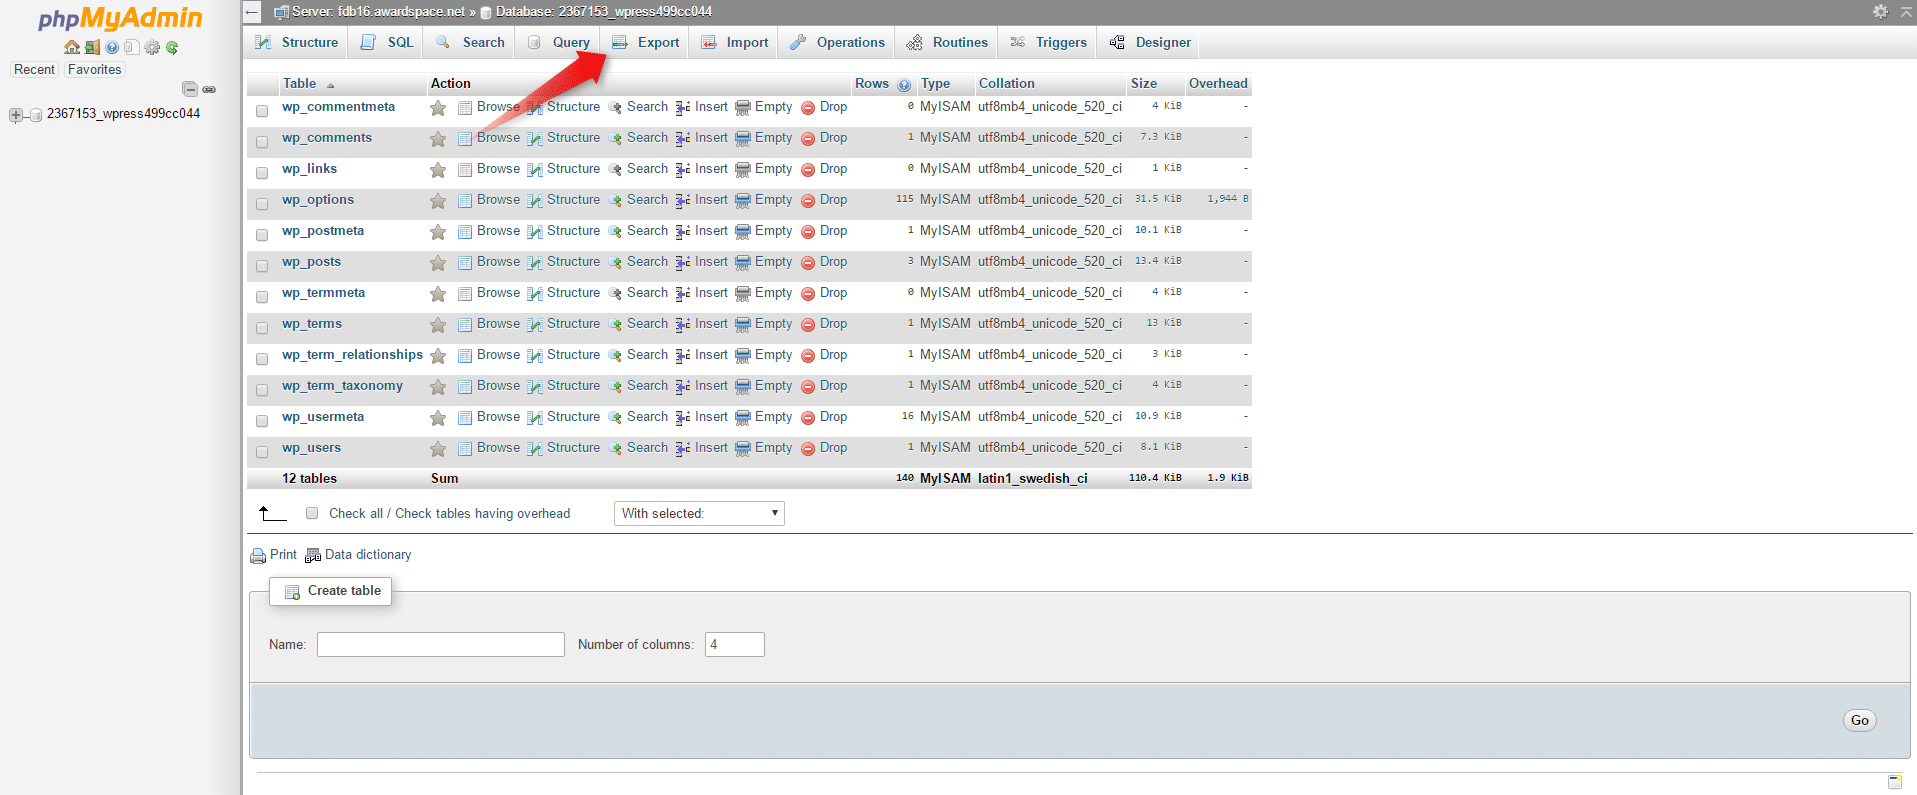
A new page will open, where you can find a falling menu, to choose the extension of the database. Choose SQL and click Go.
The SQL should be automatically downloaded to the Download directory of your primary hard drive.
You can download your website files using an FTP client like FileZilla. Alternatively, you can download your website files through the File Manager of your current hosting provider if it supports downloads of directories
Here we’ll show you how to use the FileZilla FTP client software because it is universal for most hosting providers.
First and foremost – download and install the FileZilla client. The software is free, so you can go to the FileZilla website and download it from there.
Now that you’ve downloaded and installed the FTP Client you can start it. What you will see resembles strongly the Windows File Explorer. There are few fields in the top area of the FileZilla client that you need to fill, namely:
- Host – here you need to enter the Hostname. Imagine the servers where your website is located as a cabinet with hundreds of drawers. In order to find your drawer, where the files of your website are located, you need to know where it is exactly. The hostname is the address of your drawer. It could be presented the same way a domain would be presented or as an IP address.
- Username – Now that you’ve found your drawer, you need to enter a username and a password in order to open it. With most of the hosting providers, the username and the password will be the same as those you use to enter your Control Panel.
- Password – This is the password you’ll use to open the drawer. As already mentioned, it will most likely be the same as the one that you use to open your Control Panel.
- Port – I need simplification The default Port is 21, but some providers use
These credentials should be accessible for you somewhere in the Control Panel of your current hosting provider.
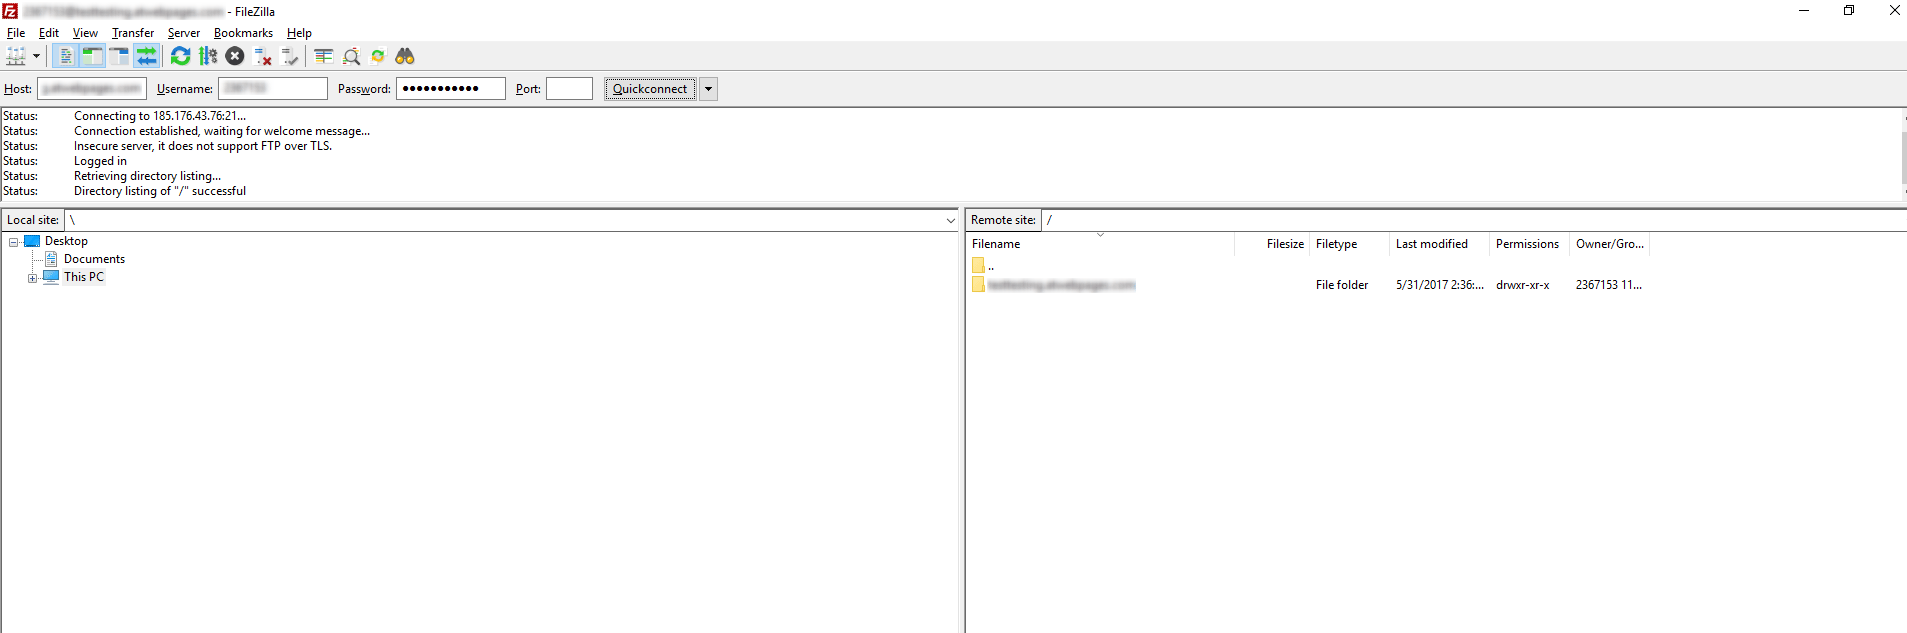
On the left side (Local site) you can browse the files/folders of your local computer and on the right side (Remote site) you can browse through the files of your account with your hosting provider. On the left side, you need to open the location where you want the backup files to be saved.
These files you’ll find on the right side. You should search for your website files because their location might differ, depending on the file structure of your hosting provider. On our servers, your websites have their own directories, so you need to look for a directory with the name of your website, i.e. directory with the name “domainname.com”. To make a copy of your files, you can just drag the entire folder from the right side to the left side. Alternatively, you can right-click on the folder and select “Download”, which will download the folder to the left side’s current directory.
In the bottom area of FileZilla, you can monitor the file transfer queue, once all the files are transferred your file backup will be completed, taking you one step closer to finishing the WordPress migration.
2.2 Register at AwardSpace. If you are migrating a WordPress website, we highly recommend you use our WordPress Hosting solution. We’ve crafted it with attention and care so that at least one of the plans will meet your needs. If the website you are moving to is not based on WordPress, you can choose the Hosting Solution that suits you best.
2.3. Host your domain in your account. Enter your AwardSpace Control Panel and go to the Domain Manager section, once there select the “Host a Domain” option, enter your domain name in the form and click the “Host” button. It is important to note, that using the host option you will use AwardSpace as a hosting provider only and your domain will remain with your current domain provider, so you will not transfer your domain. After you host your domain a pop-up window will show up with a message providing details on how to point your domain to us:
“Please go to your domain registrar control panel and change your DNS nameservers to ns5.awardspace.com and ns6.awardspace.com.”
Please note that DNS changes may take between 1 and 24 hours to take effect.
2.4 Upload the website files to your domain folder using the File Manager or FTP client, like FileZilla. If you prefer using an FTP client, you can find your FTP credentials in your AwardSpace Control Panel -> FTP Manager section. When you sign up with us, we create a default FTP account with your log-in username and password.
Once you connect successfully to your AwardSpace account with FileZilla, you need to open the directory, where you stored your WordPress files on the left side (Local Site) and on the right side (Remote Site) open your website directory. Next, you need to drag the files from the left side to the right side, alternatively, you can right-click on the files and select “Upload”.
In the bottom area of FileZilla, you can monitor the file transfer queue, once all the files are transferred your file backup will be completed, taking you one step closer to finishing the WordPress migration.
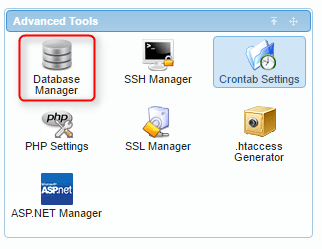
2.5 Create a new database using your AwardSpace Control Panel -> Database Manager section, which you will use to import your MySQL backup file.
Now enter the desired database name and password in the form. Afterward, click the Create Database button.
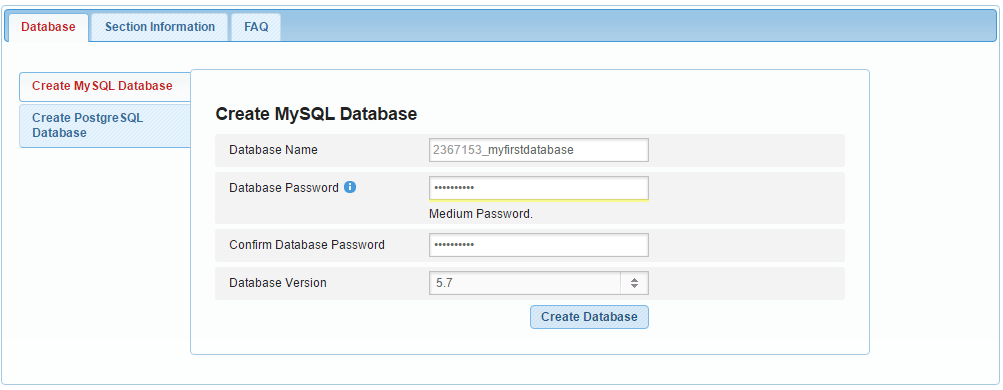
You will need the Database password, name, and host shortly, so remember them or write them down.
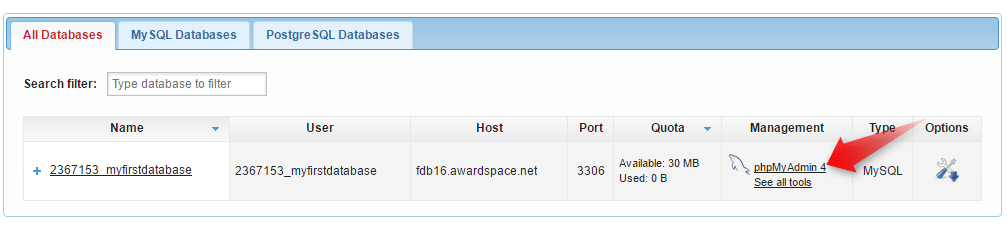
2.6 Import your SQL backup into the database that you created. Open the new database by clicking on the phpMyAdmin button. To find it go to AwardSpace Control Panel -> Database Manager section. You’ll be redirected to the phpMyAdmin page.
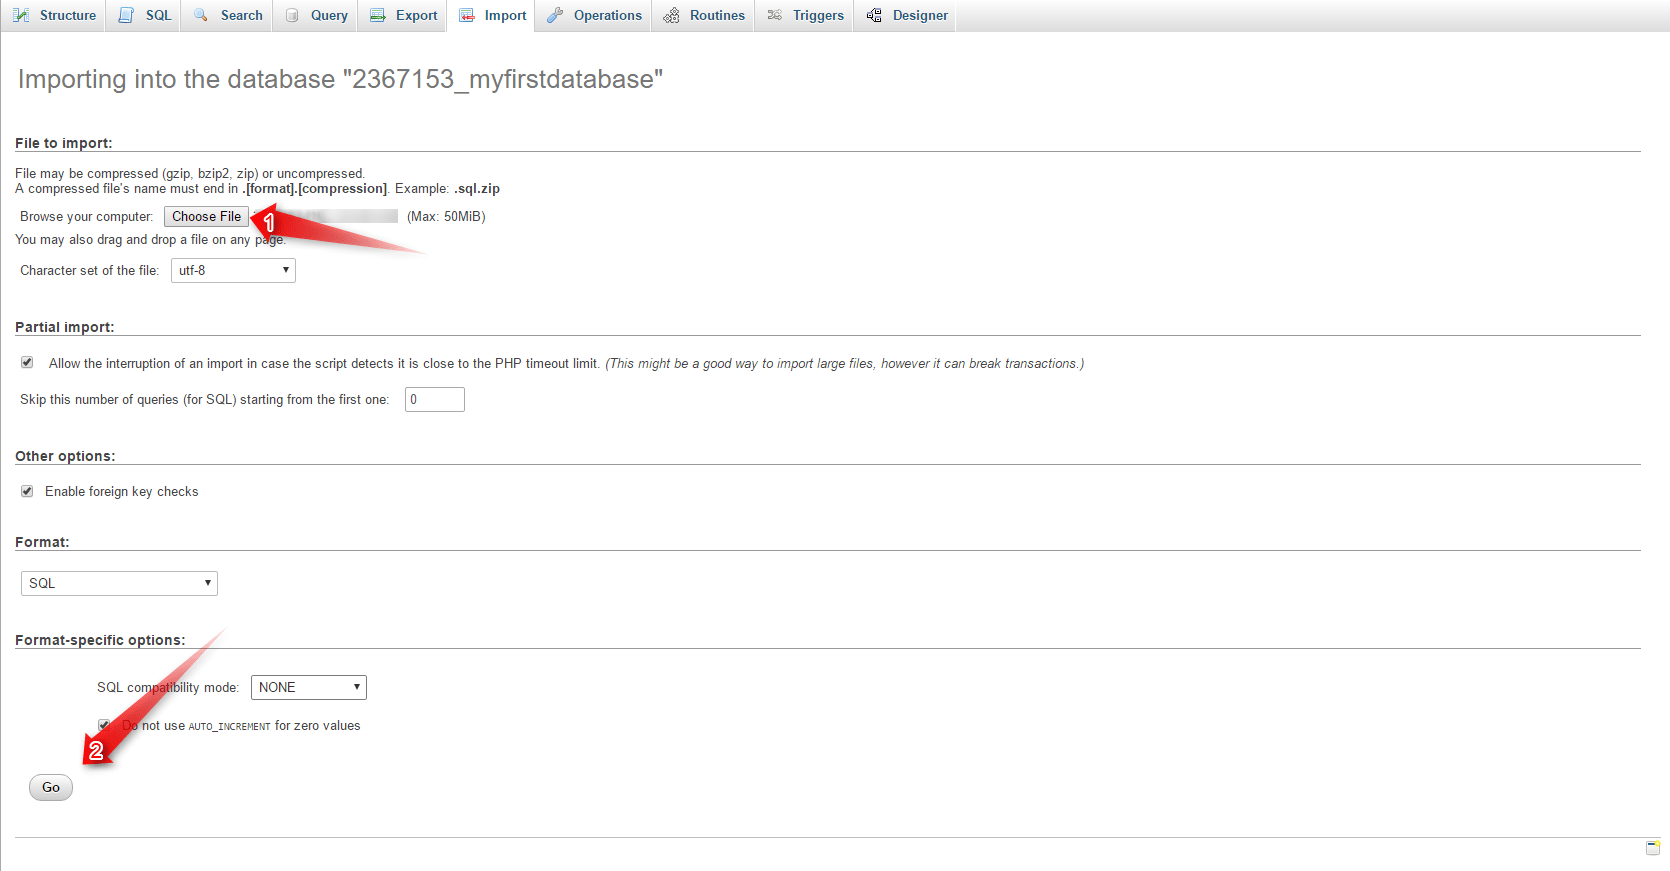
Once you are in the phpMyAdmin interface, select Import from the top navigation menu.

Click Choose File. After you’ve found and opened the SQL file, just click Go at the bottom of the page. We highly recommend not to change anything if you really don’t know what you are doing.
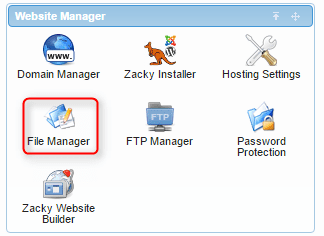
2.7 Update the wp-config.php file to use the new database settings. Go to the Dashboard of the Control Panel. Choose File Manager.
Open your website’s directory and find the wp-config.php file. Click twice on the file, thus opening the text editor, where you can change the needed information.
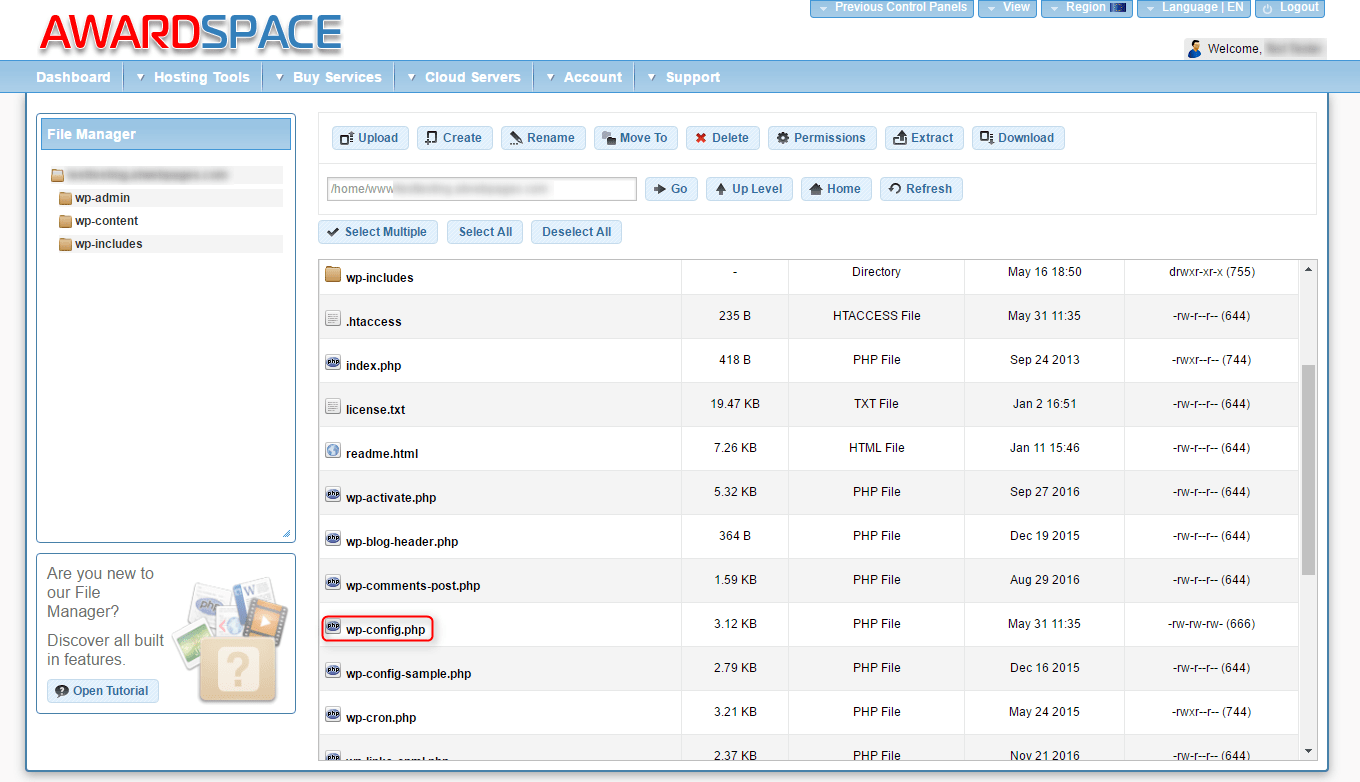
You have to replace the old DB_user, DB_name, DB_pass, and DB_host credentials with the credentials of your new AwardSpace database (those you used when creating the database in our Control Panel).

2.8 Change the NS records at the current registrar. Go to your domain provider’s account and change the NS records to ns5.awardspace.com and ns6.awardspace.com. Please be advised that these changes can take up to 72 hours.
2.9 Enjoy your time with AwardSpace.
Well, migrating between hosts is not the easiest task, but if you are smart enough to know that you should be on the web, you are smart enough to transfer a WordPress website to another host. Now that we’ve covered how to separately transfer a domain and migrate a WordPress website, you know all the steps that you need to take to completely migrate the website. But! There is always a ‘but’. Here the steps are in quite a different arrangement. Since we’ve covered all the steps in detail, here we’ll just mark and arrange them in the correct order. If any of the steps is unclear to you, just open the needed toggle from above.
So to completely migrate a WordPress website you need to follow the steps here:
1.1 Make sure that the domain doesn’t expire very soon.
1.2 Order a domain transfer service.
1.3 Unlock if necessary domain at the current registrar.
1.4 Check if the registrant information is accurate and up to date.
1.5 Request EPP key from the current registrar.
2.1 Export the WordPress database and site files.
2.2 Register at AwardSpace.
2.3 Add the domain of your website to our system, by using the Host a Domain option.
2.4 Upload website files to your domain folder using the File Manager or FTP Client.
2.5 Create a new database.
2.6 Import your SQL backup into the database that you created.
2.7 Update wp-config.php file to use the new database settings.
2.8 Change NS records at the current registrar.
1.6 Once you obtain the EPP key, send it to our support.
1.7 Once we receive the EPP key, we’ll send you a confirmation message at the registrant’s e-mail address.
1.8 After the transfer is approved the process of transferring may take from 7 to 10 business days.
2.9 Enjoy your time with AwardSpace.
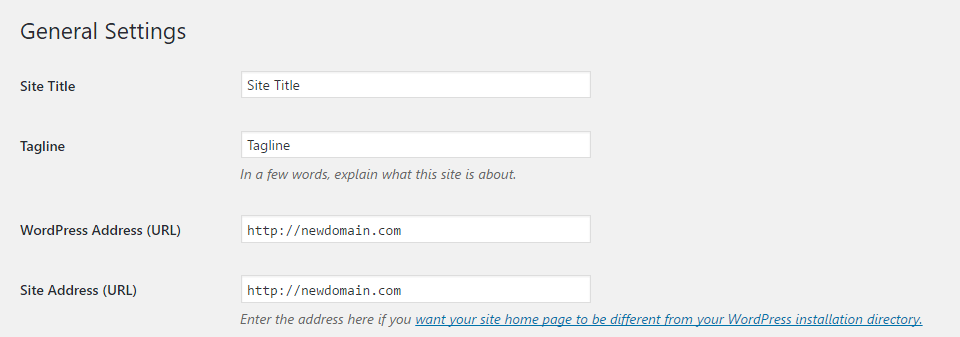
4.2 Update the “Site Address” and “Website URL” in the wp-admin of your website. Go to the WordPress Dashboard Setting->General. Below the Site Title and Tagline fields, you can find the fields that you need to edit – WordPress Address (URL) and Site Address (URL). If your WordPress installation is not made in a subdirectory (say, domain.com/wp/) in these text fields you should enter the new domain address (for example http://newdomain.com) for both fields. Click the Save Changes button at the bottom of the page.
Bear in mind, that after the change, a 404 error will be displayed on your website. That’s normal and there is no reason to panic! Just follow the next step.
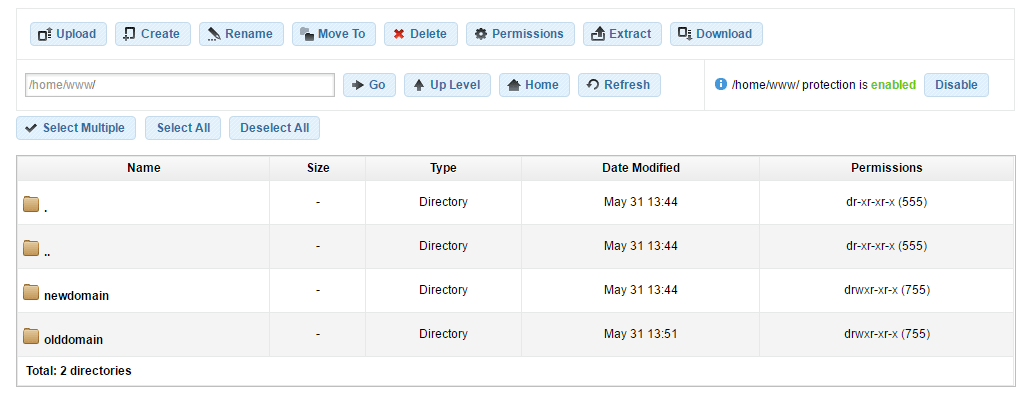
4.3 Once you’ve registered a new domain, a directory with its name will be automatically added to your account. The site files should be located in the directory with the name of your old domain. So, now you have two domain directories. One from the old domain and one from the new one. In order to run your site from the new domain, you should first make sure that the site files are in the right domain directory. Here is how to do it:
Move all files from the directory olddomain.com to the directory newdomain.com using FTP. This is an operation you can execute through the File Manager, but if you are feeling more comfortable when using an FTP Client, use one. In this article, we’ve already covered how to use it. So, that should be an easy task.
On the other hand, if you want to use the File Manager here is how to move a WordPress website to the new domain directory:
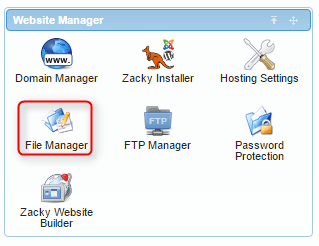
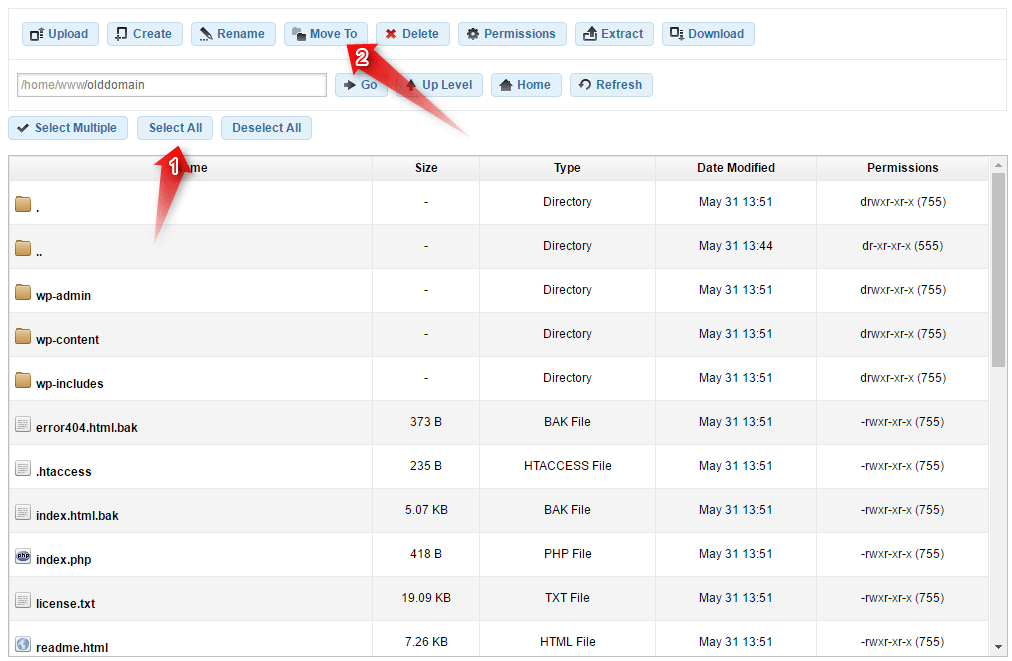
Enter the AwardSpace Control Panel and click File Manager.
Find the old domain.com directory and open it by clicking twice on it with the left mouse button.
Now that the olddomain.com directory is opened click the Select All button. All the files should be marked in dark color. If so, click Move To.
That will open a new pop-up window where you can choose the destination.
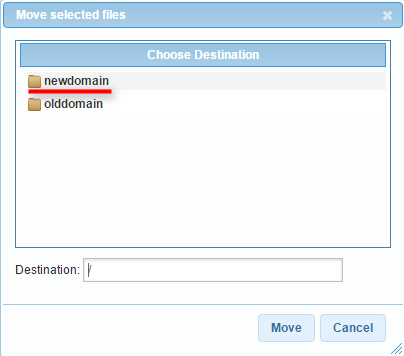
Here you can either type manually type newdomain.com directory or choose it by clicking on it once. Afterward, click on Move button. Done! Your files are moved.
4.4 Enjoy your old site with a new domain.
We’ve covered almost any possible scenario of the WordPress website migration process. But what if you decided to change the hosting provider and the domain name simultaneously? How should you approach the task and what steps should you take? Let’s get into it!
We’ve already built the basic knowledge of how to migrate the website, so now, we’ll just have to follow the already explained steps in (as you probably guessed) a slightly different arrangement.
To change the domain name and the hosting provider simultaneously, you’ll need to follow these steps:
2.1. Back up MySQL data and website files.
2.2. Register at AwardSpace.com. You can also register a domain at this step.
2.4. Upload website files to your domain folder using the File Manager or if you are familiar with FTP, use AwardSpace Control Panel -> FTP Manager to find your FTP credentials for your account.
2.5. Create a new database using the AwardSpace Control Panel -> MySQL Databases.
2.6. Import your MySQL backup into the database that you created in your account with us.
2.7. Update the wp-config.php file so that it uses the new database settings. Replace all of the following credentials: MySQL_user, MySQL_name, MySQL_pass, and MySQL_host using the settings of the database you created with us.
4.2 Change the WordPress Adress and the Site Address to the new domain.
Last but not least, enjoy your time at AwardSpace.
Conclusion
Whether you are migrating your website or transferring a domain, completely moving, or just changing your domain name, we’ve tried to cover it all. If you follow these simple steps, you’ll be able to do it all by yourself. On the other hand, if you see the following these steps as too much of an effort, we could do it for you.