
Although, while creating your WordPress website, you will choose a theme that will determine the general look and feel of your website, most often than not you ought to add a bit more customization to the website, so you can feel it is “yours”.
Adding a bit of additional CSS to the stylesheet of your child theme is the best, and easiest way to customize your website.
But before we can do that, let’s get to know CSS.
What is CSS
CSS stands for Cascading Style Sheets. What is implied in the name of this coding language is that first, it takes care of the styles of your website. This means that you’ll be able to change the look, color, and position of different objects along with your website.
And, second, these sheets, are cascading. That is to say if you’ve added different styles of the same object, the one at the bottom of the sheet will take place, as it is the last change made to the object in question.
There are a number of ways to learn CSS. Although, WordPress is a fairly simple CMS, knowing CSS will only help you in your website creation journey. You can start learning the programming language in W3Schools’ CSS course.
Why You Need to Add Additional CSS to WordPress
As it was suggested above, adding additional CSS will only help your website look and feel more like you want it to.
In WordPress, we use themes to define the appearance of a website. And as themes are created for the general public, and for our website specifically, we ought to either:
- Find the perfect theme – one that has the customization options that we need, a design that we like and want to use, and colors that are similar to our logo’s color palette
- Change our logo and main brand colors in accordance with the theme that we like.
- Tweak a theme, the design of which we enjoy to fit our website’s identity.
Although, the first two also work as a solution, most often than not, changing the theme in accordance with what we feel about our brand is the most correct approach.
The theme, after all, is just a tool, your brand is not.
To make a certain theme correspond to your ideas, you need to add additional CSS.
How to add Additional CSS to WordPress
It is really easy to add additional CSS to your WordPress website. There are two main methods to do so. Each of them, of course, has its positive and negative sides, as they are adding the code in different places on your website. We’ll cover both of them, so you can decide which one is better for you and which one you’ll use.
Method 1: Adding Custom CSS Using the Theme Editor
If you want to add additional CSS to your WordPress, we recommend you to use this method, as this way you’ll be adding the code directly in the main CSS file. Namely, styles.css. This is important, as like we mentioned, CSS is being read from the browsers from the top to the bottom. This means that the changes made at the bottom are overwriting those above.
Therefore, if you add the changes in the theme customizer instead of the editor you won’t have any control over whether the code is read from the browser before or after the rest of the CSS.
Something else, which is as important as your choice of where to add your CSS, is the fact that if you choose to go for the main style.css file, you ought to create a child theme for your WordPress.
Doing so will protect your custom CSS changes when the theme you are using gets updated.
To add additional CSS to your website, you should go to your WordPress dashboard. Once there, locate the Appearance option in the sidebar menu, hover over it and look for the Theme Editor at the bottom. What you should look for is the following:
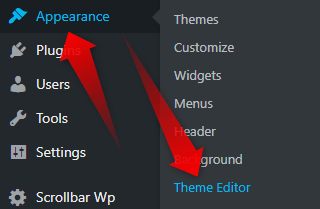
When you click on the Theme Editor, you’ll be redirected to the theme editor page, where you can start customizing your website by adding the CSS that you need or want.
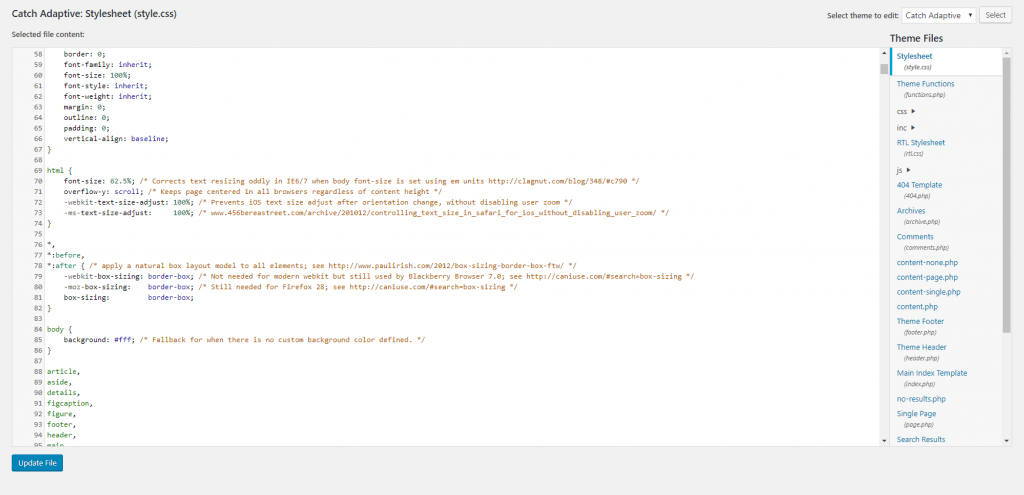
This is the theme editor page. Here is all the CSS that styles the theme that you are using. In the upper right corner, you can change the theme to which the changes will apply. In the lower-left corner is the update button, which you need to click once you’ve made the changes in order to save them.
Method 2: Adding Custom CSS Using Theme Customizer
The second method of adding CSS to customize your website is by using the so-called built-in CSS editor. The latter you can reach by going to the Theme Customizer.
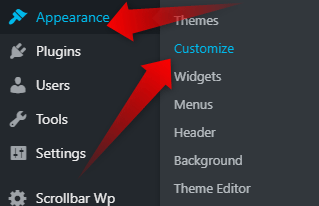
To find the Theme Customizer, you’ll need, once again, to go to the admin panel of your website. Once there hover the Appearance button in your sidebar menu, and look for Customize.
When you choose to Customize you’ll be redirected to the front end of your website. But with a tweak. On the left-hand side of your display, you’ll see a number of options to customize your website. Among these options is the one for Additional CSS.
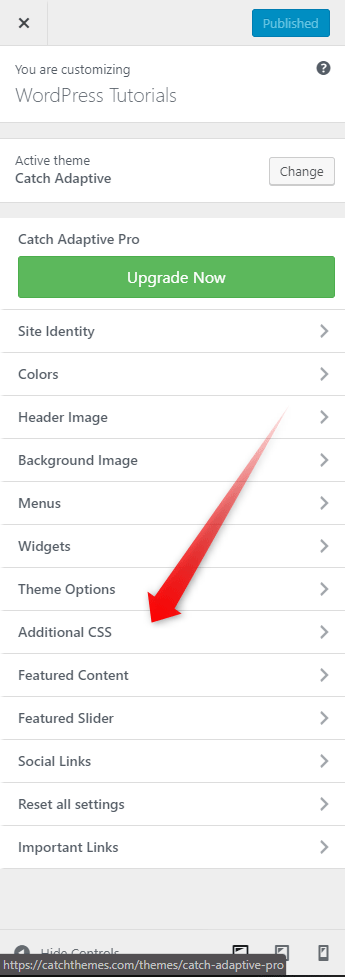
Open it, and start writing the code you need to customize your website the way you want.