
WordPress is a free Content Management System or CMS. It can be installed both on our Free Hosting and Paid Hosting plans. You can download WordPress from the official website here or you can install it with our Zacky Installer tool. In this article, we will review what is causing the WordPress installation page to show after WordPress is already installed.
Why is the WordPress installation page showing?
There are a couple of reasons that could cause your WordPress installation page to show:
- Incorrect database credentials
- Incorrect database prefix
- blocked database connection
While the first two could be caused just due to misconfigured wp-config.php file the latter is caused due to server restriction. All hosting plans have a max_questions set to a specific value which limits the number of queries that you can send to your database. We have set the max_questions for our plans as follows:
- The free hosting plan has max_questions set to 12 000 per hour
- The shared hosting plan has max_questions set to 50 000 per hour
- The semi-dedicated plan has max_questions set to 500 000/750 000/1 000 000 respectively for the Starter/Pro/Advanced plan
How to resolve the issue?
Depending on the reason for which your WordPress is returning the installation page you will have to follow different steps.
Verifying the details in the wp-config.php file
If you have recently migrated your WordPress website this could be a cause of misconfigured WordPress website. Fortunately fixing this is done within a few steps and editing the wp-config.php file. The wp-config.php file is located in the root directory of your website. You can access it via the File Manager or FTP client such as File Zilla.
Once you have opened the wp-config.php file you will have to locate the following lines:
define( 'DB_NAME', NAME');
define( 'DB_USER', 'USER');
define( 'DB_PASSWORD', 'PASSWORD');
define( 'DB_HOST', 'DATABASE');
$table_prefix = 'wp_';
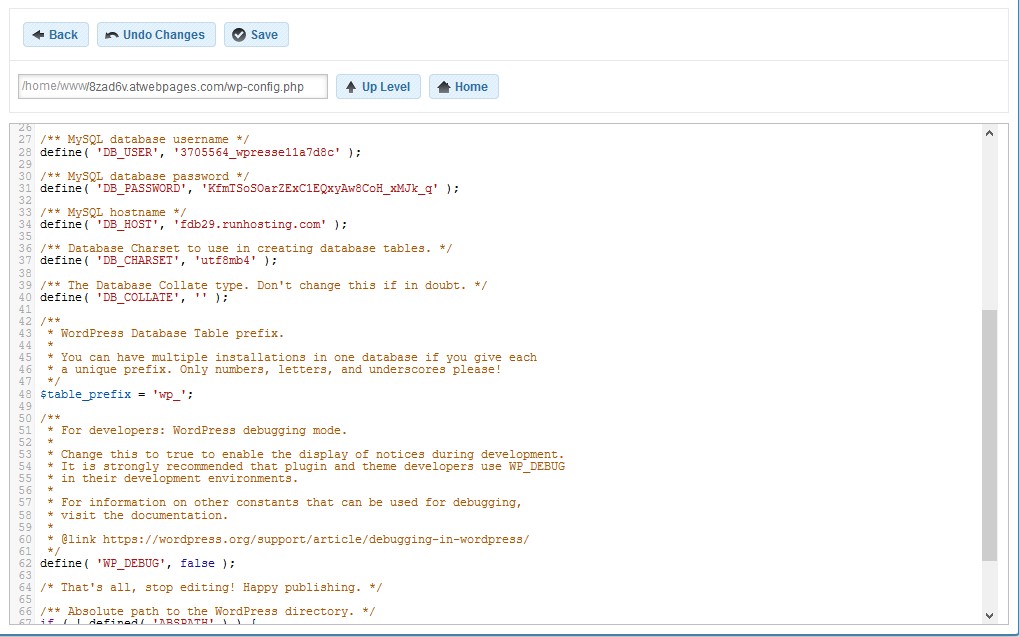
Now that you have found the above lines it is time to verify that the information in your config file matches the information for your database. You can find the necessary information inside the Database Manager by following the steps below:
- Log in to your Hosting Control Panel
- From the Hosting Tools menu click MySQL Databases
- Click on the database for your WordPress
- Open the Information tab
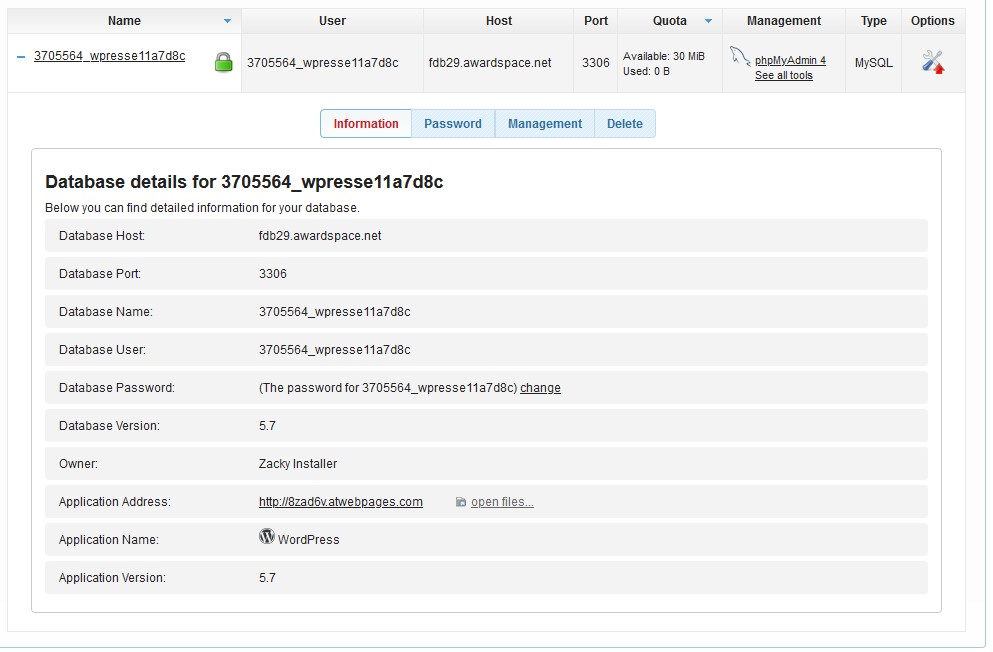
Inside the Information tab, you will find the database hostname, username, and name. If you are not sure what the password for your database is you can generate a new one from the Password tab.
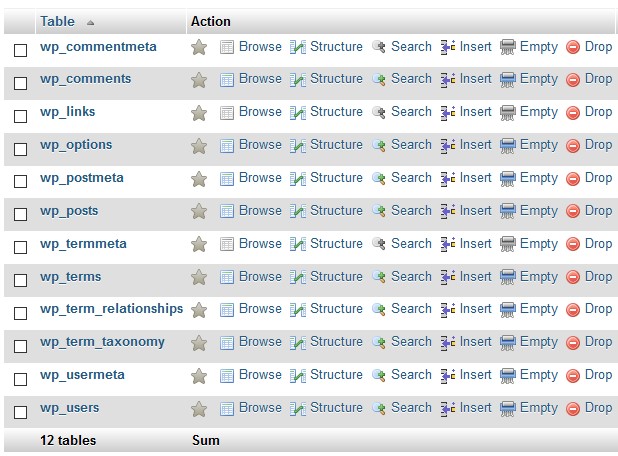
For the table prefix, you will have to access your database via the phpMyAdmin link inside the Database Manager. Once you have done that you will see the name of tables which all begin with the same prefix (usually “wp_”).
Once you have all your database information make sure to update the wp-config.php file accordingly.
Reaching the max_question limit
The max_question limit is the number of queries that you can make towards your database. In regards to WordPress, every change made inside your WordPress admin panel (creating, updating, or deleting a new post) or even updating your account password would generate a query. Every time your post is loaded by a user it would also generate a query. In fact, every time your WordPress communicates with your database it generates a query.
If you are now starting to build your website on a free hosting plan, you are very likely to reach the maximum queries for your database within one hour. Another reason for reaching the maximum number of queries is if you have too many visitors that would constantly load your pages or due to faulty plugins.
A fast way to resolve this issue is to reset the queries for your database to 0 for the current hour. This is done from the Database Manager by opening the Management tab for your database and clicking on 1-click Permission Fix. Once you have done that your website should start working again.
You can refer to our Database Manager article for more information on managing your database.
How to prevent my website from generating too many queries towards the database?
Depending on the reason for which your WordPress is generating and reaching the maximum queries per hour limit, there would be various fixes you could apply to reduce them. As already mentioned, every change/update which you make inside your WordPress will generate a query for your database. Every time your page is loaded queries will be generated for your database.
So when you are building your website and you are constantly getting the WordPress installation page you will have to reduce the number of changes/updates that you do per hour. This in turn would reduce the number of queries generated every hour and would keep you from reaching the limit. You could also upgrade your hosting plan to one which offers more queries per hour.
If your WordPress is not well optimized you might even reach the maximum number of queries from your visitors. I simple way to reduce those queries is to install a caching plugin. An example of such would be WP Super Cache. Having cache enabled for your website would also improve the loading time of your pages which would improve the user experience. You can further check our article on How to enable cache for your WordPress.
Visitors or changes/updates to your WordPress are not the only reason for your site to generate queries. A badly optimized plugin/theme could also be the cause of this. You can install a query monitoring plugin to troubleshoot what is generating the queries for your website. Once identified the cause of the problem you can either contact the developers of the plugin/theme for assistance or simply replace/remove them.