
Displaying WooCommerce Products by Category is an essential way to enhance the navigation of your store. Clear browsing is critical when it gets to eCommerce since it enables your customers to be able to quickly find what they’re searching for and make quick acquisitions. Keeping your products well organized can, therefore, create a significant distinction to the experience and fulfillment of your clients.
Fortunately, WordPress involves taxonomies to categorize posts, products, and other material for WooCommerce customers. You will make it more straightforward for clients to discover their required items by placing your products into categories. Moreover, if you display WooCommerce products by categories, clients can browse and search through your inventory more effectively.
We will discuss product categories in this tutorial and how they can enhance your online store. Then we’ll demonstrate how to display WooCommerce products by category easily without writing any code.
Let’s start with it!
What are WooCommerce Product Categories?
Categories are a built-in feature of WordPress. They tie together posts, pages, and custom post types (such as products) with comparable characteristics. Using product categories will enhance web navigation as clients can visit a specific classification to discover particular information under a broader subject or extra content-related details that have already been accessed.
In specific, enhancing navigation can considerably boost revenues for online stores. Studies have discovered that if clients are unable to find out what they are looking for, they are inclined to leave your shop without making a purchase. To build a successful eCommerce store, it is therefore vital to organize your offers into easy-to-understand product categories.
Therefore, It is sensible to show products on your website grouped by categories. Your aim should be to make products easy to find for the clients. Plus, if you include search, sort, and filter to your eCommerce store, clients can rapidly browse through your products to figure out what they want. Instead of searching through your full site or clicking through a lengthy category page, they can reach the item they are looking for in seconds.
How to display WooCommerce Products by Category?
The easiest method to display WooCommerce products by category is to use a WordPress plugin. To demonstrate how you can achieve this, we will be using the plugin WooCommerce products Table. By default, it produces tables containing all the products of your store. However, it can also list products in separate tables by category with just a little modification.
While there are various other solutions, some of them might require you to modify your WordPress template files. In contrast, using a plugin will enable you to display WooCommerce products by category quickly and straightforwardly. The instructions below will demonstrate how to build and show clear categories for your products on your website.
We’ll assume you’ve already installed and enabled WooCommerce, and we’ve also added some products to your eCommerce store. You’re ready to get started after that.
1. Group your WooCommerce Products by Categories, that are Relevant.
You need to generate your product categories before you can put up category tables. It is essential to note that when choosing how to arrange your products, the objective is to create it simple for clients to locate items. Therefore, you want products to be grouped in respects that will be easy for the customers to understand.
You can also generate broader parent categories that include multiple subcategories. For example, the dishes parent category could consist of the mugs, plates, and bowls subcategories. Categories of parents can be helpful for clients who have not yet chosen particular products and only want to browse.
How to create WooCommerce Product Categories?
- First of all, log into your WordPress Dashboard
- Navigate to Products > Categories
On the right hand of the panel, you will see an empty category list and fields to enter new category information on the left:
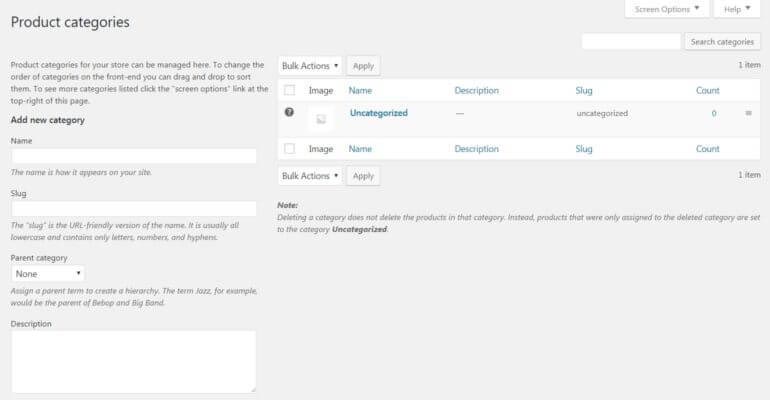
- Specify a category title (such as clothes, furniture, equipment, etc.)
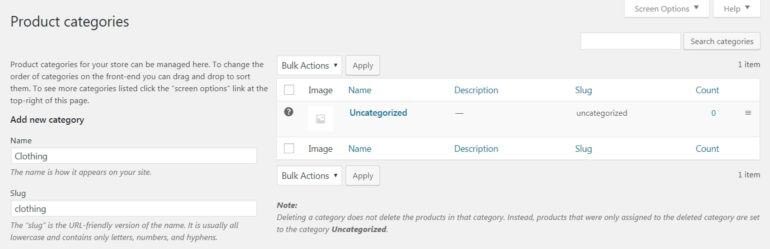
- As well as that, select a slug.
The slug is merely the end of the category-related URL. So, if you wished the yourwebsite.com/clothing URL for your class, you’d select clothing as the slug:
- You will then see a drop-down menu where you can pick a parent for your new category.
- If you like, you can also provide a description and upload a picture – this can be helpful for clients browsing your shop.
- Also, you’ll want to select the display type from the second drop-down menu. The default choice shows your categories according to the configurations of your theme:
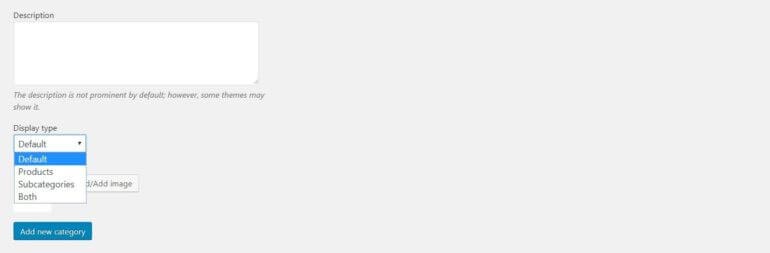
- Alternatively, you can set the display type to Products, Subcategories, or Both to show the relevant material on your topic boards. Even if you create category tables subsequently, the default category pages can still be included if you like.
- Click the Add New Category button when you’re completed.
- Repeat this method for as many categories and sub-categories as you need.
- Finally, edit each of your products and assign them to appropriate categories and subcategories.
2. Install and activate the WooCommerce Product Table plugin
With your categories created, you can now use WooCommerce Product Table to display products in your shop by category. The plugin will need to be installed and activated before you can proceed.
For a detailed tutorial on how to install a plugin manually our tutorial in the knowledge base section. Here are the short instructions:
- You will need to purchase the plugin from its official website and download the .zip file which contains the plugin files.
- Go back to your WordPress dashboard
- Navigate to Plugins > Add New > Upload Plugin.
- Select and upload the .zip file you previously downloaded.
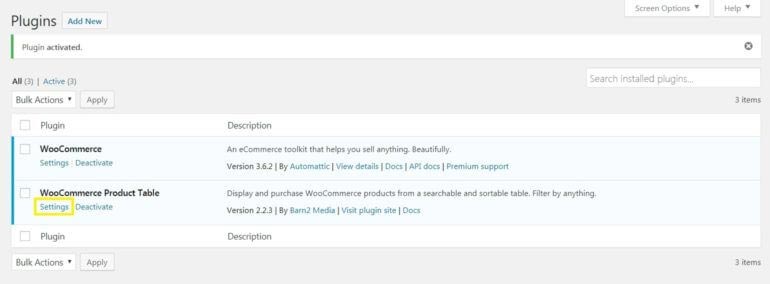
- Upon completion of the setup, press the Activate button:

- On your Plugins page, navigate to of WooCommerce Product Table and click on settings:
- On the settings page, the first field will be the license key. To find your license key check the email message which was sent to you during the purchase of the plugin.
Enter the key and save your changes afterward.
You are now ready to use the plugin.
3. Configure the Product Table settings
You will want to customize them to suit the demands of your store before you attach lists to the pages of your website. You can configure a range of options for modifying your tables on the Settings section of the plugin, including:
- Styling your tables to suit your design or special requirements;
- Specifying what information your tables should include, such as item details, pictures, add to the cart buttons, and more;
- Enabling performance-boosting options such as lazy loading charging and caching;
- Adding quantity and variation selection;
- Determine pagination options for large tables;
It is a good idea to look through all of the available options. Right now, though, to enhance navigation, we’re trying to concentrate on incorporating search, sort, and filter features to your websites.
To do that, the first scroll down to the Sorting section:

- Here, you can select what information the table should use to sort the products it displays using the first drop-down menu.
- The second drop-down menu determines whether the products will be shown in increasing or decreasing order.
- Next, scroll down to Table Controls and turn on the Product Filters option. This will allow clients to view particular products in their lists using a filter drop-down menu:
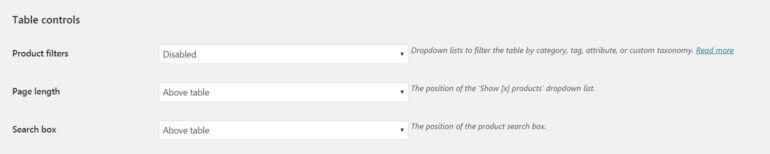
- You can also activate the search box further down and identify where it should be situated. If clients are searching for a particular product, they can enter it in the search bar to locate it rapidly in your menu.
When you are done configuring the settings, don’t forget to save your changes to this page.
You are then prepared to proceed to the final phase.
4. Add the Product Category Tables to your WooCommerce Store
You are now prepared to add product category tables to appropriate pages. You’ve got several ways to do this. For example, in addition to or instead of the default product display, you can add individual category tables to your existing category pages. Alternatively, you can create a single page listing all your category tables, or you can add separate new pages for each.
You will need to use a shortcode to show each product category table once you have chosen which pages to use. Normally, the shortcode used by WooCommerce Product Table to show a table is the following:
However, this shortcode will show a list of all your products and not products from a particular category. Fortunately, this shortcode can be readily modified. To display only products from a certain category, the following format will be used:
All you need to do is to replace “example” with the name of the category or subcategory you want to display. Save the page afterward. This method can be repeated to generate as many distinct product tables based on categories as you need.
Conclusion
It’s essential to create clear and intuitive navigation for your eCommerce shop with your conversion rate on the track. Categories are a tried and tested technique of enhancing website navigation, and selecting to show products in customized tables by category will ensure that your clients will be able to easily browse your shop.
To display Products by Category in WooCommerce, you need only:
- Group your products into categories that are related.
- Install the WooCommerce Product Table plugin and enable it.
- Customize the configuration of your product table.
- Add tables to your WooCommerce store for your product category.